该源码解析是基于最新的Glide 4.8.0进行的
Glide基本流程分析 Glide的基本使用代码
1 Glide.with(context).load($img$).apply(RequestOptions().transform(MultiTransformation(CenterCrop(),CircleCrop())).placeholder(R.drawable.ic_default_avatar)).into(imageView);
按照上述的基本使用代码,Glide的加载过程可以分为以下几步:
Glide对象初始化初始化代码是从Glide.get()开始的,在其中主要做了一些事情
Glide.java 1 2 3 4 5 6 7 8 9 10 11 12 13 14 15 16 17 18 19 20 21 22 23 24 25 26 27 @NonNull public static Glide get (@NonNull Context context) {if (glide == null ) {synchronized (Glide.class) {if (glide == null ) {return glide;private static void checkAndInitializeGlide (@NonNull Context context) {if (isInitializing) {throw new IllegalStateException ("You cannot call Glide.get() in registerComponents()," " use the provided Glide instance instead" );true ;false ;
初始化Glide时再调用到initializeGlide()去进行真正的初始化工作
Glide.java 1 2 3 4 5 6 7 8 9 10 11 12 13 14 15 16 17 18 19 20 21 22 23 24 25 26 27 28 29 30 31 32 33 34 35 36 37 38 39 40 41 42 43 44 45 46 47 48 49 50 51 52 53 54 55 56 57 58 59 60 61 62 63 64 65 private static void initializeGlide (@NonNull Context context) {new GlideBuilder ());private static void initializeGlide (@NonNull Context context, @NonNull GlideBuilder builder) {Context applicationContext = context.getApplicationContext();GeneratedAppGlideModule annotationGeneratedModule = getAnnotationGeneratedGlideModules();module .GlideModule> manifestModules = Collections.emptyList();if (annotationGeneratedModule == null || annotationGeneratedModule.isManifestParsingEnabled()) {new ManifestParser (applicationContext).parse();if (annotationGeneratedModule != null module .GlideModule> iterator = manifestModules.iterator();while (iterator.hasNext()) {module .GlideModule current = iterator.next();if (!excludedModuleClasses.contains(current.getClass())) {continue ;if (Log.isLoggable(TAG, Log.DEBUG)) {"AppGlideModule excludes manifest GlideModule: " + current);if (Log.isLoggable(TAG, Log.DEBUG)) {for (com.bumptech.glide.module .GlideModule glideModule : manifestModules) {"Discovered GlideModule from manifest: " + glideModule.getClass());RequestManagerFactory factory = null null ;for (com.bumptech.glide.module .GlideModule module : manifestModules) {module .applyOptions(applicationContext, builder);if (annotationGeneratedModule != null ) {Glide glide = builder.build(applicationContext);for (com.bumptech.glide.module .GlideModule module : manifestModules) {module .registerComponents(applicationContext, glide, glide.registry);if (annotationGeneratedModule != null ) {
源码中发现GlideModule分为两种manifestModules和annotationGeneratedModule,其中manifestModules是为了兼容V3版本,以前的都是配置在AndroidManifest.xml中,而V4版本采用注解的方式,取消了清单文件中的配置。
示例配置文件 1 2 3 4 5 6 7 8 9 10 11 12 13 14 15 16 17 18 19 20 21 22 23 24 25 26 27 @GlideModule public class CustomGlideModule extends AppGlideModule {@Override public void applyOptions (Context context, GlideBuilder builder) {MemorySizeCalculator calculator = new MemorySizeCalculator .Builder(context).build();int defaultMemoryCacheSize = calculator.getMemoryCacheSize();int defaultBitmapPoolSize = calculator.getBitmapPoolSize();int customMemoryCacheSize = (int ) (1.2 * defaultMemoryCacheSize);int customBitmapPoolSize = (int ) (1.2 * defaultBitmapPoolSize);new LruResourceCache (customMemoryCacheSize));new LruBitmapPool (customBitmapPoolSize));@Override public void registerComponents (Context context, Glide glide, Registry registry) {new OkHttpUrlLoader .Factory(ProgressManager.getOkHttpClient()));@Override public boolean isManifestParsingEnabled () {return false ;
配置好GlideModule文件后,就需要去调用其中的applyOptions()设置Glide加载基本配置项,然后调用到了GlideBuilder.build()去构造Glide对象,最后调用其中的regeisterComponents()设置加载器。
接下来分析构造Glide对象的方法——GlideBuilder.build()
1 2 3 4 5 6 7 8 9 10 11 12 13 14 15 16 17 18 19 20 21 22 23 24 25 26 27 28 29 30 31 32 33 34 35 36 37 38 39 40 41 42 43 44 45 46 47 48 49 50 51 52 53 54 55 56 57 58 59 60 61 62 63 64 65 66 67 68 69 70 71 72 73 74 75 76 77 78 79 @NonNull build (@NonNull Context context) {if (sourceExecutor == null ) {if (diskCacheExecutor == null ) {if (animationExecutor == null ) {if (memorySizeCalculator == null ) {new MemorySizeCalculator .Builder(context).build();if (connectivityMonitorFactory == null ) {new DefaultConnectivityMonitorFactory ();if (bitmapPool == null ) {int size = memorySizeCalculator.getBitmapPoolSize();if (size > 0 ) {new LruBitmapPool (size);else {new BitmapPoolAdapter ();if (arrayPool == null ) {new LruArrayPool (memorySizeCalculator.getArrayPoolSizeInBytes());if (memoryCache == null ) {new LruResourceCache (memorySizeCalculator.getMemoryCacheSize());if (diskCacheFactory == null ) {new InternalCacheDiskCacheFactory (context);if (engine == null ) {new Engine (if (defaultRequestListeners == null ) {else {RequestManagerRetriever requestManagerRetriever = new RequestManagerRetriever (requestManagerFactory);return new Glide (
当GlideBuilder.build()执行完毕后,最终调用到new Glide()完成初始化。其中关键参数为Registry后续的操作都需要用到该参数。
with()
对Glide的生命周期进行管理。
Glide对象初始化完毕后,首先会调用到的就是with()
Glide.java 1 2 3 4 5 6 7 8 9 10 11 12 13 14 15 16 17 18 19 20 21 22 23 24 @NonNull public static RequestManager with (@NonNull Context context) {return getRetriever(context).get(context);@NonNull public static RequestManager with (@NonNull Activity activity) {return getRetriever(activity).get(activity);@NonNull public static RequestManager with (@NonNull FragmentActivity activity) {return getRetriever(activity).get(activity);@NonNull public static RequestManager with (@NonNull Fragment fragment) {return getRetriever(fragment.getActivity()).get(fragment);@NonNull public static RequestManager with (@NonNull View view) {return getRetriever(view.getContext()).get(view);
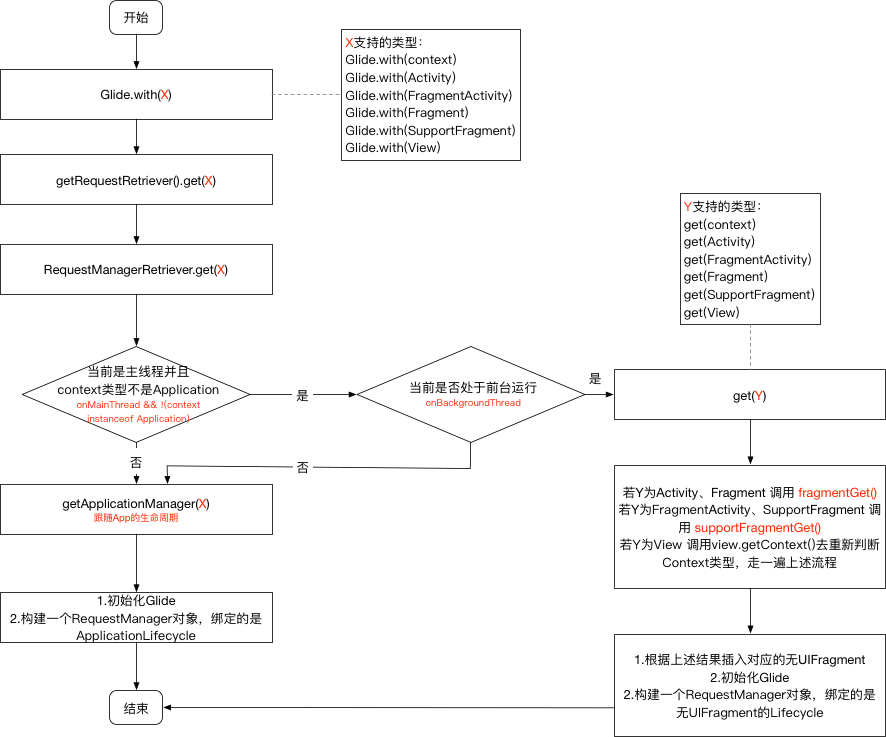
with()有5种重载方法,最后调用到的都是getRetriever(context).get()
RequestManagerRetriever.java 1 2 3 4 5 6 7 8 9 10 11 12 13 14 15 16 17 18 19 20 21 22 23 24 25 26 27 28 29 30 31 32 33 34 35 36 37 38 39 40 41 42 43 44 45 46 47 48 49 50 51 52 53 54 55 56 57 58 59 60 61 62 63 64 65 66 67 68 69 70 71 72 73 74 75 76 77 78 79 80 81 82 @NonNull public RequestManager get (@NonNull Context context) {if (context == null ) {throw new IllegalArgumentException ("You cannot start a load on a null Context" );else if (Util.isOnMainThread() && !(context instanceof Application)) {if (context instanceof FragmentActivity) {return get((FragmentActivity) context);else if (context instanceof Activity) {return get((Activity) context);else if (context instanceof ContextWrapper) {return get(((ContextWrapper) context).getBaseContext());return getApplicationManager(context);@NonNull public RequestManager get (@NonNull FragmentActivity activity) {if (Util.isOnBackgroundThread()) {return get(activity.getApplicationContext());else {FragmentManager fm = activity.getSupportFragmentManager();return supportFragmentGet(null , isActivityVisible(activity));@NonNull public RequestManager get (@NonNull Fragment fragment) {"You cannot start a load on a fragment before it is attached or after it is destroyed" );if (Util.isOnBackgroundThread()) {return get(fragment.getActivity().getApplicationContext());else {FragmentManager fm = fragment.getChildFragmentManager();return supportFragmentGet(fragment.getActivity(), fm, fragment, fragment.isVisible());@SuppressWarnings("deprecation") @NonNull public RequestManager get (@NonNull Activity activity) {if (Util.isOnBackgroundThread()) {return get(activity.getApplicationContext());else {FragmentManager fm = activity.getFragmentManager();return fragmentGet(null , isActivityVisible(activity));public RequestManager get (@NonNull View view) {if (Util.isOnBackgroundThread()) {return get(view.getContext().getApplicationContext());"Unable to obtain a request manager for a view without a Context" );Activity activity = findActivity(view.getContext());if (activity == null ) {return get(view.getContext().getApplicationContext());if (activity instanceof FragmentActivity) {Fragment fragment = findSupportFragment(view, (FragmentActivity) activity);return fragment != null ? get(fragment) : get(activity);Fragment fragment = findFragment(view, activity);if (fragment == null ) {return get(activity);return get(fragment);
简单分析上述源码可知,调用流程如下:
首先判断当前调用是否在子线程,在子线程的话,直接调用ApplicationContext获取ReqeustManager
不在子线程即运行在主线程时,需要判断context类型
support.Fragment或者support.FragmentActivity:调用supportFragmentGet()app.Activity或者app.fragment:调用fragmentGet()Application:调用getApplicationManager()view.getContext:需要判断view的context类型,然后再走一次上面的步骤
根据流程分析,监听生命周期的方式主要是通过监听一个无UI的Fragment(位于主线程且有对应的context存在)和监听Application(当位于后台线程或者contxt为Application)。
其中无UI的Fragment对应源码中的两个类RequestManagerFragment、SupportRequestFragment在其中构造了ActivityFragmentLifecycle对象,在其中的关键生命周期进行联动,就可以对应的去进行加载和取消加载操作了。
RequestManagerFragment.java 1 2 3 4 5 6 7 8 9 10 11 12 13 14 15 16 17 18 @Override public void onStart () {super .onStart();@Override public void onStop () {super .onStop();@Override public void onDestroy () {super .onDestroy();
然后最后返回的RequestManager对象自身也会实现LifecycleListener接口,就可以根据对应调用跳转加载过程
RequestManager.java 1 2 3 4 5 6 7 8 9 10 11 12 13 14 15 16 17 18 19 20 21 22 23 24 25 26 27 28 29 30 31 32 33 34 35 36 37 38 39 40 41 42 43 44 45 46 47 public class RequestManager implements LifecycleListener {private final Runnable addSelfToLifecycle = new Runnable () {@Override public void run () {this );@Override public void onStart () {@Override public void onStop () {public void resumeRequests () {public void pauseRequests () {@Override public void onDestroy () {for (Target<?> target : targetTracker.getAll()) {this );this );
完成上述流程后,RequestManager就可以实现对Fragment的监听,也就等同于实现了Glide的生命周期。
load()
传入需要加载的图片信息,通过with()得到的RequestManager进行加载。
RequestManager.java 1 2 3 4 5 6 7 8 9 10 11 12 13 14 15 16 17 18 19 20 21 22 23 24 25 26 27 28 29 30 31 32 33 34 35 36 37 38 39 40 41 42 43 44 45 46 47 48 49 50 51 52 53 54 55 56 57 58 59 60 61 62 63 64 @NonNull @CheckResult @Override public RequestBuilder<Drawable> load (@Nullable Bitmap bitmap) {return asDrawable().load(bitmap);@NonNull @CheckResult @Override public RequestBuilder<Drawable> load (@Nullable Drawable drawable) {return asDrawable().load(drawable);@NonNull @CheckResult @Override public RequestBuilder<Drawable> load (@Nullable String string) {return asDrawable().load(string);@NonNull @CheckResult @Override public RequestBuilder<Drawable> load (@Nullable Uri uri) {return asDrawable().load(uri);@NonNull @CheckResult @Override public RequestBuilder<Drawable> load (@Nullable File file) {return asDrawable().load(file);@SuppressWarnings("deprecation") @NonNull @CheckResult @Override public RequestBuilder<Drawable> load (@RawRes @DrawableRes @Nullable Integer resourceId) {return asDrawable().load(resourceId);@SuppressWarnings("deprecation") @CheckResult @Override @Deprecated public RequestBuilder<Drawable> load (@Nullable URL url) {return asDrawable().load(url);@NonNull @CheckResult @Override public RequestBuilder<Drawable> load (@Nullable byte [] model) {return asDrawable().load(model);@NonNull @CheckResult @Override public RequestBuilder<Drawable> load (@Nullable Object model) {return asDrawable().load(model);
经过load()分析,Glide加载的类型支持Bitmap、Drawable、String(图片地址)、Uri、File(图片文件)、Integer(图片ResourceId)、URL、byte,Object。
实际内部调用到的是asDrawable.load()
1 2 3 4 5 6 7 8 9 10 11 12 13 14 15 16 17 18 19 20 21 22 public RequestBuilder<Drawable> asDrawable () {return as(Drawable.class);@NonNull @CheckResult public RequestBuilder<Bitmap> asBitmap () {return as(Bitmap.class).apply(DECODE_TYPE_BITMAP);@NonNull @CheckResult public RequestBuilder<GifDrawable> asGif () {return as(GifDrawable.class).apply(DECODE_TYPE_GIF);@NonNull @CheckResult public <ResourceType> RequestBuilder<ResourceType> as ( @NonNull Class<ResourceType> resourceClass) {return new RequestBuilder <>(glide, this , resourceClass, context);
通过asDrawable()得到RequestBuilder对象,接下来走到ReqeustBuilder.load()
RequestBuilder.java 1 2 3 4 5 6 7 8 9 10 11 12 13 14 15 16 17 18 19 20 21 22 23 24 25 26 27 28 29 30 31 public RequestBuilder<TranscodeType> load (@Nullable Bitmap bitmap) {return loadGeneric(bitmap)public RequestBuilder<TranscodeType> load (@Nullable Drawable drawable) {return loadGeneric(drawable)public RequestBuilder<TranscodeType> load (@Nullable String string) {return loadGeneric(string);public RequestBuilder<TranscodeType> load (@Nullable Uri uri) {return loadGeneric(uri);public RequestBuilder<TranscodeType> load (@Nullable File file) {return loadGeneric(file);private RequestBuilder<TranscodeType> loadGeneric (@Nullable Object model) {this .model = model;true ;return this ;public RequestBuilder<TranscodeType> load (@Nullable Object model) {return loadGeneric(model);
上述的load()都调用到了loadGeneric()然后进行了赋值操作,确定了model数据,然后完成了load流程。
//TODO 流程图
apply()
设置一些额外配置,例如占位图、加载错误图片、图片显示类型,圆角什么的
load()流程结束后就得到了RequestBuilder对象,调用其中的apply()
1 2 3 4 5 6 7 8 9 10 11 12 public class RequestBuilder <TranscodeType> extends BaseRequestOptions <RequestBuilder<TranscodeType>> implements Cloneable , ModelTypes<RequestBuilder<TranscodeType>> {@NonNull @CheckResult @Override public RequestBuilder<TranscodeType> apply (@NonNull BaseRequestOptions<?> requestOptions) {return super .apply(requestOptions);
调用到了super.apply()其实就是BaseRequestOptions.apply()
BaseRequestOptions.java 1 2 3 4 5 6 7 8 9 10 11 12 13 14 15 16 17 @NonNull @CheckResult public T apply (@NonNull BaseRequestOptions<?> o) {if (isAutoCloneEnabled) {return clone().apply(o);if (isSet(other.fields, SIZE_MULTIPLIER)) {return selfOrThrowIfLocked();
isSet()是判断该属性是否设置,若已设置过则替换,设置完毕后,得到一个RequestBuilder对象,不过已经设置了RequestOptions里面包含了一些显示上以及缓存上的配置。
into()——最关键步骤
进行图片的加载与显示
创建请求Request 起点是从RequestBuilder.into()开始
RequestBuilder.java 1 2 3 4 5 6 7 8 9 10 11 12 13 14 15 16 17 18 19 20 21 22 23 24 25 26 27 28 29 30 31 32 33 34 35 36 37 38 39 40 41 42 43 44 45 46 47 48 49 50 51 52 53 54 55 56 57 58 59 60 61 62 63 64 65 66 67 68 @NonNull public ViewTarget<ImageView, TranscodeType> into (@NonNull ImageView view) {this ;if (!requestOptions.isTransformationSet()null ) {switch (view.getScaleType()) {case CENTER_CROP:break ;case CENTER_INSIDE:break ;case FIT_CENTER:case FIT_START:case FIT_END:break ;case FIT_XY:break ;case CENTER:case MATRIX:default :return into(null ,private <Y extends Target <TranscodeType>> Y into ( @NonNull Y target, @Nullable RequestListener<TranscodeType> targetListener, BaseRequestOptions<?> options, Executor callbackExecutor) {if (!isModelSet) {throw new IllegalArgumentException ("You must call #load() before calling #into()" );Request request = buildRequest(target, targetListener, options, callbackExecutor);Request previous = target.getRequest();if (request.isEquivalentTo(previous)if (!Preconditions.checkNotNull(previous).isRunning()) {return target;return target;
通过buildRequest()构建图片加载请求对象。
RequestBuilder.java 1 2 3 4 5 6 7 8 9 10 11 12 13 14 15 16 17 18 19 20 21 22 23 24 25 26 27 28 29 30 31 32 33 34 35 36 37 38 39 40 41 42 43 44 45 46 47 48 49 50 51 52 53 54 55 56 57 58 59 60 61 62 63 64 65 66 67 68 69 70 71 72 73 74 75 76 77 78 79 80 81 82 83 84 85 86 87 88 89 90 91 92 93 94 95 96 97 98 99 100 101 102 103 104 105 106 107 108 109 110 111 112 private Request buildRequest ( Target<TranscodeType> target, @Nullable RequestListener<TranscodeType> targetListener, BaseRequestOptions<?> requestOptions, Executor callbackExecutor) {return buildRequestRecursive(null ,private Request buildRequestRecursive (...) {ErrorRequestCoordinator errorRequestCoordinator = null ;if (errorBuilder != null ) {new ErrorRequestCoordinator (parentCoordinator);Request mainRequest = if (errorRequestCoordinator == null ) {return mainRequest;Request errorRequest = return errorRequestCoordinator;private Request buildThumbnailRequestRecursive (...) {if (thumbnailBuilder != null ) {if (isThumbnailBuilt) {throw new IllegalStateException ("You cannot use a request as both the main request and a " "thumbnail, consider using clone() on the request(s) passed to thumbnail()" );super TranscodeType> thumbTransitionOptions =if (thumbnailBuilder.isDefaultTransitionOptionsSet) {Priority thumbPriority = thumbnailBuilder.isPrioritySet()int thumbOverrideWidth = thumbnailBuilder.getOverrideWidth();int thumbOverrideHeight = thumbnailBuilder.getOverrideHeight();if (Util.isValidDimensions(overrideWidth, overrideHeight)ThumbnailRequestCoordinator coordinator = new ThumbnailRequestCoordinator (parentCoordinator);ThumbnailRequestCoordinator coordinator = new ThumbnailRequestCoordinator (parentCoordinator);Request fullRequest = true ;Request thumbRequest = false ;return coordinator;else if (thumbSizeMultiplier != null ) {ThumbnailRequestCoordinator coordinator = new ThumbnailRequestCoordinator (parentCoordinator);Request fullRequest = obtainRequest(...);Request thumbnailRequest = return coordinator;else {return obtainRequest(...);private Request obtainRequest ( Target<TranscodeType> target, RequestListener<TranscodeType> targetListener, BaseRequestOptions<?> requestOptions, RequestCoordinator requestCoordinator, TransitionOptions<?, ? super TranscodeType> transitionOptions, Priority priority, int overrideWidth, int overrideHeight, Executor callbackExecutor) {return SingleRequest.obtain(...);
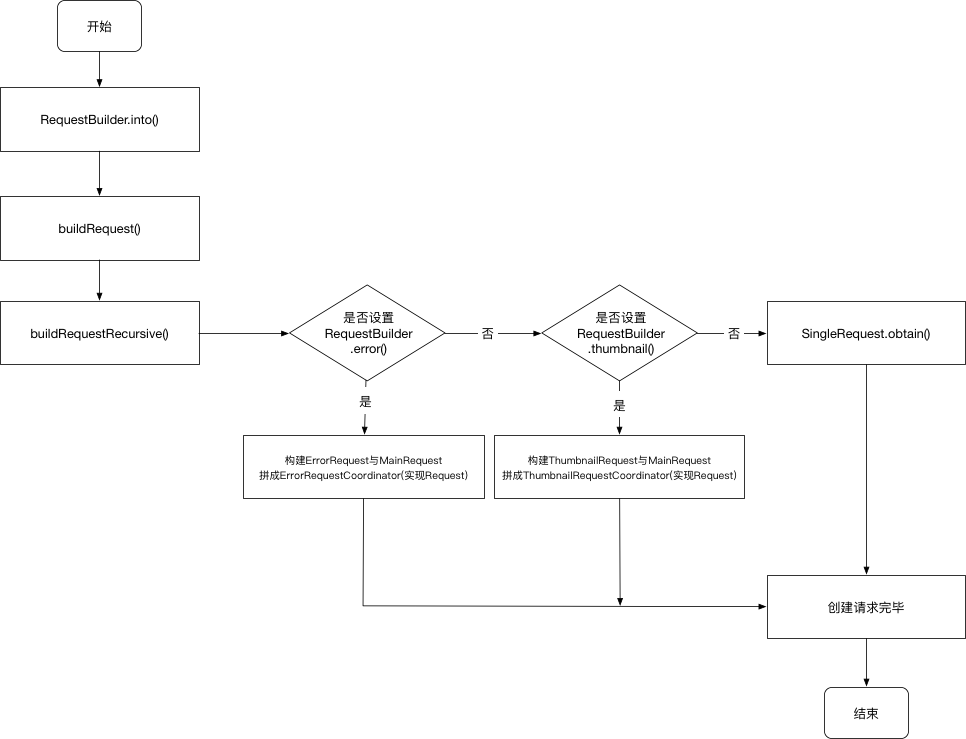
总结一下创建请求的流程,最后调用的是SingleRequest对象。
通过RequestBuilder.buildRequest()创建Request对象,调用到buildRequestRecursive()执行创建逻辑
先判断设置过RequestBuilder.error()参数,如果设置过errorRequest,需要通过errorRequest和mainRequest得到ErrorRequestCoordinator(实现Request接口)对象。
没设置过RequestBuilder.error()参数,则向下判断是否设置过ReqeustBuilder.thumbnail()参数,设置ReqeustBuilder.thumbnail()有两种方法:
ReqeustBuilder.thumbnail(RequestBuilder thumbnailBuilder):自定义要显示的缩略图ReqeustBuilder.thumbnail(float thumbSizeMultiper):设置原图缩放比例
只要设置了其中的一种,就会产生thumbRequest对象,然后与fullRequest得到ThumbnailRequestCoordinator(实现Request接口)对象。
ReqeustBuilder.thumbnail()也未设置,则最终调用SingleRequest.obtain()得到SingleRequest(实现Request接口)对象。
errorRequest表示了加载错误的请求
thumbRequest表示了缩略图加载请求
mainRequest和fullRequest都代表了原始图片加载请求。
上述创建请求流程执行完毕后,就是发送请求。
发送请求
发送请求通过调用Request实现。
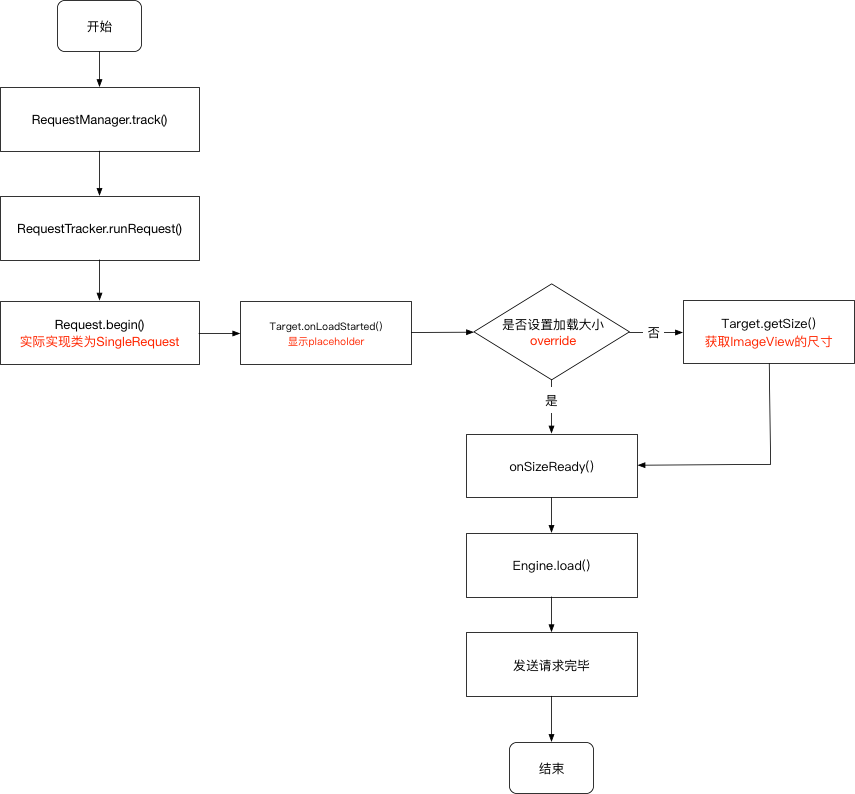
在创建请求 中,创建完成后会调用到requestManager.track(target, request);去发送请求
RequestManager.java 1 2 3 4 5 6 synchronized void track (@NonNull Target<?> target, @NonNull Request request) {
RequestTracker.java 1 2 3 4 5 6 7 8 9 10 11 12 13 public void runRequest (@NonNull Request request) {if (!isPaused) {else {if (Log.isLoggable(TAG, Log.VERBOSE)) {"Paused, delaying request" );
接下来就是调用到Request.begin(),Request是一个接口,singleRequest是具体的实现类,即调用到SingleRequest.begin()
SingleRequest.java 1 2 3 4 5 6 7 8 9 10 11 12 13 14 15 16 17 18 19 20 21 22 23 24 25 26 27 28 29 30 31 32 33 34 35 36 37 38 39 40 41 42 43 44 45 46 47 48 49 50 51 52 53 54 55 56 57 58 59 60 61 62 63 64 65 66 67 68 69 70 71 72 73 @Override public synchronized void begin () {if (model == null ) {if (Util.isValidDimensions(overrideWidth, overrideHeight)) {int logLevel = getFallbackDrawable() == null ? Log.WARN : Log.DEBUG;new GlideException ("Received null model" ), logLevel);return ;if (status == Status.RUNNING) {throw new IllegalArgumentException ("Cannot restart a running request" );if (status == Status.COMPLETE) {return ;if (Util.isValidDimensions(overrideWidth, overrideHeight)) {else {this );if ((status == Status.RUNNING || status == Status.WAITING_FOR_SIZE)if (IS_VERBOSE_LOGGABLE) {"finished run method in " + LogTime.getElapsedMillis(startTime));@Override public synchronized void onSizeReady (int width, int height) {if (IS_VERBOSE_LOGGABLE) {"Got onSizeReady in " + LogTime.getElapsedMillis(startTime));if (status != Status.WAITING_FOR_SIZE) {return ;float sizeMultiplier = requestOptions.getSizeMultiplier();this .width = maybeApplySizeMultiplier(width, sizeMultiplier);this .height = maybeApplySizeMultiplier(height, sizeMultiplier);if (IS_VERBOSE_LOGGABLE) {"finished setup for calling load in " + LogTime.getElapsedMillis(startTime));if (status != Status.RUNNING) {null ;if (IS_VERBOSE_LOGGABLE) {"finished onSizeReady in " + LogTime.getElapsedMillis(startTime));
上述流程主要是去计算得到 被加载图片的尺寸信息,如果手动设置了尺寸通过override那么通过合法性校验后,加载的图片大小就会为用户设置尺寸,否则使用Target的尺寸信息。
Target是一个接口,主要意义是提供View的确切尺寸信息以及对回调结果进行处理。
加载图片 接下来调用Engine.load()开始加载图片,包括三级缓存的部分。
Engine.java 1 2 3 4 5 6 7 8 9 10 11 12 13 14 15 16 17 18 19 20 21 22 23 24 25 26 27 28 29 30 31 32 33 34 35 36 37 38 39 40 41 42 43 44 45 46 47 48 49 50 51 52 53 54 55 public synchronized <R> LoadStatus load (...) {long startTime = VERBOSE_IS_LOGGABLE ? LogTime.getLogTime() : 0 ;EngineKey key = keyFactory.buildKey(model, signature, width, height, transformations,if (active != null ) {if (VERBOSE_IS_LOGGABLE) {"Loaded resource from active resources" , startTime, key);return null ;if (cached != null ) {if (VERBOSE_IS_LOGGABLE) {"Loaded resource from cache" , startTime, key);return null ;if (current != null ) {if (VERBOSE_IS_LOGGABLE) {"Added to existing load" , startTime, key);return new LoadStatus (cb, current);if (VERBOSE_IS_LOGGABLE) {"Started new load" , startTime, key);return new LoadStatus (cb, engineJob);
在Engine.load(),主要执行逻辑是:先从一级内存缓存-弱引用中查找指定资源,找不到则去二级内存缓存-LRUCache中去查找,再没有就转到DecodeJob去加载图片。
加载图片的具体实现细节会单独在Glide缓存实现原理 说明。
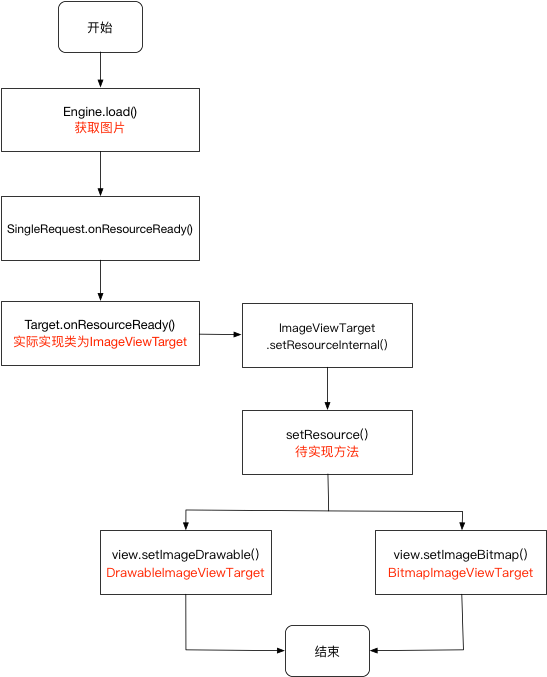
显示图片 当图片从三级缓存中取出后,最终得到的是一个Resource对象,然后再回调到SingleRequest.onResourceReady()中
SingleRequest.java 1 2 3 4 5 6 7 8 9 10 11 12 13 14 15 16 17 18 19 20 21 22 23 24 25 26 27 28 29 30 31 32 33 34 35 36 37 38 39 40 41 42 43 44 45 46 47 48 49 50 51 52 53 54 55 56 57 58 59 60 61 62 63 64 65 @Override public synchronized void onResourceReady (Resource<?> resource, DataSource dataSource) {null ;if (resource == null ) {return ;Object received = resource.get();if (received == null || !transcodeClass.isAssignableFrom(received.getClass())) {return ;if (!canSetResource()) {return ;private synchronized void onResourceReady (Resource<R> resource, R result, DataSource dataSource) {boolean isFirstResource = isFirstReadyResource();this .resource = resource;if (glideContext.getLogLevel() <= Log.DEBUG) {"Finished loading " + result.getClass().getSimpleName() + " from " " for " + model + " with size [" + width + "x" + height + "] in " " ms" );true ;try {boolean anyListenerHandledUpdatingTarget = false ;if (requestListeners != null ) {for (RequestListener<R> listener : requestListeners) {null if (!anyListenerHandledUpdatingTarget) {super R> animation =finally {false ;
在SingleRequest.onSourceReady()主要回调了Target.onResourceReady(),把Resource显示到Target上,实质就是into()传入的Target对象。
ImageViewTarget.java 1 2 3 4 5 6 7 8 9 10 11 12 13 14 15 16 17 @Override public void onResourceReady (@NonNull Z resource, @Nullable Transition<? super Z> transition) {if (transition == null || !transition.transition(resource, this )) {else {private void setResourceInternal (@Nullable Z resource) {protected abstract void setResource (@Nullable Z resource) ;
其中有两个类继承了ImageViewTarget用于实现不同的功能。分别是DrawableImageViewTarget、BitmapImageViewTarget。
DrawableImageViewTarget.java 1 2 3 4 5 6 7 8 9 10 11 12 13 14 15 16 17 18 19 20 21 public class DrawableImageViewTarget extends ImageViewTarget <Drawable> {public DrawableImageViewTarget (ImageView view) {super (view);@SuppressWarnings({"unused", "deprecation"}) @Deprecated public DrawableImageViewTarget (ImageView view, boolean waitForLayout) {super (view, waitForLayout);@Override protected void setResource (@Nullable Drawable resource) {
最终通过ImageView.setImageDrawable()将图片显示在ImageView上。
Glide缓存实现原理
Glide的缓存主要分成了两个模块,一个是内存缓存 ,另一部分是硬盘缓存 。
内存缓存 :防止应用重复将图片数据读取到内存当中
硬盘缓存 :防止应用重复从网络或其他地方重复下载和读取数据
缓存配置 1.在自定义的GlideModule中的applyOptions()中设置具体的缓存参数
1 2 3 4 5 6 7 8 9 10 11 12 13 @GlideModule public class CustomGlideModule extends AppGlideModule {@Override public void applyOptions (Context context, GlideBuilder builder) {MemorySizeCalculator calculator = new MemorySizeCalculator .Builder(context).build();int defaultMemoryCacheSize = calculator.getMemoryCacheSize();int defaultBitmapPoolSize = calculator.getBitmapPoolSize();int customMemoryCacheSize = (int ) (1.2 * defaultMemoryCacheSize);int customBitmapPoolSize = (int ) (1.2 * defaultBitmapPoolSize);new LruResourceCache (customMemoryCacheSize));new LruBitmapPool (customBitmapPoolSize));
2.在具体请求中设置缓存参数
1 2 val requestBuilder = Glide.with(this ).asBitmap().apply(RequestOptions().diskCacheStrategy(DiskCacheStrategy.NONE).skipMemoryCache(true )).load(path)
缓存Key 缓存功能,就需要有对应的缓存Key,应用可以根据这个Key找到对应的缓存文件。Glide的缓存Key生成代码如下
Engine.java 1 2 3 4 public synchronized <R> LoadStatus load (...){ EngineKey key = keyFactory.buildKey(model, signature, width, height, transformations,resourceClass, transcodeClass, options) ;
model对应的就是load()过程中传入的参数,例如传入String(图片加载地址),那么对应的就是加载地址。决定生成Key的参数有很多。
如果设置了override修改了加载尺寸,那也会有不同的key生成。
内存缓存 默认情况下,内存缓存是自动开启的,加载图片完成后,就会默认在内存中缓存,然后下次再调用时就会从内存中直接读取显示,无需重新加载。
可以通过设置skipMemoryCache(true)来关闭内存缓存功能。
Glide中的内存缓存主要分为两部分处理:弱引用复用机制 和LRUCache 。
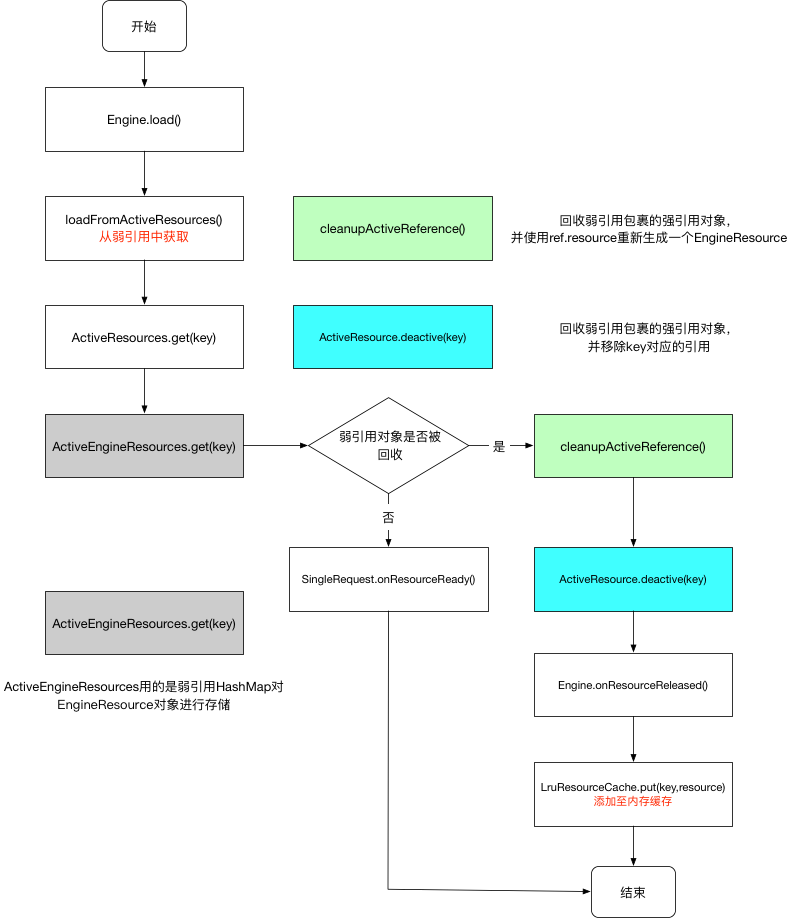
弱引用复用 —— ActiveResources
从正在活动的资源中取出缓存进行复用
Engine.java 1 2 3 4 5 6 7 8 9 10 11 12 13 14 15 16 17 18 19 20 21 22 23 24 public synchronized <R> LoadStatus load (...) {if (active != null ) {if (VERBOSE_IS_LOGGABLE) {"Loaded resource from active resources" , startTime, key);return null ;@Nullable private EngineResource<?> loadFromActiveResources(Key key, boolean isMemoryCacheable) {if (!isMemoryCacheable) {return null ;if (active != null ) {return active;
对应的Resource文件要从ActiveResource中获取
ActiveResource.java 1 2 3 4 5 6 7 8 9 10 11 12 13 14 15 16 17 18 19 20 21 22 23 24 25 26 27 28 29 30 31 32 33 34 35 36 37 38 39 40 41 42 43 44 45 46 47 48 49 50 51 52 53 54 55 56 57 58 59 60 61 62 63 64 65 66 final Map<Key, ResourceWeakReference> activeEngineResources = new HashMap <>();synchronized void deactivate (Key key) {ResourceWeakReference removed = activeEngineResources.remove(key);if (removed != null ) {@Nullable synchronized EngineResource<?> get(Key key) {ResourceWeakReference activeRef = activeEngineResources.get(key);if (activeRef == null ) {return null ;if (active == null ) {return active;void cleanupActiveReference (@NonNull ResourceWeakReference ref) {synchronized (listener) {synchronized (this ) {if (!ref.isCacheable || ref.resource == null ) {return ;new EngineResource <>(ref.resource, true , false );@VisibleForTesting static final class ResourceWeakReference extends WeakReference <EngineResource<?>> {@SuppressWarnings("WeakerAccess") @Synthetic final Key key;@SuppressWarnings("WeakerAccess") @Synthetic final boolean isCacheable;@Nullable @SuppressWarnings("WeakerAccess") @Synthetic Resource<?> resource;@Synthetic @SuppressWarnings("WeakerAccess") @NonNull Key key,@NonNull EngineResource<?> referent,@NonNull ReferenceQueue<? super EngineResource<?>> queue,boolean isActiveResourceRetentionAllowed) {super (referent, queue);this .key = Preconditions.checkNotNull(key);this .resource =null ;void reset () {null ;
listener对应的就是Engine对象,调用到Engine.onResourceReleased()
Engine.java 1 2 3 4 5 6 7 8 9 10 11 @Override public synchronized void onResourceReleased (Key cacheKey, EngineResource<?> resource) { if (resource.isCacheable()) {else {
ActivieResources采用HashMap + WeakReference来保存EngineResource,不会有上限。然后get()从activeEngineResources弱引用HashMap中获取数据,这里分为两种情况:
获取到弱引用关联对象EngineResource,则直接返回结果
获取不到关联对象,则需进行清除工作调用cleanupActiveResource(),在activeEngineResources移除对应的key和引用,在判断是否开启缓存,若开启则缓存至LRUCache中。
总结:
ActiveResources采用弱引用的方式,里面存储的是EngineResource,同时采用强引用保存EngineResource.resource,在ActiveResources中还会有一个清理线程在运行,负责当EngineResource被回收时,就去取出对应的EngineResource.resource,然后创建一个新的EngineResource对象,回调到Engine.onResourceReleased()中,在其中做内存缓存,之后调用ActivityResources.deactivate()移除对应的强引用。
LRUCache
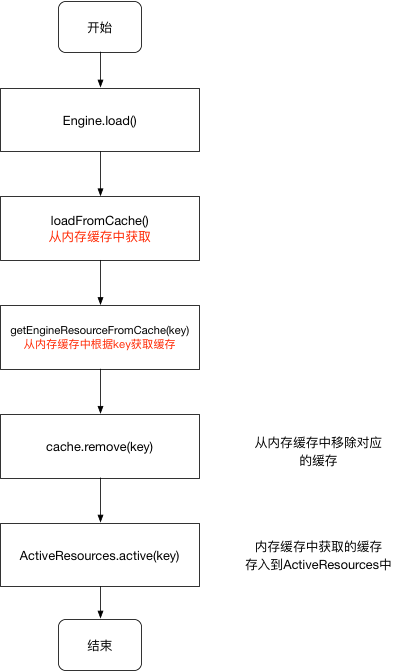
在当前活动资源中没有对应的缓存时,就要从内存中去进行读取
Engine.java 1 2 3 4 5 6 7 8 9 10 11 12 13 14 15 16 17 18 19 20 21 22 23 24 25 26 27 28 29 30 31 32 33 34 35 36 37 38 39 40 public synchronized <R> LoadStatus load (...) {if (cached != null ) {if (VERBOSE_IS_LOGGABLE) {"Loaded resource from cache" , startTime, key);return null ;private EngineResource<?> loadFromCache(Key key, boolean isMemoryCacheable) {if (!isMemoryCacheable) {return null ;if (cached != null ) {return cached;private EngineResource<?> getEngineResourceFromCache(Key key) {final EngineResource<?> result;if (cached == null ) {null ;else if (cached instanceof EngineResource) {else {new EngineResource <>(cached, true , true );return result;
loadFromCache()实际调用到getEngineResourceFromCache()获取内存缓存中的资源,如果找到,缓存数量+1,然后会把cached放入ActiveResources中,变为活动资源,对应的要在内存缓存中移除引用。
①getEngineResourceFromCache(key):从内存缓存中根据缓存key获取缓存
②activeResources.activate(key, cached):取出的缓存数据存入到活动资源中
ActiveResources.java 1 2 3 4 5 6 7 8 9 10 11 12 synchronized void activate (Key key, EngineResource<?> resource) {ResourceWeakReference toPut = new ResourceWeakReference (ResourceWeakReference removed = activeEngineResources.put(key, toPut);if (removed != null ) {
③cache.remove(key):从内存缓存中移除对应缓存
cache对应的是MemoryCache是一个接口,实现类为LruResourceCache
LruResourceCache.java 1 2 3 4 5 6 7 8 9 10 11 12 13 14 15 16 17 18 19 20 21 22 23 24 25 26 27 28 29 30 31 32 33 34 35 36 37 38 39 40 41 42 public class LruResourceCache extends LruCache <Key, Resource<?>> implements MemoryCache {private ResourceRemovedListener listener;public LruResourceCache (long size) {super (size);@Override public void setResourceRemovedListener (@NonNull ResourceRemovedListener listener) {this .listener = listener;@Override protected void onItemEvicted (@NonNull Key key, @Nullable Resource<?> item) {if (listener != null && item != null ) {@Override protected int getSize (@Nullable Resource<?> item) {if (item == null ) {return super .getSize(null );else {return item.getSize();@SuppressLint("InlinedApi") @Override public void trimMemory (int level) {if (level >= android.content.ComponentCallbacks2.TRIM_MEMORY_BACKGROUND) {else if (level >= android.content.ComponentCallbacks2.TRIM_MEMORY_UI_HIDDEN2 );
LruResourceCache继承自LruCache,不过内部计算缓存大小是通过Resource对象的大小累计,还增加了资源移除监听,为了和ActiveResources进行联动。
LruResourceCache的size是在自定义GlideModule中的 applyOptions()时设置进来的,如果未设置会采用MemorySizeCalculator.getMemoryCacheSize()设置。
当前在内存中缓存的对象都是Resource,而不是通常认为的Bitmap,下面会介绍到转码的过程。
小结 在内存缓存中,分为两种方案:从弱引用中获取 、从内存缓存中获取 。两者的关系简单概括就是:
读取内存缓存时,会优先从ActiveResources中读取,读取到的话,需要判断当前包装Resource的弱引用对象是否被回收,未回收则直接返回。被回收的话,需要重新包装EngineResource.resource然后存入到内存缓存中并需要移除ActiveResources对其的引用。
从ActiveResources中没有获取到对应缓存时,就从LruResourceCache中去获取,获取到的话,就需要从当前内存缓存中移除对应缓存引用,并存入到ActiveResources中。
实现了正在使用的图片通过弱引用进行缓存,未使用的图片通过LruCache进行缓存。
ActiveResources优先级高于LruResourceCache。
比较两者之间的区别:
弱引用获取
内存缓存获取
基础实现
HashMap
LinkedHashMap(LruCache )
可否禁用
用户无法禁用
通过skipMemoryCache(true)禁用
运行位置
内存
内存
释放时机
依赖垃圾回收机制弱引用实现,GC时被回收
采用最近最少使用 来淘汰数据
磁盘缓存
当内存中不存在缓存时,就会向下从硬盘中去读取缓存数据
通过设置diskCacheStrategy(DiskCacheStrategy.NONE)来关闭硬盘缓存功能。
Engine.java 1 2 3 4 5 6 7 8 9 10 11 12 13 14 15 16 17 18 19 20 21 22 23 24 25 26 27 public synchronized <R> LoadStatus load (...) {if (current != null ) {if (VERBOSE_IS_LOGGABLE) {"Added to existing load" , startTime, key);return new LoadStatus (cb, current);
从内存中读取不到缓存时,Engine尝试从jobs读取对应的EngineJob缓存,如存在就去回调加载成功或加载失败。不存在的话,就需要新建一个EngineJob以及DecodeJob去加载图片。
EngineJob.java 1 2 3 4 5 6 7 public synchronized void start (DecodeJob<R> decodeJob) {this .decodeJob = decodeJob;GlideExecutor executor = decodeJob.willDecodeFromCache()
通过线程池去执行decodeJob,DecodeJob实现了Runnable接口,execute()直接调用到run()
DecodeJob.java 1 2 3 4 5 6 7 8 9 10 11 12 13 14 15 16 17 18 19 20 21 22 23 24 25 26 27 28 29 30 31 32 33 34 35 36 37 38 39 40 41 42 43 44 45 46 47 48 49 50 51 52 53 54 55 56 57 58 59 60 61 62 @SuppressWarnings("PMD.AvoidRethrowingException") @Override public void run () {"DecodeJob#run(model=%s)" , model);try {if (isCancelled) {return ;catch (CallbackException e) {throw e;catch (Throwable t) {if (stage != Stage.ENCODE) {if (!isCancelled) {throw t;throw t;finally {if (localFetcher != null ) {private void runWrapped () {switch (runReason) {case INITIALIZE:break ;case SWITCH_TO_SOURCE_SERVICE:break ;case DECODE_DATA:break ;default :throw new IllegalStateException ("Unrecognized run reason: " + runReason);private enum RunReason {
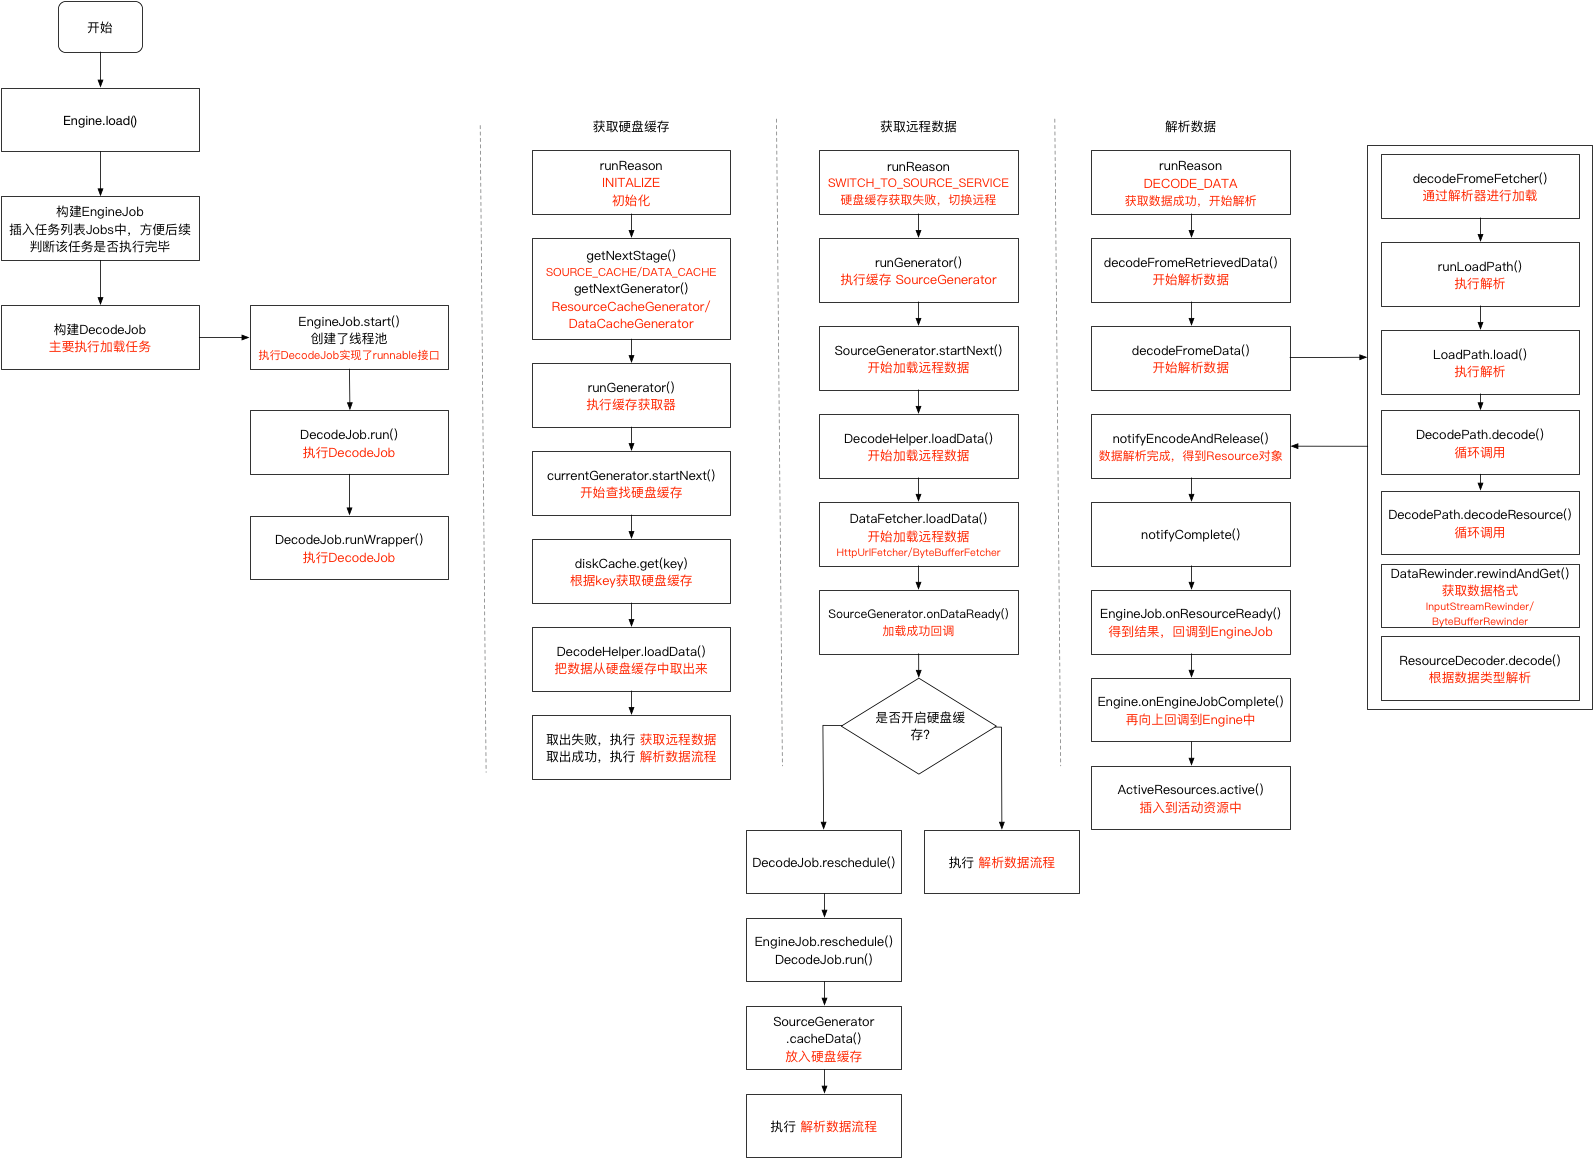
调用DecodeJob.run()开始加载资源,内部调用runWrapped(),此时runWrapped()中会根据runReason执行不同的操作,runReason就是用于控制当前执行到的任务。
INITIALIZE:第一次调用run(),执行目的是从diskcache中获取缓存
SWITCH_TO_SOURCE_SERVICE:从diskcache中获取缓存失败,需要从数据源获取
DECODE_DATA:缓存数据成功,对数据进行解析
获取硬盘缓存数据 DecodeJob.java 1 2 3 4 5 6 7 8 9 10 11 12 13 14 15 16 17 18 19 20 21 22 23 24 25 26 27 28 29 30 31 32 33 34 35 36 37 38 39 40 41 42 43 44 45 46 47 48 49 50 51 52 53 54 55 56 57 58 59 60 61 62 63 64 65 66 67 68 69 70 71 72 73 74 private DiskCacheStrategy diskCacheStrategy;private void runGenerators () {boolean isStarted = false ;while (!isCancelled && currentGenerator != null if (stage == Stage.SOURCE) {return ;if ((stage == Stage.FINISHED || isCancelled) && !isStarted) {private Stage getNextStage (Stage current) {switch (current) {case INITIALIZE:return diskCacheStrategy.decodeCachedResource()case RESOURCE_CACHE:return diskCacheStrategy.decodeCachedData()case DATA_CACHE:return onlyRetrieveFromCache ? Stage.FINISHED : Stage.SOURCE;case SOURCE:case FINISHED:return Stage.FINISHED;default :throw new IllegalArgumentException ("Unrecognized stage: " + current);private DataFetcherGenerator getNextGenerator () {switch (stage) {case RESOURCE_CACHE:return new ResourceCacheGenerator (decodeHelper, this );case DATA_CACHE:return new DataCacheGenerator (decodeHelper, this );case SOURCE:return new SourceGenerator (decodeHelper, this );case FINISHED:return null ;default :throw new IllegalStateException ("Unrecognized stage: " + stage);private enum Stage {
stage对应Stage枚举类,可以通过DiskCacheStrategy得到Stage。
DiskCacheStrategy参数解释:
NONE:表示不缓存任何内容DATA:只缓存原始图片RESOURCE:只缓存转换后的图片ALL:原始图片和转换后的图片都进行缓存AUTOMATIC:尝试选择最佳策略。针对加载数据类型进行区分:
加载本地图片:缓存原始图片
加载网络图片:缓存转换后的图片
stage默认尽量就是INITIALIZE,通过递归调用getNextStage()向下推进,并改变stage表示进行状态。stage的推进过程也表示了硬盘缓存的查找顺序。
Stage
描述
INITIALIZE
初始状态
RESOURCE_CACHE
转换后缓存 调用ResourceCacheGenerator
DATA_CACHE
原图缓存 调用DataCacheGenerator
SOURCE
远程获取图片 调用SourceGenerator
ENCODE
解析资源,生成Resource对象
FINISHED
解析完成
查找缓存从初始查找开始->查找转换后图片缓存->查找原图图片缓存->前面都没找到就去进行远程加载->加载完成后就开始解析数据->解析完成。
查找缓存从currentGenerator.startNext()开始,就先从ResourceCacheGenerator开始
ResourceCacheGenerator.java 1 2 3 4 5 6 7 8 9 10 11 12 13 14 15 16 17 18 19 20 21 22 23 24 25 26 27 28 29 30 31 32 33 34 35 36 37 38 39 40 41 42 43 44 45 46 47 48 49 50 51 52 53 54 55 56 57 58 59 60 61 62 63 private File cacheFile;public boolean startNext () {if (sourceIds.isEmpty()) {return false ;if (resourceClasses.isEmpty()) {if (File.class.equals(helper.getTranscodeClass())) {return false ;throw new IllegalStateException ("Failed to find any load path from " + helper.getModelClass() + " to " while (modelLoaders == null || !hasNextModelLoader()) {if (resourceClassIndex >= resourceClasses.size()) {if (sourceIdIndex >= sourceIds.size()) {return false ;0 ;Key sourceId = sourceIds.get(sourceIdIndex);new ResourceCacheKey (if (cacheFile != null ) {0 ;null ;boolean started = false ;while (!started && hasNextModelLoader()) {if (loadData != null && helper.hasLoadPath(loadData.fetcher.getDataClass())) {true ;this );return started;
根据相关参数生成对应的cacheKey,然后从DiskCache中取出对应的cacheFile,然后使用FileLoader解析该文件。
helper.getDiskCache()对应的就是DiskLruCacheWrapper类,内部包装了DiskLruCache,内部实现了整套的文件读写功能。
远程获取数据 若为初次加载的数据,肯定不会在diskCache中获取到,就需要远程加载。
SourceGenerator.java 1 2 3 4 5 6 7 8 9 10 11 12 13 14 15 16 17 18 19 20 21 22 23 24 25 26 27 28 29 30 31 32 33 34 35 36 37 38 39 40 41 42 43 44 45 46 47 48 49 50 51 52 53 54 55 56 57 58 59 60 61 62 63 public boolean startNext () {if (dataToCache != null ) {Object data = dataToCache;null ;if (sourceCacheGenerator != null && sourceCacheGenerator.startNext()) {return true ;null ;null ;boolean started = false ;while (!started && hasNextModelLoader()) {if (loadData != null && (helper.getDiskCacheStrategy().isDataCacheable(loadData.fetcher.getDataSource())true ;this );return started;private void cacheData (Object dataToCache) {long startTime = LogTime.getLogTime();try {new DataCacheWriter <>(encoder, dataToCache, helper.getOptions());new DataCacheKey (loadData.sourceKey, helper.getSignature());if (Log.isLoggable(TAG, Log.VERBOSE)) {"Finished encoding source to cache" ", key: " + originalKey", data: " + dataToCache", encoder: " + encoder", duration: " + LogTime.getElapsedMillis(startTime));finally {new DataCacheGenerator (Collections.singletonList(loadData.sourceKey), helper, this );@Override public void onDataReady (Object data) {DiskCacheStrategy diskCacheStrategy = helper.getDiskCacheStrategy();if (data != null && diskCacheStrategy.isDataCacheable(loadData.fetcher.getDataSource())) {else {
在SourceGenerator.startNext()会优先判断数据是否在DiskCache中,若存在调用cacheData()创建DataCacheGenerator调用其startNext()。不存在则循环去获取loadData,通过DecodeHelper.getLoadData(),然后继续执行loadData.fetch.loadData()去加载数据,加载成功后回调到onDataReady()。
现在开始按步骤分析:
加载远程数据——地址加载(HttpUrlFetcher) HttpUrlFetcher.java 1 2 3 4 5 6 7 8 9 10 public void loadData (Priority priority, DataCallback<? super InputStream> callback) {try {InputStream result = loadDataWithRedirects(glideUrl.toURL(), 0 , null , glideUrl.getHeaders());catch (IOException e) {finally {
加载本地数据——本地文件加载(ByteBufferFetcher) ByteBufferFileLoader.java 1 2 3 4 5 6 7 8 9 10 11 12 13 14 15 16 17 18 19 private static final class ByteBufferFetcher implements DataFetcher <ByteBuffer> {@Override public void loadData (@NonNull Priority priority, @NonNull DataCallback<? super ByteBuffer> callback) {try {catch (IOException e) {if (Log.isLoggable(TAG, Log.DEBUG)) {"Failed to obtain ByteBuffer for file" , e);return ;
loadData()成功后,回调到SourceGenerator.onDataReady()中。这时需要判断是否开启了硬盘缓存,如果关闭了直接回调到DecodeJob.onDataFetcherReady(),开启了的话,就继续调用到DecodeJob.reschedule()。
DecodeJob.java 1 2 3 4 5 6 7 8 9 10 11 12 13 14 15 16 17 18 19 20 21 22 23 24 25 26 27 28 29 30 31 32 33 34 35 36 37 38 39 40 41 42 43 44 45 46 47 48 @Override
在reschedule(),把runReason设为SWITCH_TO_SOURCE_SERVICE,继续调用到EngineJob.reschedule(),再次执行到DecodeJob.run()不过已经在一个新的线程池中继续执行。
在onDataFetcherReady()中,会判断当前线程是否相同,不同的话,设置runReason为DECODE_DATA,重新执行EngineJob.reschedule()还会走到run()中,继续执行到 decodeFromRetrievedData(),线程相同则直接执行。
解析数据
此时拿到的数据类型还是InputStream或者ByteBuffer,需要解析成常用的File或者Bitmap。
此时runReason为DECODE_DATA,调用到decodeFromRetrievedData()
DecodeJob.java 1 2 3 4 5 6 7 8 9 10 11 12 13 14 15 16 17 18 19 20 21 22 23 24 25 26 27 28 29 30 31 32 33 34 35 36 37 38 39 40 41 42 43 44 45 46 private Object currentData; private void decodeFromRetrievedData () {null ;try {catch (GlideException e) {if (resource != null ) {else {private <Data> Resource<R> decodeFromData (DataFetcher<?> fetcher, Data data, DataSource dataSource) throws GlideException {try {return result;finally {@SuppressWarnings("unchecked") private <Data> Resource<R> decodeFromFetcher (Data data, DataSource dataSource) throws GlideException {return runLoadPath(data, dataSource, path);private <Data, ResourceType> Resource<R> runLoadPath (Data data, DataSource dataSource, LoadPath<Data, ResourceType, R> path) throws GlideException {Options options = getOptionsWithHardwareConfig(dataSource);try {return path.load(new DecodeCallback <ResourceType>(dataSource));finally {
调用decodeFromRetrievedData开始解析加载返回的数据,数据格式可能为InputSteam、ByteBuffer。向下调用到decodeFromData(),再到decodeFromFetcher(),最终通过DecodeHelper.getLoadPath()得到的LoadPath去对获取的数据进行解析。
LoadPath.java 1 2 3 4 5 6 7 8 9 10 11 12 13 14 15 16 17 18 19 20 21 22 23 24 25 26 27 28 29 30 31 32 33 34 35 public Resource<Transcode> load (DataRewinder<Data> rewinder, @NonNull Options options, int width, int height, DecodePath.DecodeCallback<ResourceType> decodeCallback) throws GlideException {try {return loadWithExceptionList(rewinder, options, width, height, decodeCallback, throwables);finally {private Resource<Transcode> loadWithExceptionList (DataRewinder<Data> rewinder, @NonNull Options options, int width, int height, DecodePath.DecodeCallback<ResourceType> decodeCallback, List<Throwable> exceptions) throws GlideException {null ;for (int i = 0 , size = decodePaths.size(); i < size; i++) {try {catch (GlideException e) {if (result != null ) {break ;if (result == null ) {throw new GlideException (failureMessage, new ArrayList <>(exceptions));return result;
DecodePath.java 1 2 3 4 5 6 7 8 9 10 11 12 13 14 15 16 17 18 19 20 21 22 23 24 25 26 27 28 29 30 31 32 33 34 35 36 37 38 39 40 41 42 43 44 45 46 public Resource<Transcode> decode (DataRewinder<DataType> rewinder, int width, int height, @NonNull Options options, DecodeCallback<ResourceType> callback) throws GlideException {return transcoder.transcode(transformed, options);@NonNull private Resource<ResourceType> decodeResource (DataRewinder<DataType> rewinder, int width, int height, @NonNull Options options) throws GlideException {try {return decodeResourceWithList(rewinder, width, height, options, exceptions);finally {@NonNull private Resource<ResourceType> decodeResourceWithList (DataRewinder<DataType> rewinder, int width, int height, @NonNull Options options, List<Throwable> exceptions) throws GlideException {null ;for (int i = 0 , size = decoders.size(); i < size; i++) {try {DataType data = rewinder.rewindAndGet();if (decoder.handles(data, options)) {catch (IOException | RuntimeException | OutOfMemoryError e) {if (result != null ) {break ;if (result == null ) {throw new GlideException (failureMessage, new ArrayList <>(exceptions));return result;
LoadPath.load()通过调用loadWithExceptionList(),循环获取DecodePath对象,然后调用其自身的decode()进行数据解析。DecodePath与LoadPath逻辑相似,最终在DecodePath.decodeResourceWithList()中循环获取ResourceDecoder对象,通过DateRewinder.rewindAndGet()获取要解析数据的格式(比如ByteBuffer,InputStream),然后调用decoder.decode继续解析数据。
获取数据格式 由上述流程可知,我们能获得的数据类型为InputStream和ByteBuffer,对应的就会有两种DataRewinder
InputStreamRewinder.java 1 2 3 4 5 6 7 private final RecyclableBufferedInputStream bufferedStream;@NonNull @Override public InputStream rewindAndGet () throws IOException {return bufferedStream;
ByteBufferRewinder.java 1 2 3 4 5 6 @NonNull @Override public ByteBuffer rewindAndGet () {0 );return buffer;
将传进来的data可以转换成对应的数据格式。
根据格式转换相应类型 得到对应数据格式后,就需要通过ResourceDecoder.decode()去解析数据。
ResourceDecoder.java 1 2 3 4 5 6 7 8 9 public interface ResourceDecoder <T, Z> {boolean handles (@NonNull T source, @NonNull Options options) throws IOException;@Nullable decode (@NonNull T source, int width, int height, @NonNull Options options) throws IOException;
T代表需要被解析的类型(例如InputStream、ByteBuffer),Z代表解析的结果类型(例如Bitmap、Drawable)。
ResourceDecoder在原码中有很多实现类,StreamBitmapDecoder、ButeBufferBitmapDecoder,此处拿出常用的StreamBitmapDecoder进行分析。
StreamBitmapDecoder.java 1 2 3 4 5 6 7 8 9 10 11 12 13 14 15 16 17 18 19 20 21 22 23 24 25 26 27 28 29 30 31 32 33 34 @Override public boolean handles (@NonNull InputStream source, @NonNull Options options) {return downsampler.handles(source);@Override public Resource<Bitmap> decode (@NonNull InputStream source, int width, int height, @NonNull Options options) throws IOException {final RecyclableBufferedInputStream bufferedStream;final boolean ownsBufferedStream;if (source instanceof RecyclableBufferedInputStream) {false ;else {new RecyclableBufferedInputStream (source, byteArrayPool);true ;ExceptionCatchingInputStream exceptionStream = MarkEnforcingInputStream invalidatingStream = new MarkEnforcingInputStream (exceptionStream);UntrustedCallbacks callbacks = new UntrustedCallbacks (bufferedStream, exceptionStream);try {return downsampler.decode(invalidatingStream, width, height, options, callbacks);finally {if (ownsBufferedStream) {
ResourceDecode.decode()内部是通过Downsampler.decode()进行解析
Downsampler.java 1 2 3 4 5 6 7 8 9 10 11 12 13 14 15 16 17 18 19 20 21 22 23 24 25 26 27 28 29 30 31 32 33 34 35 36 37 38 39 @SuppressWarnings({"resource", "deprecation"}) public Resource<Bitmap> decode (InputStream is, int requestedWidth, int requestedHeight, Options options, DecodeCallbacks callbacks) throws IOException {try {Bitmap result = decodeFromWrappedStreams(is, bitmapFactoryOptions,return BitmapResource.obtain(result, bitmapPool);finally {private Bitmap decodeFromWrappedStreams (InputStream is, BitmapFactory.Options options, DownsampleStrategy downsampleStrategy, DecodeFormat decodeFormat, boolean isHardwareConfigAllowed, int requestedWidth, int requestedHeight, boolean fixBitmapToRequestedDimensions, DecodeCallbacks callbacks) throws IOException {Bitmap downsampled = decodeStream(is, options, callbacks, bitmapPool);private static Bitmap decodeStream (InputStream is, BitmapFactory.Options options, DecodeCallbacks callbacks, BitmapPool bitmapPool) throws IOException {try {null , options);catch (IllegalArgumentException e) {throw bitmapAssertionException;finally {
Downsampler.decode()内部主要实现依靠decodeFromWrapperStreams(),内部主要是配置BitmapFactory.Options。去控制图片的缩放(scale)、旋转(rotate)、复用(inBitmap)等方面配置。最后通过decodeStream解析输入流,最后生成Bitmap对象返回。
获取图片后继续处理(例如圆角) DecodePath.java 1 2 3 4 5 6 7 8 public Resource<Transcode> decode (DataRewinder<DataType> rewinder, int width, int height, @NonNull Options options, DecodeCallback<ResourceType> callback) throws GlideException {return transcoder.transcode(transformed, options);
decodeResource最终会调到DecodeJob.onResourceDecoded()进行Transform处理。
1 2 3 4 5 6 7 8 9 10 11 12 13 14 15 16 17 18 19 20 21 22 23 24 25 26 27 28 29 30 31 32 33 34 35 36 37 38 39 40 41 42 43 44 45 <Z> Resource<Z> onResourceDecoded (DataSource dataSource, @NonNull Resource<Z> decoded) {@SuppressWarnings("unchecked") null ;if (dataSource != DataSource.RESOURCE_DISK_CACHE) {if (!decoded.equals(transformed)) {if (diskCacheStrategy.isResourceCacheable(isFromAlternateCacheKey, dataSource,if (encoder == null ) {throw new Registry .NoResultEncoderAvailableException(transformed.get().getClass());final Key key;switch (encodeStrategy) {case SOURCE:new DataCacheKey (currentSourceKey, signature);break ;case TRANSFORMED:new ResourceCacheKey (break ;default :throw new IllegalArgumentException ("Unknown strategy: " + encodeStrategy);return result;
从这里可看出 保存原图和保存转换后图片的缓存key是不一致的。
缓存原图用的是DataCacheKey,保存转换后图片用的是ResourceCacheKey
上述数据处理完毕后,层层回溯到达了decodeFromRetrievedData()
DecodeJob.java 1 2 3 4 5 6 7 8 9 10 11 12 13 14 15 16 17 18 19 20 21 22 23 24 25 26 27 28 29 30 31 32 private void decodeFromRetrievedData () {null ;try {catch (GlideException e) {if (resource != null ) {else {private void notifyEncodeAndRelease (Resource<R> resource, DataSource dataSource) {if (resource instanceof Initializable) {private void notifyComplete (Resource<R> resource, DataSource dataSource) {
经过解析数据那一套流程下来后,数据已经加载完成,然后回到DecodeJob.decodeFromRetrieveData(),这时Resource对象不为空,向下继续调用notifyEncodeAndRelease(),内部调用到notifyComplete()再回调到EngineJob.onResourceReady()。
EngineJob.java 1 2 3 4 5 6 7 8 9 10 11 12 13 14 15 16 17 18 19 20 21 @Override public void onResourceReady (Resource<R> resource, DataSource dataSource) {synchronized (this ) {this .resource = resource;this .dataSource = dataSource;void notifyCallbacksOfResult () {this , localKey, localResource);for (final ResourceCallbackAndExecutor entry : copy) {new CallResourceReady (entry.cb));
EngineJob.onResourceReady()资源加载完成后,通过notifyCallbacksOfResulr()调用到Engine.onEngineJobComplete()
Engine.java 1 2 3 4 5 6 7 8 9 10 11 12 13 14 15 public synchronized void onEngineJobComplete ( EngineJob<?> engineJob, Key key, EngineResource<?> resource) {if (resource != null ) {this );if (resource.isCacheable()) {
加载完成后,把对应资源插入到ActiveResources中作为活动资源。
Glide高级用法 处理带有后缀的图片类型,可能为了保证安全,不同的用户获取的图片除了图片地址外还会有一段标识用户的token。而且token并不一定是固定的,这样我们再去加载图片时,由于缓存key不一致,导致重复加载。
这里涉及到了缓存key 的生成,其中有一个重要参数为远程图片加载地址,对于上述情况,因为地址的变化,key不同则查找缓存时也无法命中,解决这个情况就需要排除掉变化的部分。
1 2 3 4 5 6 7 8 9 10 11 12 13 14 15 16 17 18 19 20 21 22 23 24 25 26 27 28 29 30 31 class MyGlideUrl extends GlideUrl {private String mUrl;public MyGlideUrl (String url) {super (url);@Override public String getCacheKey () {return mUrl.replace(replaceTokenParam(),"" );private String replaceTokenParam () {"" ;int tokenIndex = mUrl.contains("?.token" ) ? mUrl.indexOf("?token" ):mUrl.indexOf("&token" );if (tokenIndex!=-1 ){int nextAndIndex = mUrl.indexOf("&" ,tokenIndex+1 );if (nextAndIndex!=-1 ){1 ,nextAndIndex+1 );else {return tokenParam;
内容引用 Glide主流源码分析
Glide4.8源码拆解(二)核心加载流程
