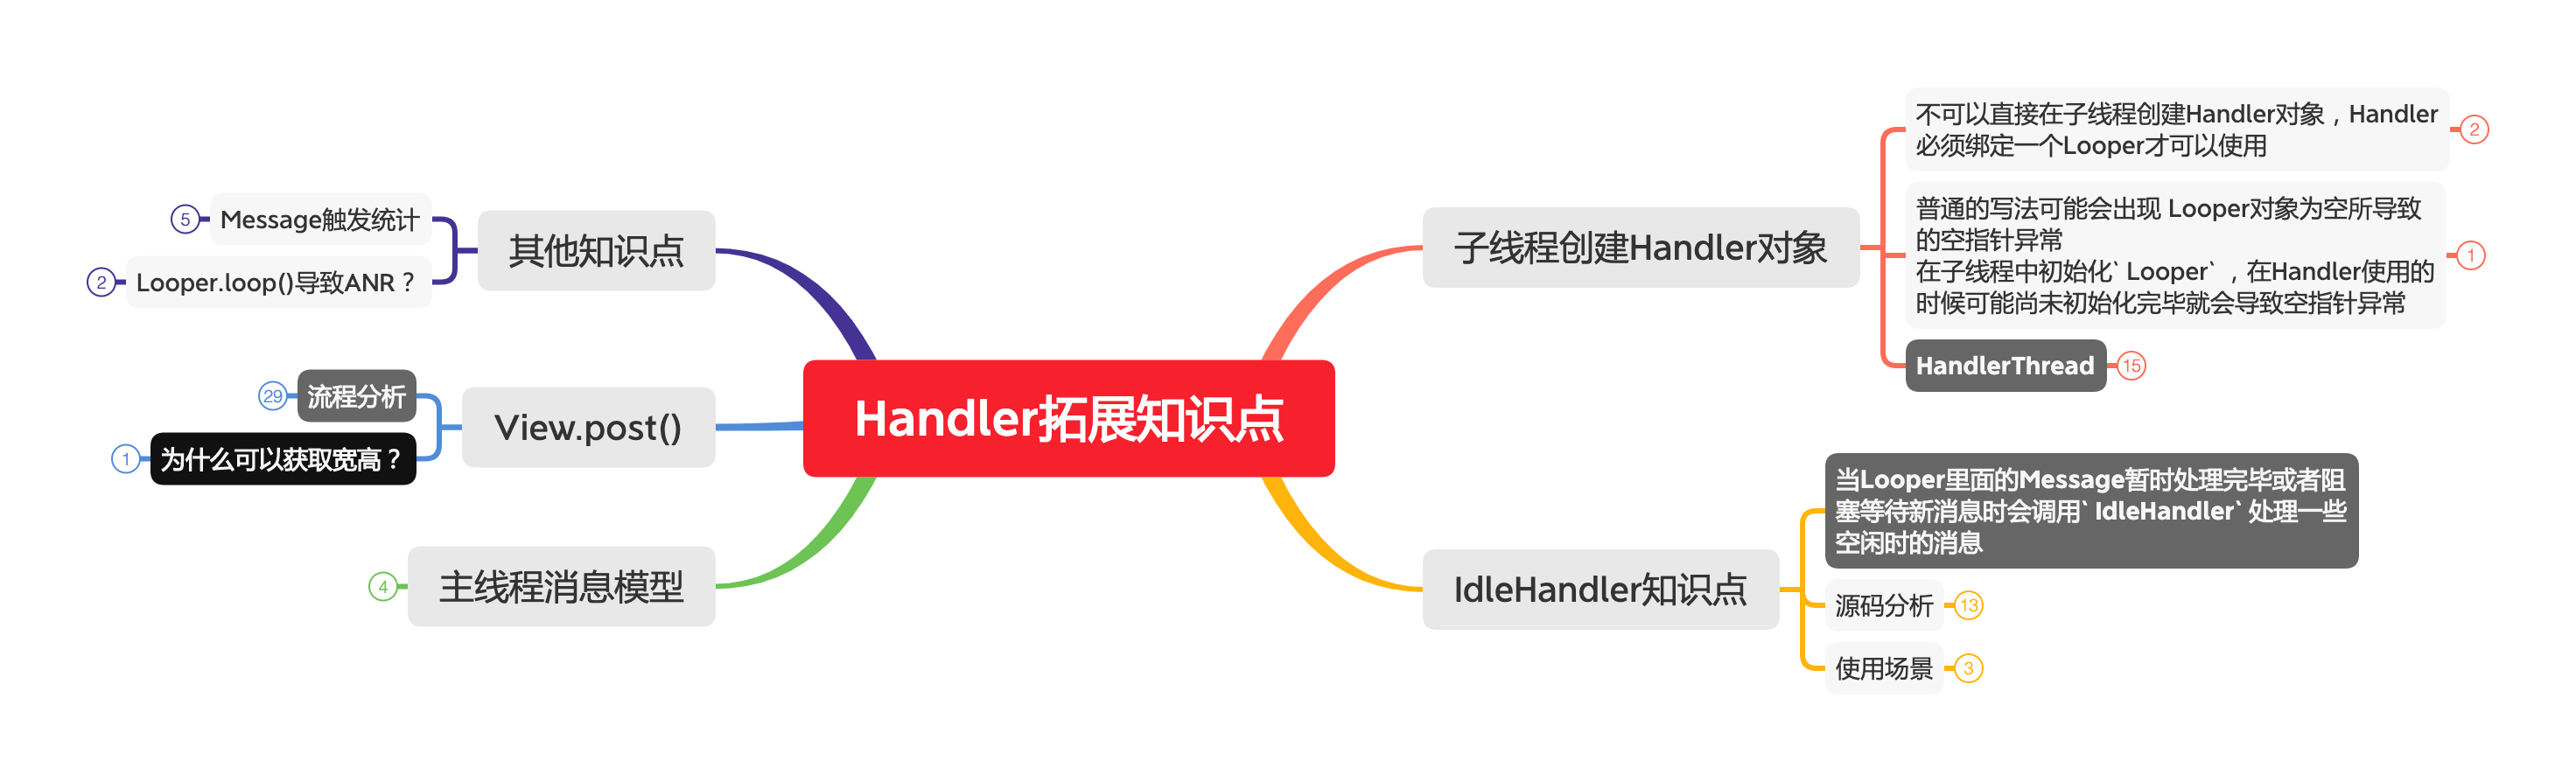
主要包括Handler其他使用知识点
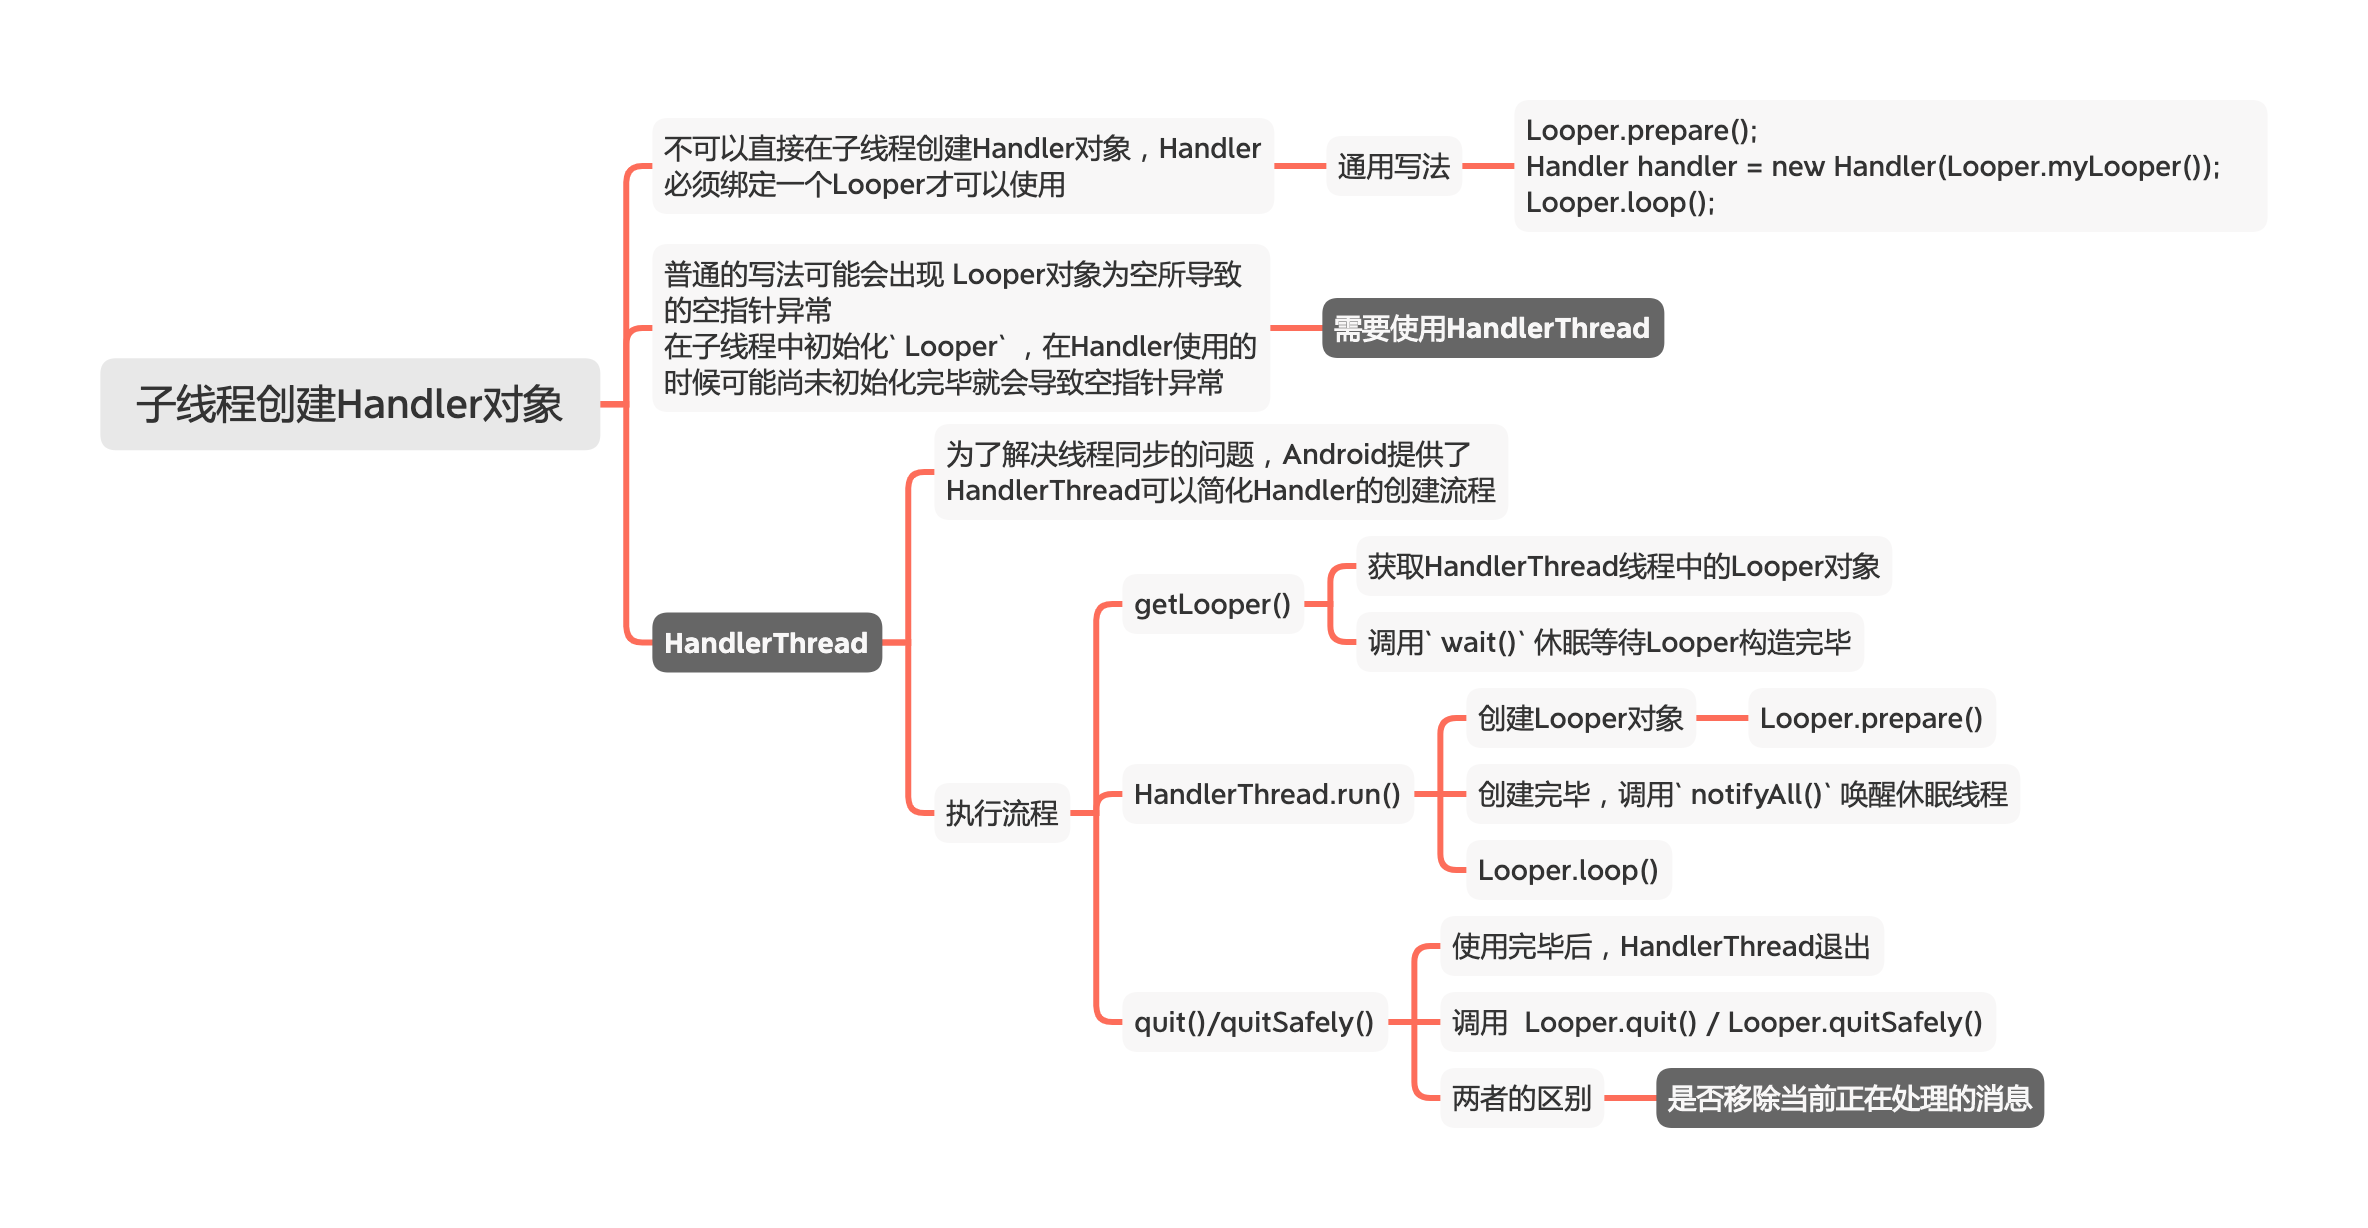
1. 子线程创建Handler对象
不可以直接在子线程创建Handler对象,因为Handler对象必须要绑定一个Looper,才可以使用。
若在子线程需要使用Handler,则需要先创建一个Looper对象即执行Looper.prepare()然后再创建Handler对象时调用Looper.myLooper()获取Looper对象传入方法,最后调用Looper.loop()开始运行。
1
2
3
4
5
6
7
8
9
10
11
12
13
14
15
16
17
18
19
20
21
22
23
24
25
26
27
28
29
30
31
32
33
34
35
36
37
38
39
40
41
42
class MyActivity : Activity {lateinit var mThread: MyThreadlateinit var mHandler: MyHandleroverride fun onCreate (savedInstanceState: Bundle ?) super .onCreate(savedInstanceState)val message = Message.obtain()"test" this , mThread.childLooper)class MyThread : Thread () {var childLooper: Looper? = null override fun run () class MyHandler (activity: MyActivity, looper: Looper?) : Handler(looper) {var mWeakRe: WeakReference<MyActivity> = WeakReference(activity)override fun handleMessage (msg: Message ?) super .handleMessage(msg)val activity: MyActivity? = mWeakRe.get ()if (activity!=null ){
以上代码执行完毕后就可以在子线程调用Handler对象。
但是,在多次执行过程中,会有java.lang.NullPointerException: Attempt to read from field ‘android.os.MessageQueue android.os.Looper.mQueue’ on a null object reference 空指针导致应用崩溃。调试过程中发现是由于Looper对象为空导致的异常。由于 在子线程run()初始化了Looper对象,Handler对象的初始化依然继续执行,Looper对象此时尚未初始化好,导致空指针异常。
由于这种情况的出现是随机的,不是百分百重现,为了保证应用的运行就需要引入HandlerThread这个类,可以帮我们解决这个问题。
1 2 3 4 5 6 7 8 9 10 11 12 13 14 15 16 17 18 19 20 21 22 23 24 25 26 27 28 29 30 31 32 33 34 35 36 37 38 39 class MyActivity : Activity {lateinit var mHandler: MyHandlervar mHandlerThread: HandlerThread?=null override fun onCreate (savedInstanceState: Bundle ?) super .onCreate(savedInstanceState)"test" ,Process.THREAD_PRIORITY_BACKGROUND)val message = Message.obtain()"test" this , mHandlerThread?.looper)class MyHandler (activity: MyActivity, looper: Looper?) : Handler(looper) {var mWeakRe: WeakReference<MyActivity> = WeakReference(activity)override fun handleMessage (msg: Message ?) super .handleMessage(msg)val activity: MyActivity? = mWeakRe.get ()if (activity!=null ){override fun onDestroy () super .onDestroy()
以上代码执行完毕后,即可在HandlerThread中使用Handler对象。
我们需要从源码去分析为什么使用HandlerThread可以避免上述异常,是怎样一个机制实现的。
1 2 3 4 5 6 7 8 9 10 11 12 13 14 15 16 17 18 19 20 21 22 23 24 25 26 27 28 29 30 31 32 33 34 35 36 37 38 39 40 41 42 43 44 45 46 47 48 49 50 51 52 53 54 55 56 57 58 59 60 61 62 63 64 65 66 67 68 69 70 71 72 73 74 75 76 77 78 79 80 81 82 83 84 85 86 87 88 public class HandlerThread extends Thread {int mPriority;public HandlerThread (String name) {super (name);public HandlerThread (String name, int priority) {super (name);protected void onLooperPrepared () {@Override public void run () {synchronized (this ) {1 ;public Looper getLooper () {if (!isAlive()) {return null ;synchronized (this ) {while (isAlive() && mLooper == null ) {try {catch (InterruptedException e) {return mLooper;@NonNull public Handler getThreadHandler () {if (mHandler == null ) {new Handler (getLooper());return mHandler;public boolean quit () {Looper looper = getLooper();if (looper != null ) {return true ;return false ;public boolean quitSafely () {Looper looper = getLooper();if (looper != null ) {return true ;return false ;
总结:
HandlerThread内嵌了Handler,Looper,MessageQueue对象HandlerThread内部使用wait(),notifyAll()等线程同步方式保证mLooper对象不会为空,wait()当Looper对象尚未初始化完成时阻塞其他线程,notifyAll()当mLooper对象不为空时,通知其他线程使用mLooper。
补充:HandlerThread与手写Looper的边界
手写Looper.prepare() + Looper.loop()的问题不在于“不能用”,而在于容易出现初始化时序和退出时机管理不当。
HandlerThread.getLooper()内部用wait()/notifyAll()等待mLooper完成初始化,天然规避“先取Looper后初始化”的竞态。若使用手写Looper模型,必须额外设计“初始化完成通知 + 退出协议”,否则容易出现空指针或线程泄漏。
补充:quit与quitSafely选择
quit():立即退出,队列中的未处理消息会被移除,适合“任务已无意义”的快速收尾场景。quitSafely():只移除未来消息,允许已到期消息执行完,适合“希望平滑结束后台任务”的场景。生命周期结束时,除停止HandlerThread外,还建议同步清理removeCallbacksAndMessages(null),避免页面销毁后仍有回调。
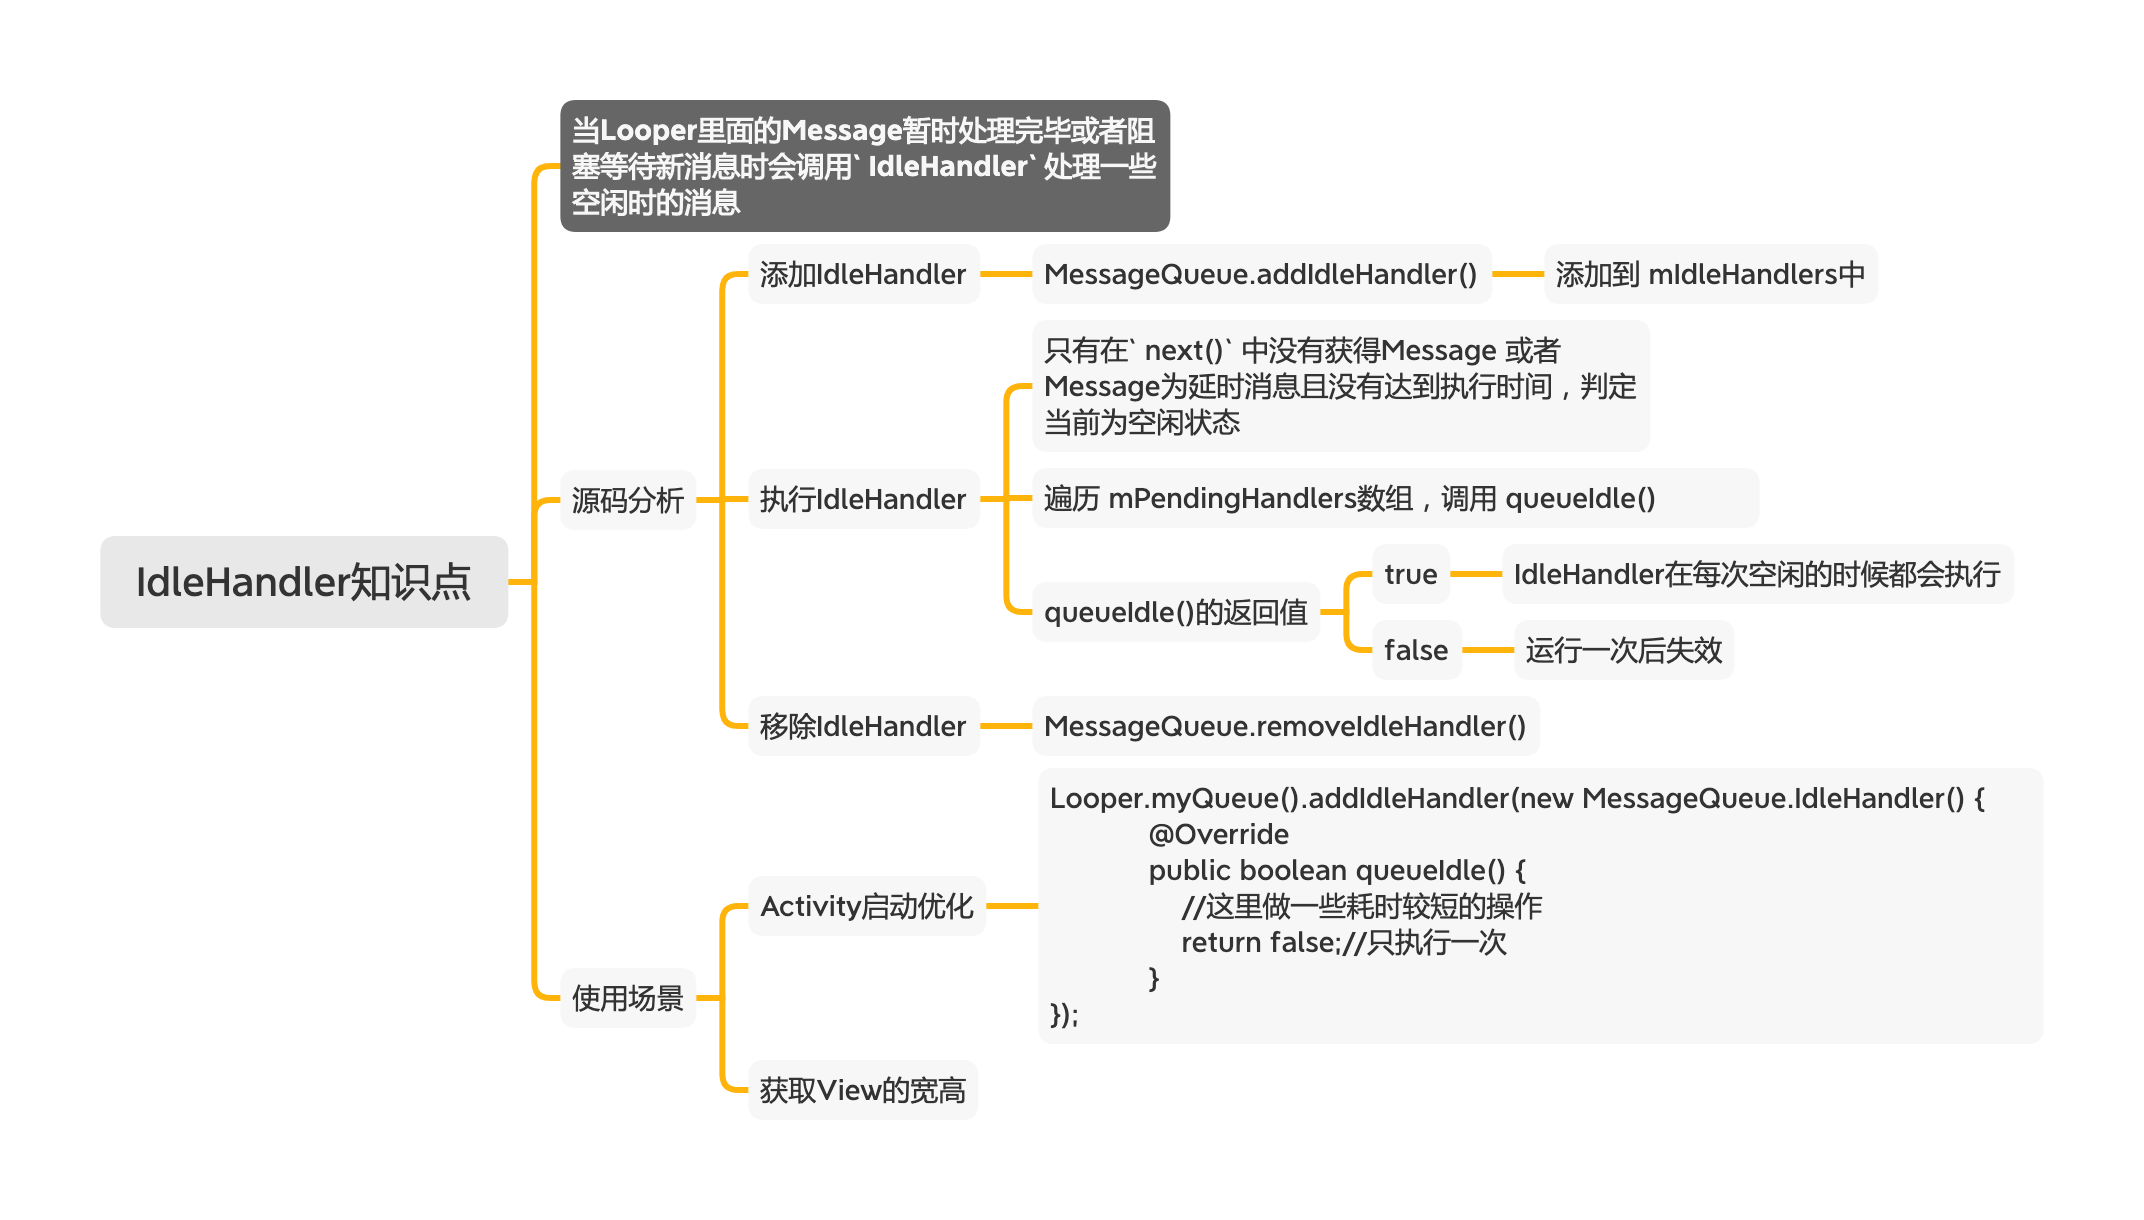
2. IdleHandler
当Looper里面的Message暂时处理完毕即全部消息处理完毕或者阻塞等待新消息 时会调用IdleHandler这个类去处理一些空闲时间的消息。
继承IdleHandler这个接口,需要设置queueIdle()的返回值。若返回false则调用一次后会移除,为true则继续持有,空闲时依然会调用。
概括就是:优先级别较低的Message,只有当Looper中没有消息要处理时,才会去处理IdleHandler。
1 2 3 4 5 6 7 8 9 10 11 12 13 14 15 16 17 18 19 20 21 22 23 24 25 26 27 28 29 30 31 32 33 34 35 val message = Message.obtain()"1234" val delayMessage=Message.obtain()"12344" 3000 )class OnceIdleHandler : MessageQueue.IdleHandler {override fun queueIdle () Boolean {"idle once" )return false class ForeverIdleHandler : MessageQueue.IdleHandler {override fun queueIdle () Boolean {"idle forever" )return true
接入上述代码即可测试IdleHandler的使用,接下来分析它的源码实现以及使用场景。
补充:IdleHandler执行语义
触发条件并不只是在“队列完全为空”,当队头消息when尚未到达时也可能触发。
queueIdle()运行在Looper绑定线程(主线程场景最常见),因此必须保证逻辑短小且可快速返回。返回true会持续驻留,若逻辑较重应改为一次性任务(返回false)或转移到后台线程。
1 2 3 4 5 6 7 8 9 10 11 12 13 14 15 16 17 18 19 20 21 22 23 24 25 26 27 28 29 30 31 32 33 34 35 36 37 38 39 40 41 42 43 44 45 46 47 48 49 50 51 52 53 54 55 56 57 58 59 60 61 62 63 64 65 66 67 68 69 70 71 72 73 74 75 76 77 78 79 80 81 82 public static interface IdleHandler {boolean queueIdle () ;private final ArrayList<IdleHandler> mIdleHandlers = new ArrayList <IdleHandler>();public void addIdleHandler (@NonNull IdleHandler handler) {if (handler == null ) {throw new NullPointerException ("Can't add a null IdleHandler" );synchronized (this ) {public void removeIdleHandler (@NonNull IdleHandler handler) {synchronized (this ) {next () {for (;;){if (pendingIdleHandlerCount < 0 null || now < mMessages.when )) {if (pendingIdleHandlerCount <= 0 ) {true ;continue ;if (mPendingIdleHandlers == null ) {new IdleHandler [Math.max(pendingIdleHandlerCount, 4 )];for (int i = 0 ; i < pendingIdleHandlerCount; i++) {final IdleHandler idler = mPendingIdleHandlers[i];null ; boolean keep = false ;try {catch (Throwable t) {"IdleHandler threw exception" , t);if (!keep) {synchronized (this ) {
3. Handler常见问题 1. 消息机制中的主要引用对象及其关系
Looper ,MessageQueue,Message,ThreadLocal,Handler
Looper对象有一个MessageQueue,MessageQueue为一个消息队列来存储Message
Message中带有一个Handler对象,从Looper中取出消息后,可以直接调用到Handler的相关方法
Handler发送消息时会把自身封装进Message:Message.obtain(Handler h, int what, int arg1, int arg2, Object obj)
Handler通过获取Looper对象中的MessageQueue插入消息来发送Message
Looper创建对象时会把自己保存至ThreadLocal中,并提供一个public static Looper myLooper()方法来返回一个Looper对象
2. Android主线程不会因为Looper.loop()死循环卡死 当线程中的可执行代码执行完成后,线程生命周期便该终止,线程就要退出。通过死循环 的方式可以保证线程一直存活。
简单来说就是循环里有阻塞阻塞的原理是利用Linux的管道机制(PIPE/EPOLL)机制实现,所以死循环不会一直执行,由于大部分时间都是没有消息的,所以主线程大部分处于休眠状态,也不会过度消耗CPU资源导致卡死。
先说明进程和线程的区别:
进程 :每个App运行时首先会创建一个进程,该进程是由zygote fork出来的,用于承载运行App上的Activity/Service等组件。进程对于上层应用来说是完全透明的,目的是为了让App都运行在Android Runtime。大多数情况下一个App运行在一个进程中,除非配置了android:process属性,或者通过native fork进程。
线程 :线程比较常见,每次new Thread().start()都会创建一个新线程。并且与当前App所在进程之间资源共享。在CPU看来进程或线程无非是一段可执行的代码,CPU采用CFS调度算法,保证每个task尽可能公平享有CPU时间片。
拓展知识:CFS调度算法是一种完全公平调度算法,基本设计思路是根据各个进程的权重来分配运行时间**。
当进入死循环时又该如何处理其他事务呢?需要创建新的线程去处理 。
主线程进入Looper的死循环后,还需要处理Activity的各个生命周期回调(在同一个线程下,代码是按顺序执行的,如果死循环阻塞了,后续该如何执行)。
1 2 3 4 5 6 7 8 9 10 11 12 13 14 15 16 17 18 19 20 21 22 23 24 public static void main (String[] args) {ActivityThread thread = new ActivityThread ();false );if (sMainThreadHandler == null ) {if (false ) {new LogPrinter (Log.DEBUG, "ActivityThread" ));throw new RuntimeException ("Main thread loop unexpectedly exited" );
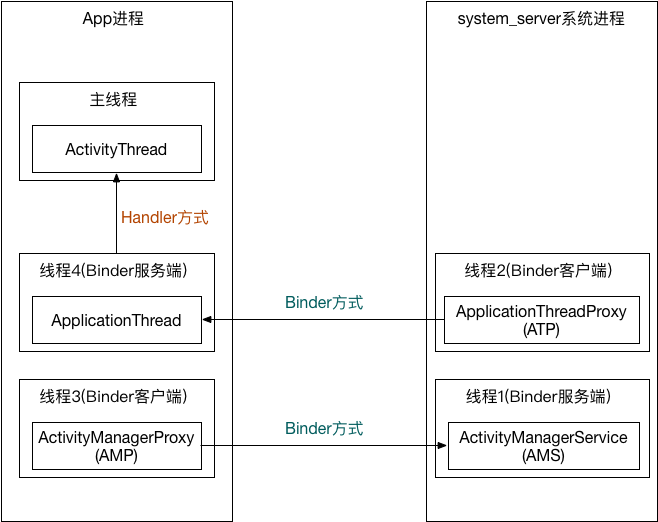
源码中在初始化ActivityThread时也会初始化一个H类型的成员,它继承了Handler。
源码中调用thread.attach(false)时,会创建对应的Binder通信链路(例如ApplicationThread作为Binder服务端,用于接收系统AMS发出的事件),再由Handler线程发送Message至主线程。
所以在主线程开启Looper死循环之前,就已经启动了一个Binder线程并且准备了H 这一个Handler类,就可以用于处理一些死循环之外的事务。仅需通过Binder线程向H发送消息即可。
system_server进程即为系统进程 ,里面运行了大量的系统服务,比如上图提供了ApplicationThreadProxy以及ActivityManagerService,这两者都基于IBinder接口,都是Binder线程。
App进程即为我们常说的应用程序 ,主线程主要负责Activity等组件的生命周期以及UI绘制。每个App进程中至少会包括两个Binder线程:ApplicationThread和ActivityManagerProxy。
Binder用于不同进程间的通信,由一个进程的Binder客户端向另一个进程的服务端发送事务。
Handler则用于同一进程间不同线程的通信。
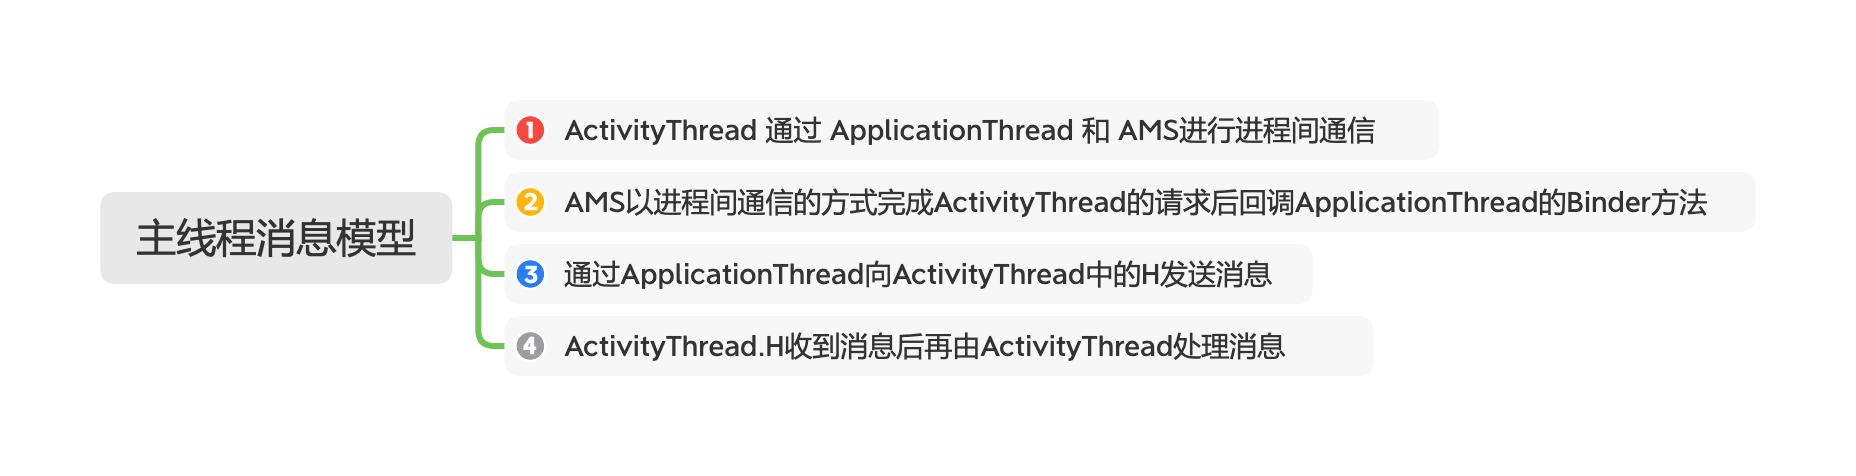
3.主线程的消息模型
上图中绘制出主线程(ActivityThread)是如何循环的,简单的文字表达就是
ActivityManagerService(AMS) ==直接调用==>ApplicationThreadProxy(ATP)==Binder==>ApplicationThread==Handler方式==>ActivityThread
主线程(ActivityThread)通过ApplicationThread和ActivityManagerService进行进程间通信,AMS以进程间通信的方式完成ActivityThread的请求后回调ApplicationThread中的Binder方法。然后由ApplicationThread向ActivityThread中的H发送消息,然后收到消息后 把处理逻辑发送至ActivityThread中去执行。
4.Message的触发统计
Message是在MessageQueue中进行存放,事件的分发需要通过Looper.loop()从MessageQueue中获取Message,BlockCanary就是通过计算事件分发的时间间隔来判断当前是否出现卡顿。
1 2 3 4 5 6 7 8 9 10 11 12 13 14 15 16 17 18 19 20 21 public void setMessageLogging (@Nullable Printer printer) {public static void loop () {for (;;) {final Printer logging = me.mLogging;if (logging != null ) {">>>>> Dispatching to " + msg.target + " " +": " + msg.what);if (logging != null ) {"<<<<< Finished to " + msg.target + " " + msg.callback);
可以通过给Handler中的Looper对象设置setMessageLogging(),对事件的分发进行监听。
1 2 3 4 5 6 Looper.getMainLooper().setMessageLogging(new Printer (){@Override public void println (String x) {
5.View.post()和Handler.post()有什么区别?
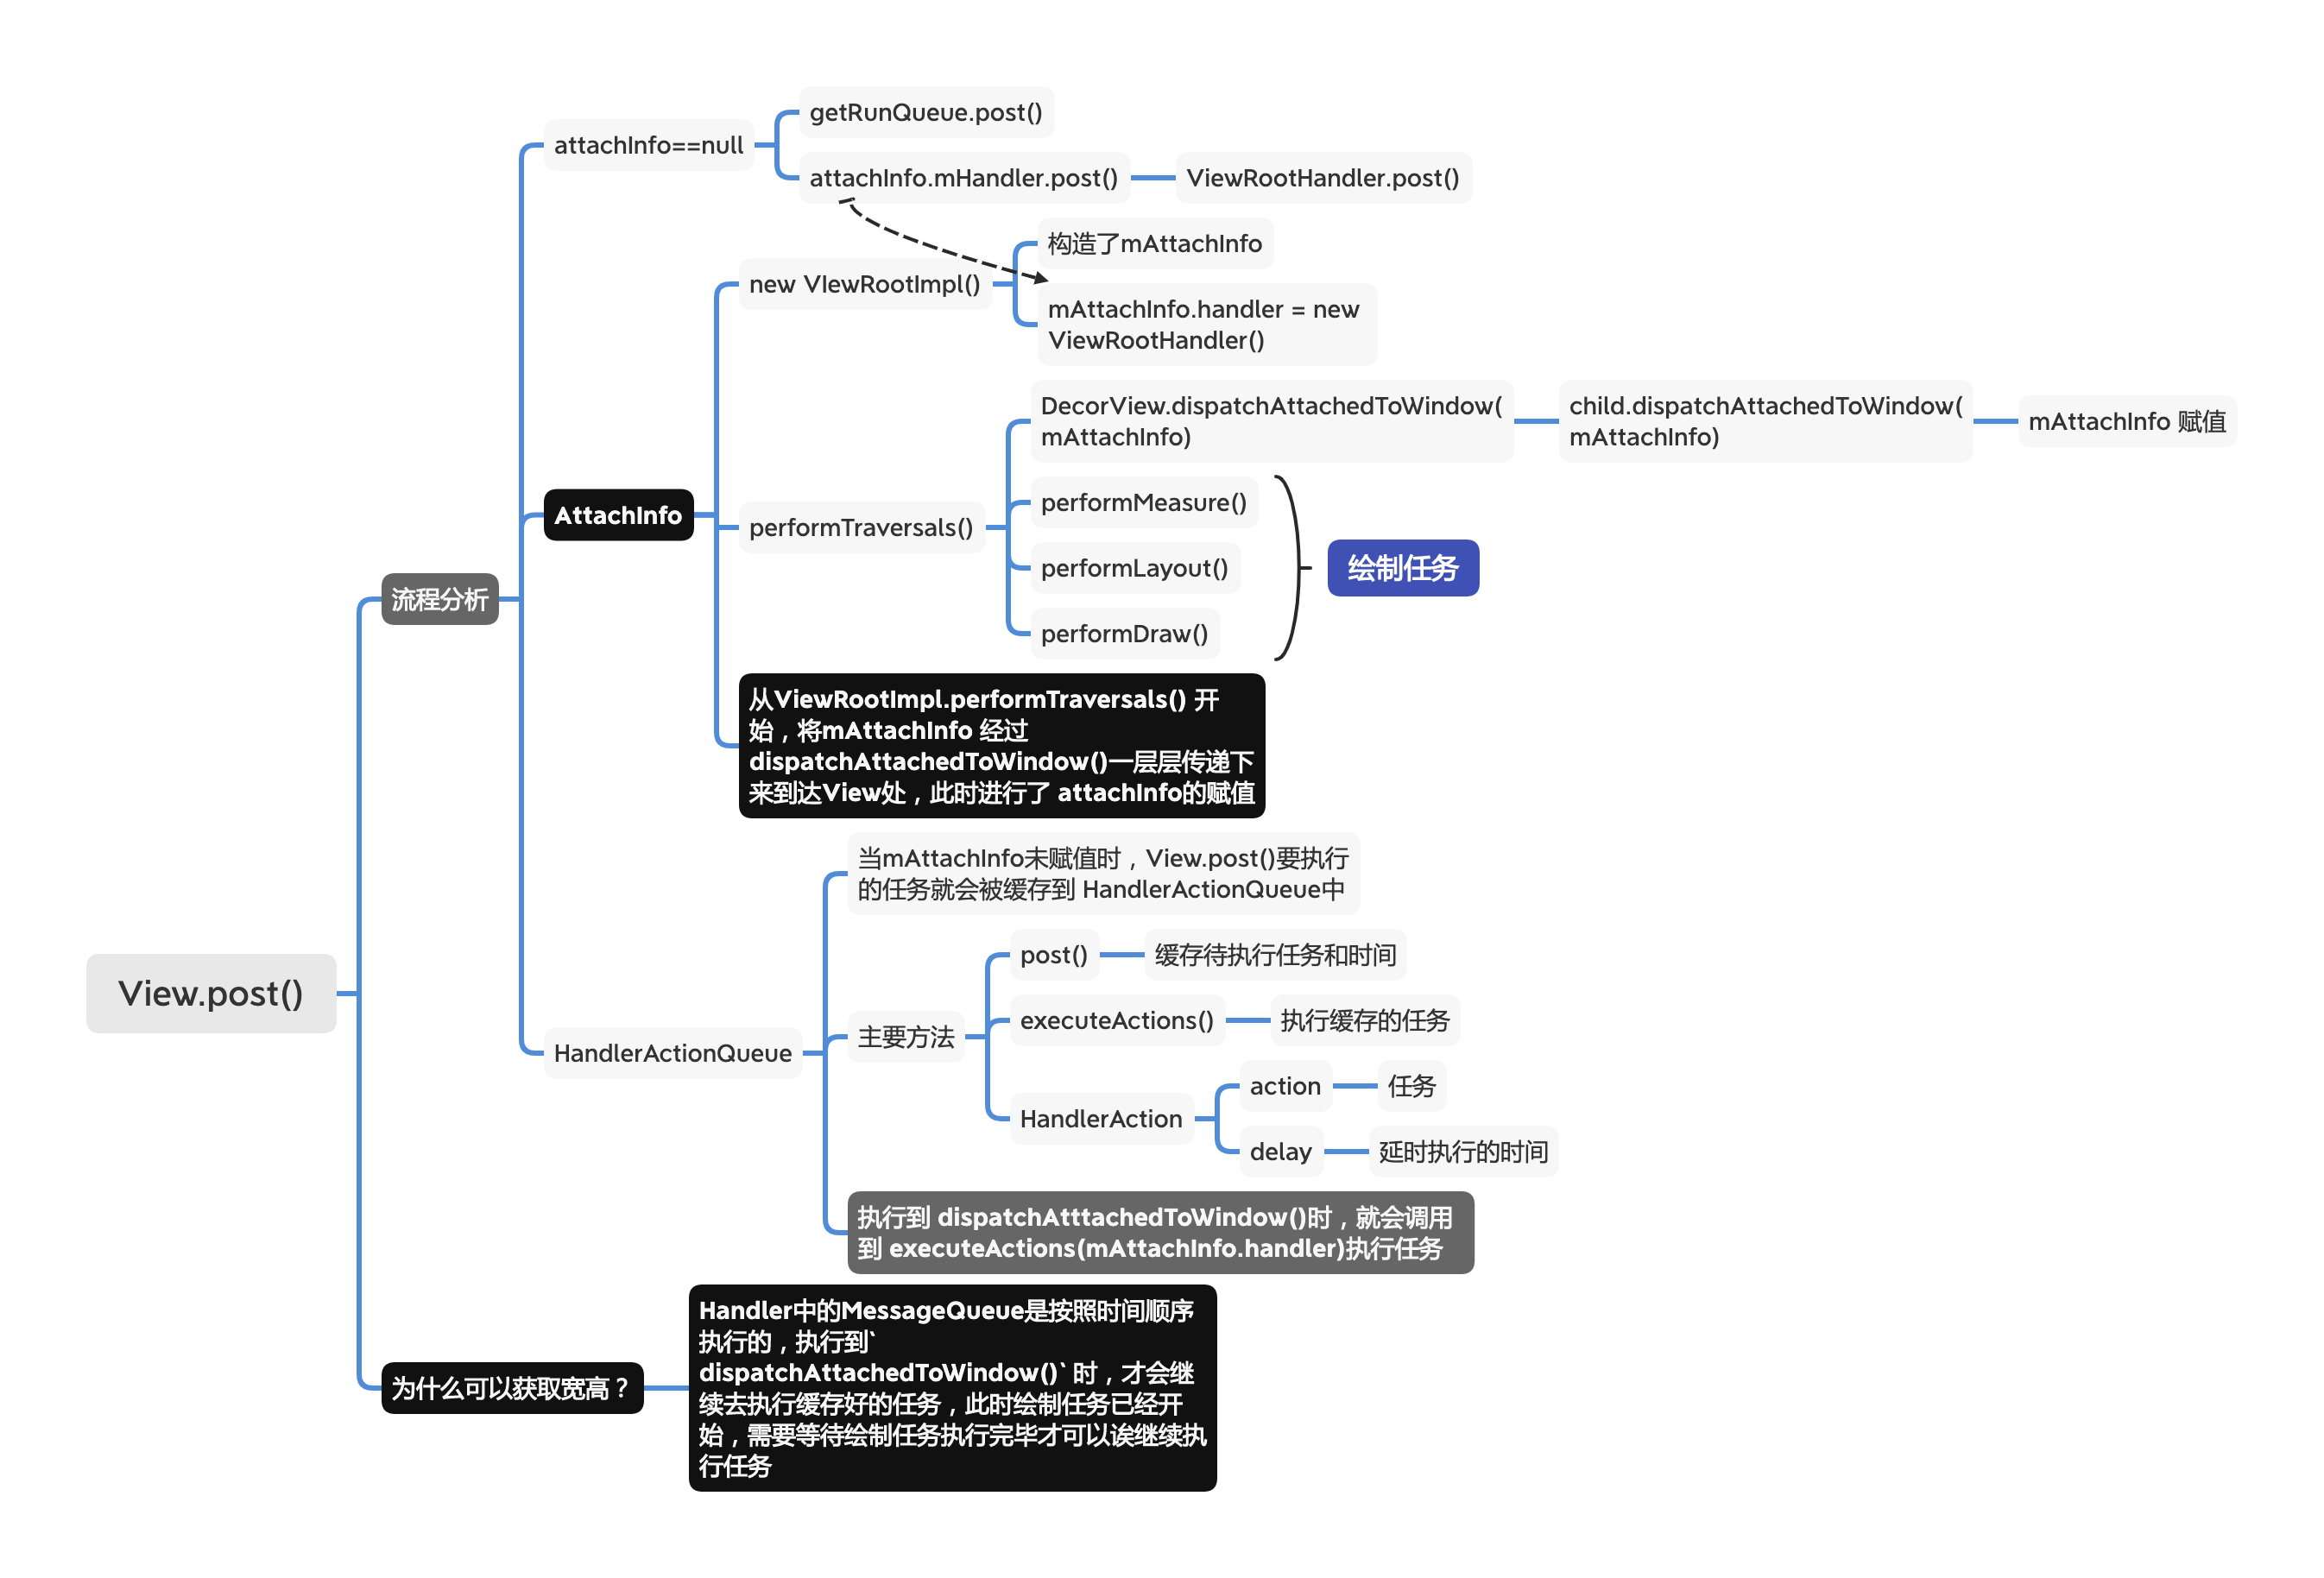
1 2 3 4 5 6 7 8 9 10 11 12 public boolean post (Runnable action) {final AttachInfo attachInfo = mAttachInfo;if (attachInfo != null ) {return attachInfo.mHandler.post(action);return true ;
需要判断attachInfo是否为null,不为null直接执行handler.post()去执行任务;否则,插入到getRunQueue()中。
现在需要分为两部分进行分析:
AttachInfo 1 2 3 4 5 6 void dispatchAttachedToWindow (AttachInfo info, int visibility) {
这时需要知道何时调用了dispatchAttachedToWindow(),需要向上看
1 2 3 4 5 6 7 8 9 10 11 12 13 14 15 16 17 void dispatchAttachedToWindow (AttachInfo info, int visibility) {final int count = mChildrenCount;final View[] children = mChildren;for (int i = 0 ; i < count; i++) {final View child = children[i];final int transientCount = mTransientIndices == null ? 0 : mTransientIndices.size();for (int i = 0 ; i < transientCount; ++i) {View view = mTransientViews.get(i);
再往上就是DecorView,DecorView继承自ViewGroup,所以最终就是到了ViewRootImpl
1 2 3 4 5 6 7 8 9 10 11 12 13 14 15 16 17 18 19 private void performTraversals () {final View host = mView;if (mFirst) {true ;true ;0 );
是从ViewRootImpl.performTraversals()向下执行到DecorView.dispatchAttachedToWindow(),最后执行到View.dispatchAttachedToWindow()。
1 2 3 4 5 6 7 8 9 10 11 public ViewRootImpl (Context context, Display display) {true ; false ;new View .AttachInfo(mWindowSession, mWindow, display, this , mHandler, this ,final ViewRootHandler mHandler = new ViewRootHandler ();
是在ViewRootImpl初始化的时候构建了AttachInfo对象,其中attachInfo.handler指的就是ViewRootHandler
所以最后通过View.post()执行的任务都会切换到ViewRootHandler上去执行。
HandlerActionQueue 当mAttachInfo未赋值时(尚未执行 dispatchAttachedToWindow()),缓存当前无法执行的Runnable
1 2 3 4 5 6 7 8 9 10 11 12 13 14 15 16 17 18 19 20 21 22 23 24 25 26 27 28 29 30 31 32 33 34 35 36 37 38 39 40 41 42 43 44 45 46 47 48 49 50 51 public class HandlerActionQueue {private HandlerAction[] mActions;public void post (Runnable action) {0 );public void postDelayed (Runnable action, long delayMillis) {final HandlerAction handlerAction = new HandlerAction (action, delayMillis);synchronized (this ) {if (mActions == null ) {new HandlerAction [4 ];public void executeActions (Handler handler) {synchronized (this ) {final HandlerAction[] actions = mActions;for (int i = 0 , count = mCount; i < count; i++) {final HandlerAction handlerAction = actions[i];null ;0 ;private static class HandlerAction {final Runnable action;final long delay;public HandlerAction (Runnable action, long delay) {this .action = action;this .delay = delay;public boolean matches (Runnable otherAction) {return otherAction == null && action == null null && action.equals(otherAction);
当mAttachInfo尚未赋值时,就会缓存View.post()要执行的任务
1 2 3 4 5 6 7 8 9 10 void dispatchAttachedToWindow (AttachInfo info, int visibility) {if (mRunQueue != null ) {null ;
在dispatchAttachedToWindow()执行了关键的两步:
赋值mAttachInfo
执行View.post()未执行的任务
总结
View.post()内部自动分为两种情况:
尚未执行dispatchAttachedToWindow():尚未赋值mAttachInfo,将需要执行的任务缓存到HandlerActionQueue,等待dispatchAttachedToWindow()之后通过ViewRootHandler执行。
已执行dispatchAttachedToWindow():已赋值mAttachInfo,直接调用ViewRootHandler执行对应任务即可。
ViewRootHandler绑定的Looper为MainLooper,所以通过View.post()的操作都会在主线程执行。
dispatchAttachedToWindow()是在ViewRootImpl.performTraversals()中执行的。
为什么可以获取宽高 前面有讲过在onCreate()调用View.post()可以获取View的宽和高,下面简单的分析原因。
1 2 3 4 5 6 7 8 9 10 11 12 13 14 15 16 17 18 19 20 21 22 23 24 25 26 27 28 29 30 31 32 33 34 35 36 private void performTraversals () {0 );void doTraversal () {if (mTraversalScheduled) {false ;final class TraversalRunnable implements Runnable {@Override public void run () {final TraversalRunnable mTraversalRunnable = new TraversalRunnable ();void scheduleTraversals () {if (!mTraversalScheduled) {true ;null );
这边转到Choreographer
1 2 3 4 5 6 7 8 9 10 11 12 13 14 15 16 17 18 19 20 21 22 23 24 25 26 27 28 29 30 31 32 33 34 35 36 37 38 39 40 41 42 43 44 45 46 47 48 49 50 public static Choreographer getInstance () {return sThreadInstance.get();private static final ThreadLocal<Choreographer> sThreadInstance =new ThreadLocal <Choreographer>() {@Override protected Choreographer initialValue () {Looper looper = Looper.myLooper();if (looper == null ) {throw new IllegalStateException ("The current thread must have a looper!" );Choreographer choreographer = new Choreographer (looper, VSYNC_SOURCE_APP);if (looper == Looper.getMainLooper()) {return choreographer;private Choreographer (Looper looper, int vsyncSource) {new FrameHandler (looper);private void postCallbackDelayedInternal (int callbackType, Object action, Object token, long delayMillis) {if (DEBUG_FRAMES) {"PostCallback: type=" + callbackType", action=" + action + ", token=" + token", delayMillis=" + delayMillis);synchronized (mLock) {final long now = SystemClock.uptimeMillis();final long dueTime = now + delayMillis;if (dueTime <= now) {else {Message msg = mHandler.obtainMessage(MSG_DO_SCHEDULE_CALLBACK, action);true );
根据上述源码分析可得结论:TraversalRunnable也会运行到FrameHandler上。
Handler的MessageQueue是按顺序执行的,因此需要等performTraversals()执行完毕后,才可以执行后续任务(例如HandlerActionQueue中缓存的任务)。
补充:View.post()与Handler.post()核心差异
Handler.post()直接向目标Looper入队,调用时就需要明确线程归属。View.post()在View未attach时会先缓存到HandlerActionQueue,attach后再切到ViewRootHandler执行。因为dispatchAttachedToWindow()发生在performTraversals()链路中,所以onCreate()里调用View.post()常常能拿到宽高。
补充:主线程消息分发观察建议
Looper.setMessageLogging(Printer)适合定位“哪类消息执行过久”,可用于卡顿初筛。线上监控不建议长期打印完整日志,建议抽样、限频并做阈值上报,避免日志本身放大主线程负担。
结合what/callback/target维度统计,通常比只看单次耗时更容易定位高频慢消息来源。
补充:版本差异与写法建议
Android R(API 30)起,无参Handler()被标记为@Deprecated,建议显式传入Looper。
需要异步消息通道时,可使用Handler.createAsync(...)或Message.setAsynchronous(true)。
在新项目里,Handler仍适合与系统消息循环深度交互的场景;纯业务异步任务可结合协程/线程池提升可维护性。