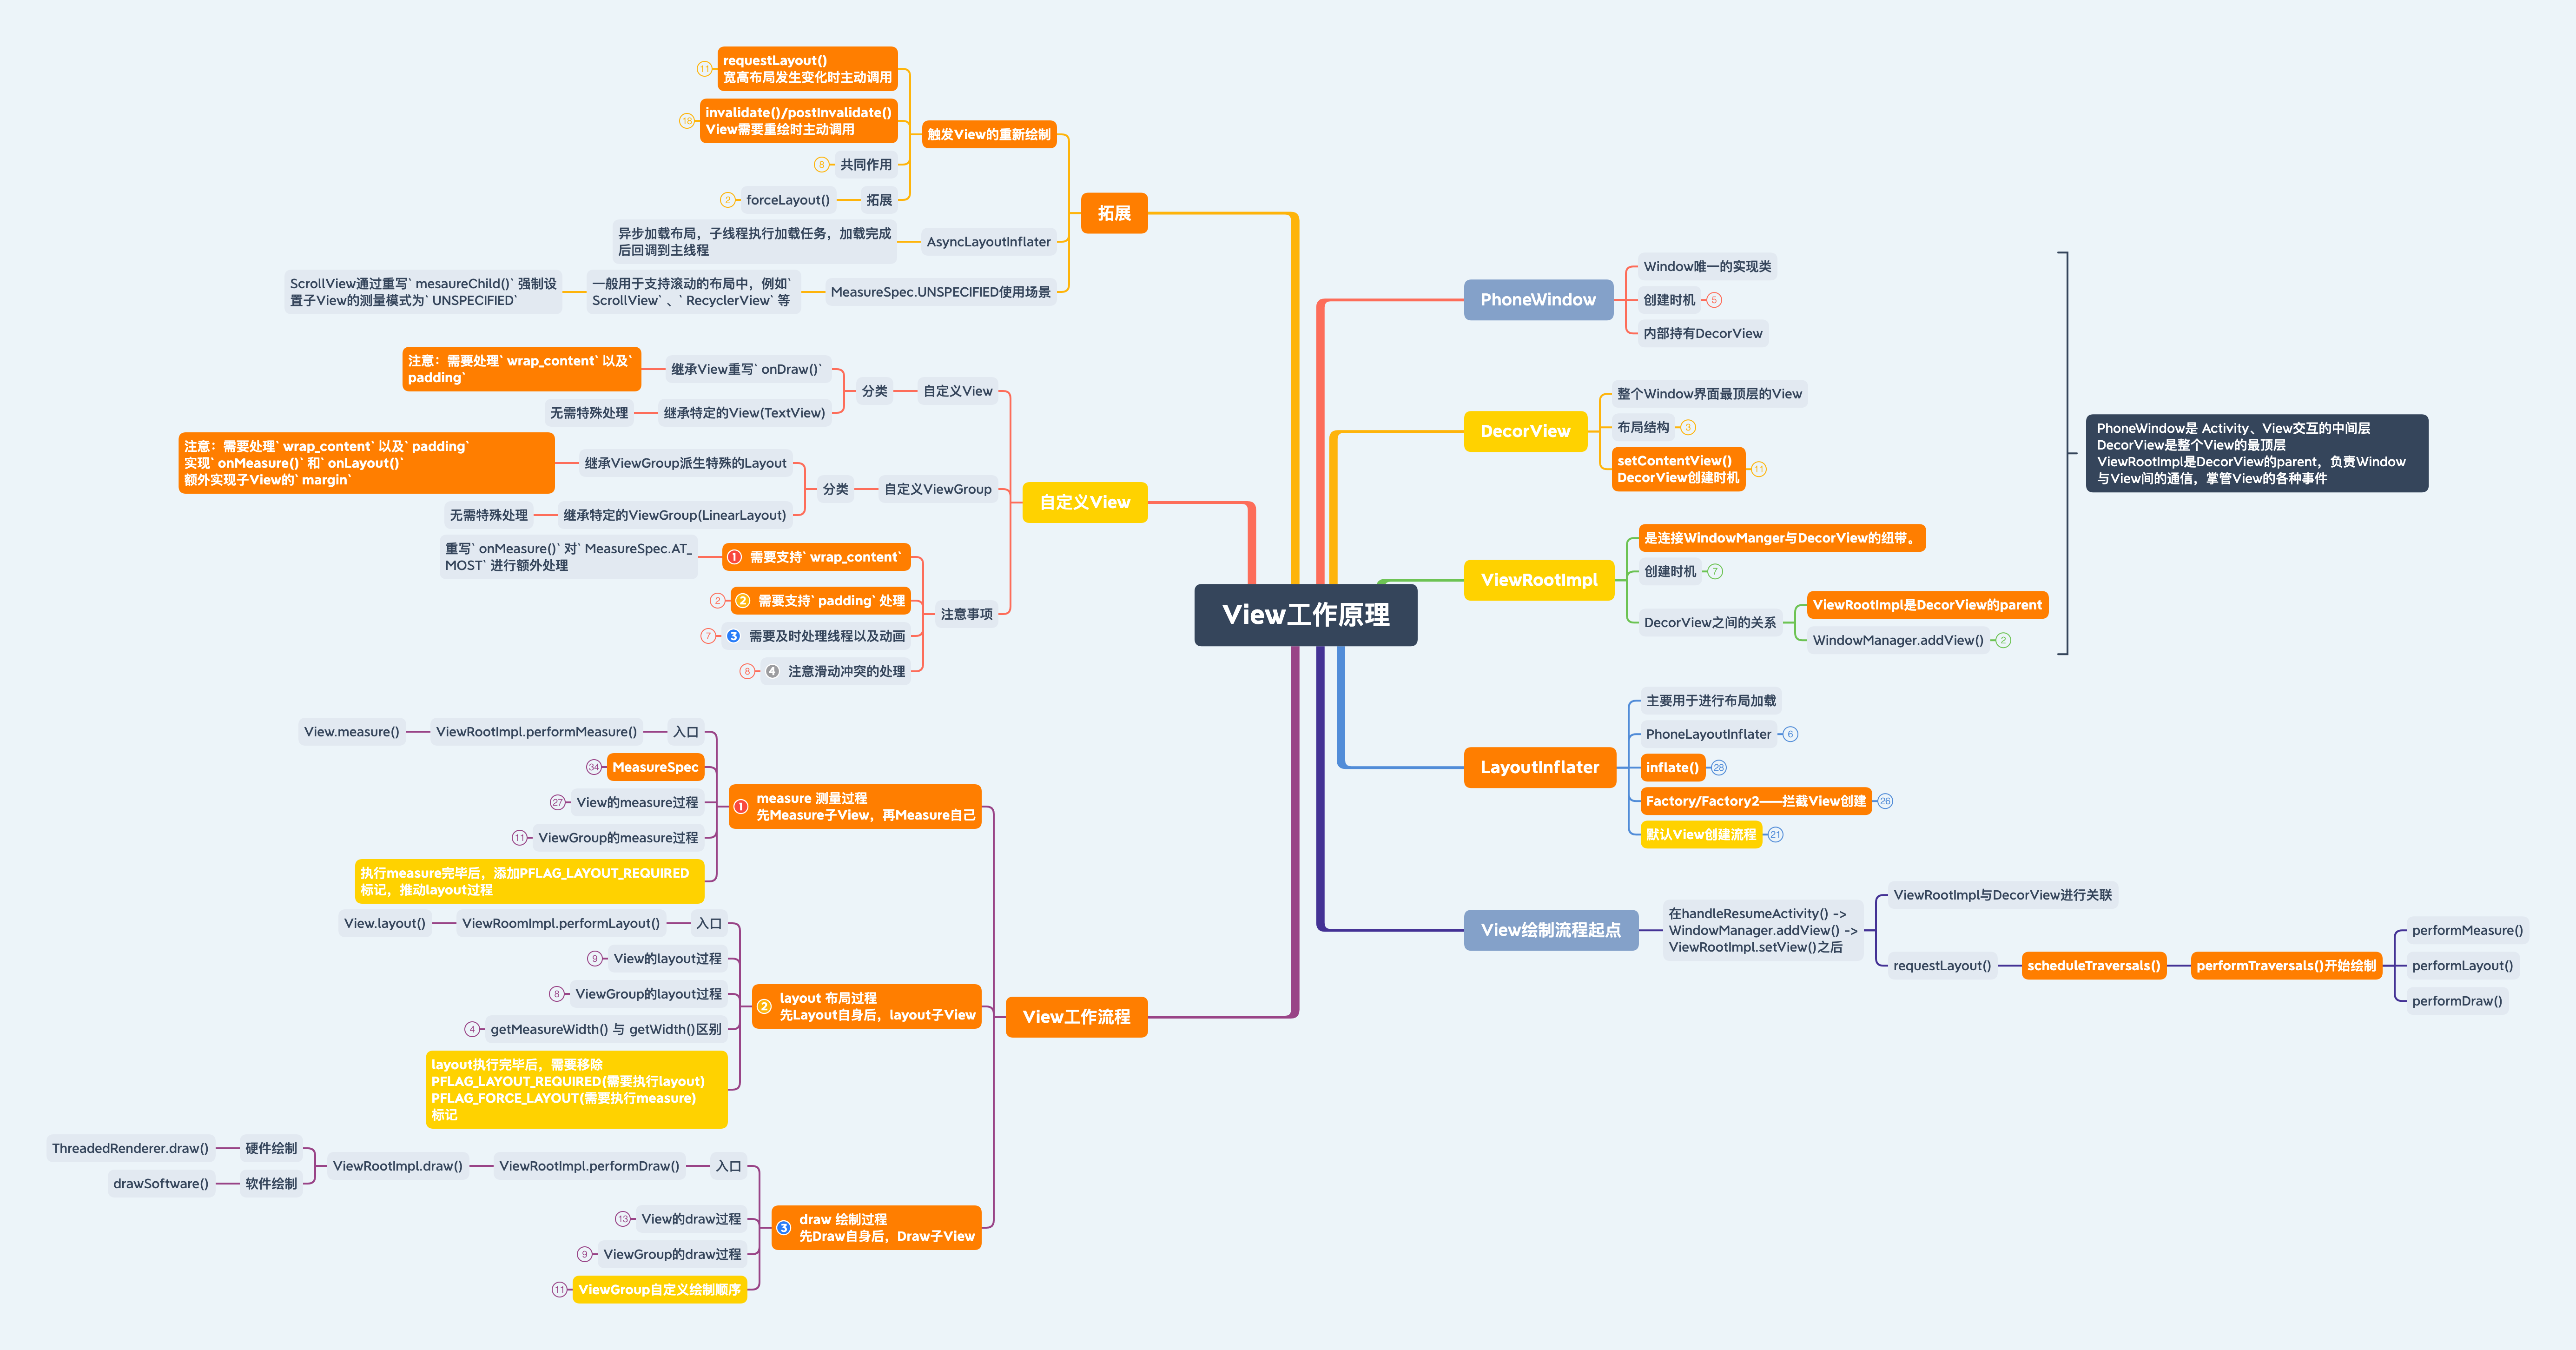
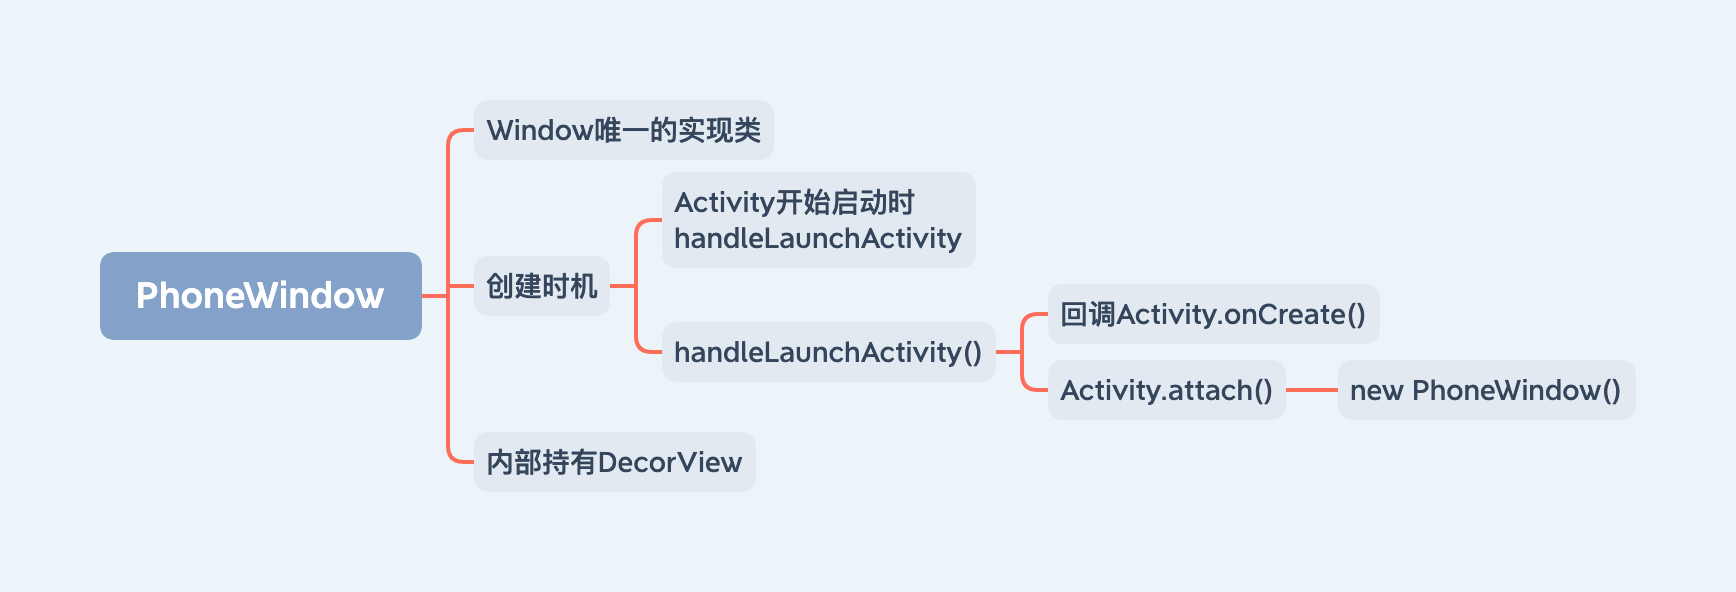
PhoneWindow
Window是一个抽象类,提供了各种窗口操作方法。每个Activity都会持有一个Window。
PhoneWindow是Window唯一实现类,在Activity被创建时Activity.attach()进行初始化
1 2 3 4 5 6 7 8 9 10 11 12 13 14 15 16 17 public Activity handleLaunchActivity (ActivityClientRecord r, PendingTransactionActions pendingActions, Intent customIntent) {final Activity a = performLaunchActivity(r, customIntent);private Activity performLaunchActivity (ActivityClientRecord r, Intent customIntent) {Application app = r.packageInfo.makeApplication(false , mInstrumentation); this , getInstrumentation(), r.token,
1 2 3 4 5 6 7 8 9 10 11 12 13 14 15 16 final void attach (Context context, ActivityThread aThread, Instrumentation instr, IBinder token, int ident, Application application, Intent intent, ActivityInfo info, CharSequence title, Activity parent, String id, NonConfigurationInstances lastNonConfigurationInstances, Configuration config, String referrer, IVoiceInteractor voiceInteractor, Window window, ActivityConfigCallback activityConfigCallback) {new PhoneWindow (this , window, activityConfigCallback);this );this );
1 2 3 4 5 public class PhoneWindow extends Window implements MenuBuilder .Callback {private DecorView mDecor;
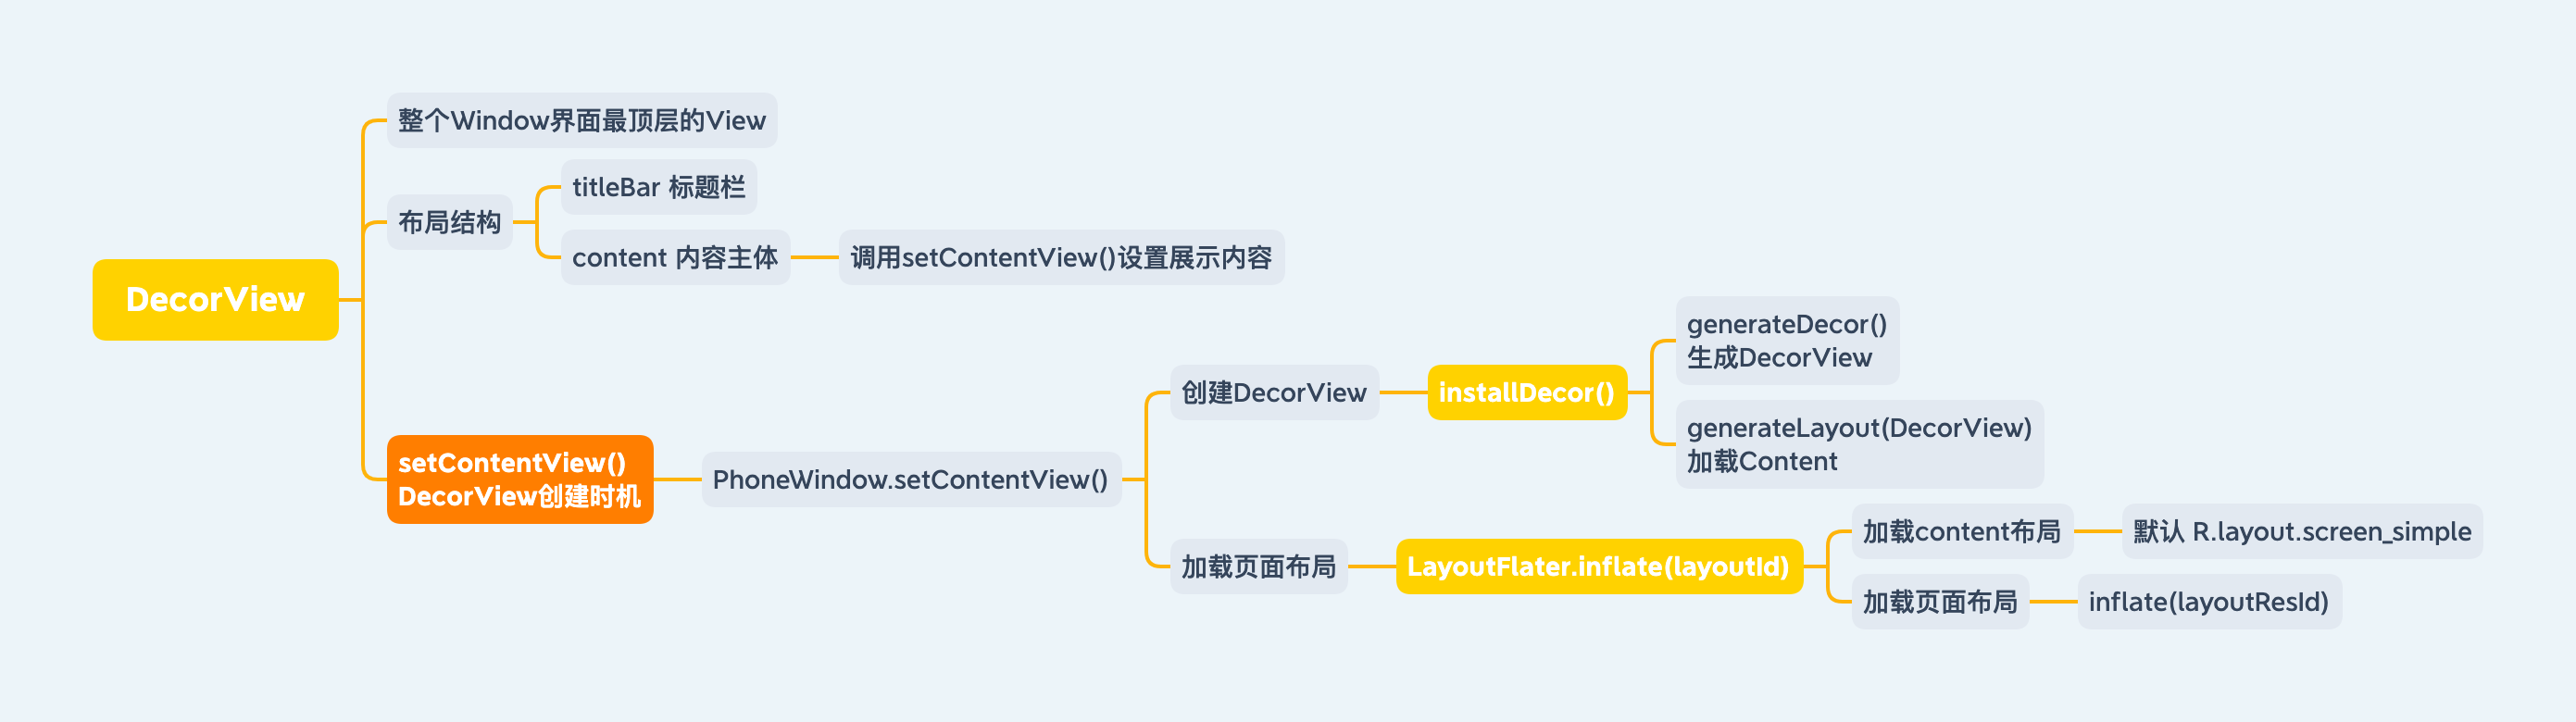
DecorView
DecorView是整个Window界面的最顶层View。 可以使用Android Studio自带的Layout Inspector查看页面层级
DecorView的布局结构 一般情况下DecorView会包含一个竖直方向的LinearLayout,该LinearLayout分为上下两个部分,上面是标题栏(titlebar),下面是内容栏(继承自FrameLayout 且id为content)。因此我们设置Activity的布局方法叫做setContentView(),因为他们都被加进了id为content的FrameLayout中。
我们可以利用ViewGroup content = findViewById(R.android.id.content)获取content。使用content.getChildAt(0)获取设置的Activity布局。
1 2 3 4 5 6 7 8 9 10 11 public <T extends View > T findViewById (@IdRes int id) {return getWindow().findViewById(id);public <T extends View > T findViewById (@IdRes int id) {return getDecorView().findViewById(id);
所有的View都会从DecorView中开始检索,所以View层的事件都会先经过DecorView,再传递到我们定义的View上 。
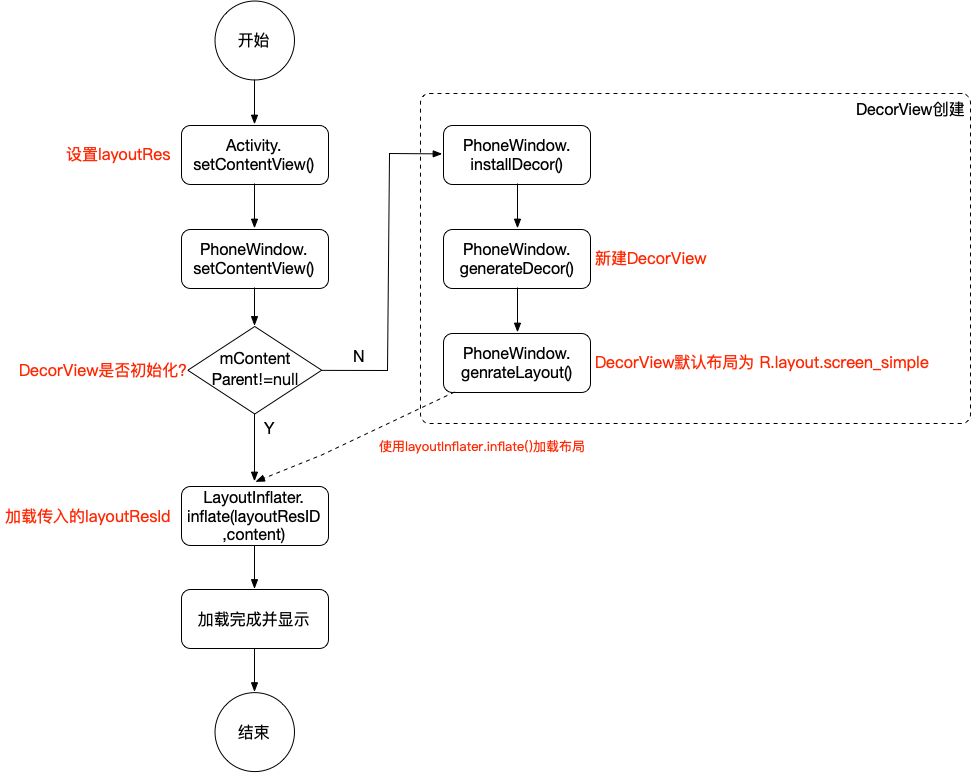
setContentView()过程
通过setContentView()将需要加载的布局放到DecorView中
1 2 3 4 5 public void setContentView (@LayoutRes int layoutResID) {
Activity.setContentView()调用PhoneWindow.setContentView()
1
2
3
4
5
6
7
8
9
10
11
12
13
14
15
16
17
18
19
20
21
22
23
24
25
26
public void setContentView (int layoutResID) {if (mContentParent == null ) {else if (!hasFeature(FEATURE_CONTENT_TRANSITIONS)) {if (hasFeature(FEATURE_CONTENT_TRANSITIONS)) {final Scene newScene = Scene.getSceneForLayout(mContentParent, layoutResID,else {final Callback cb = getCallback();if (cb != null && !isDestroyed()) {true ;
setContentView()主要执行以下两步:
installDecor()——创建DecorView
基础DecorView主要包含两部分,标题title_bar和内容content
1 2 3 4 5 6 7 8 9 10 11 12 13 14 15 16 17 18 19 20 21 22 23 24 25 26 27 28 29 30 31 32 33 34 35 36 37 38 39 40 41 42 43 44 45 46 47 48 49 50 51 52 53 54 55 56 57 58 59 60 61 62 63 64 65 66 67 68 69 70 71 72 73 private void installDecor () {false ;if (mDecor == null ) {1 );else {this );if (mContentParent == null ) {protected DecorView generateDecor (int featureId) {if (mUseDecorContext) {Context applicationContext = getContext().getApplicationContext();if (applicationContext == null ) {else {new DecorContext (applicationContext, getContext());if (mTheme != -1 ) {else {return new DecorView (context, featureId, this , getAttributes());protected ViewGroup generateLayout (DecorView decor) {int layoutResource;int features = getLocalFeatures();if ((features & (1 << FEATURE_SWIPE_TO_DISMISS)) != 0 ) {true ); else {ViewGroup contentParent = (ViewGroup)findViewById(ID_ANDROID_CONTENT);return contentParent;void onResourcesLoaded (LayoutInflater inflater, int layoutResource) {final View root = inflater.inflate(layoutResource, null );if (mDecorCaptionView != null ) {if (mDecorCaptionView.getParent() == null ) {new ViewGroup .LayoutParams(MATCH_PARENT, MATCH_PARENT));new ViewGroup .MarginLayoutParams(MATCH_PARENT, MATCH_PARENT));else {0 , new ViewGroup .LayoutParams(MATCH_PARENT, MATCH_PARENT));
installDecor()主要负责创建DecorView并执行generateLayout()生成contentParent将自定义的布局放入其中。
inflate(layoutResID, mContentParent)——加载布局 inflate()主要将layoutResID加载成具体的View,并加入到mContentParent中,进行显示。
ViewRootImpl
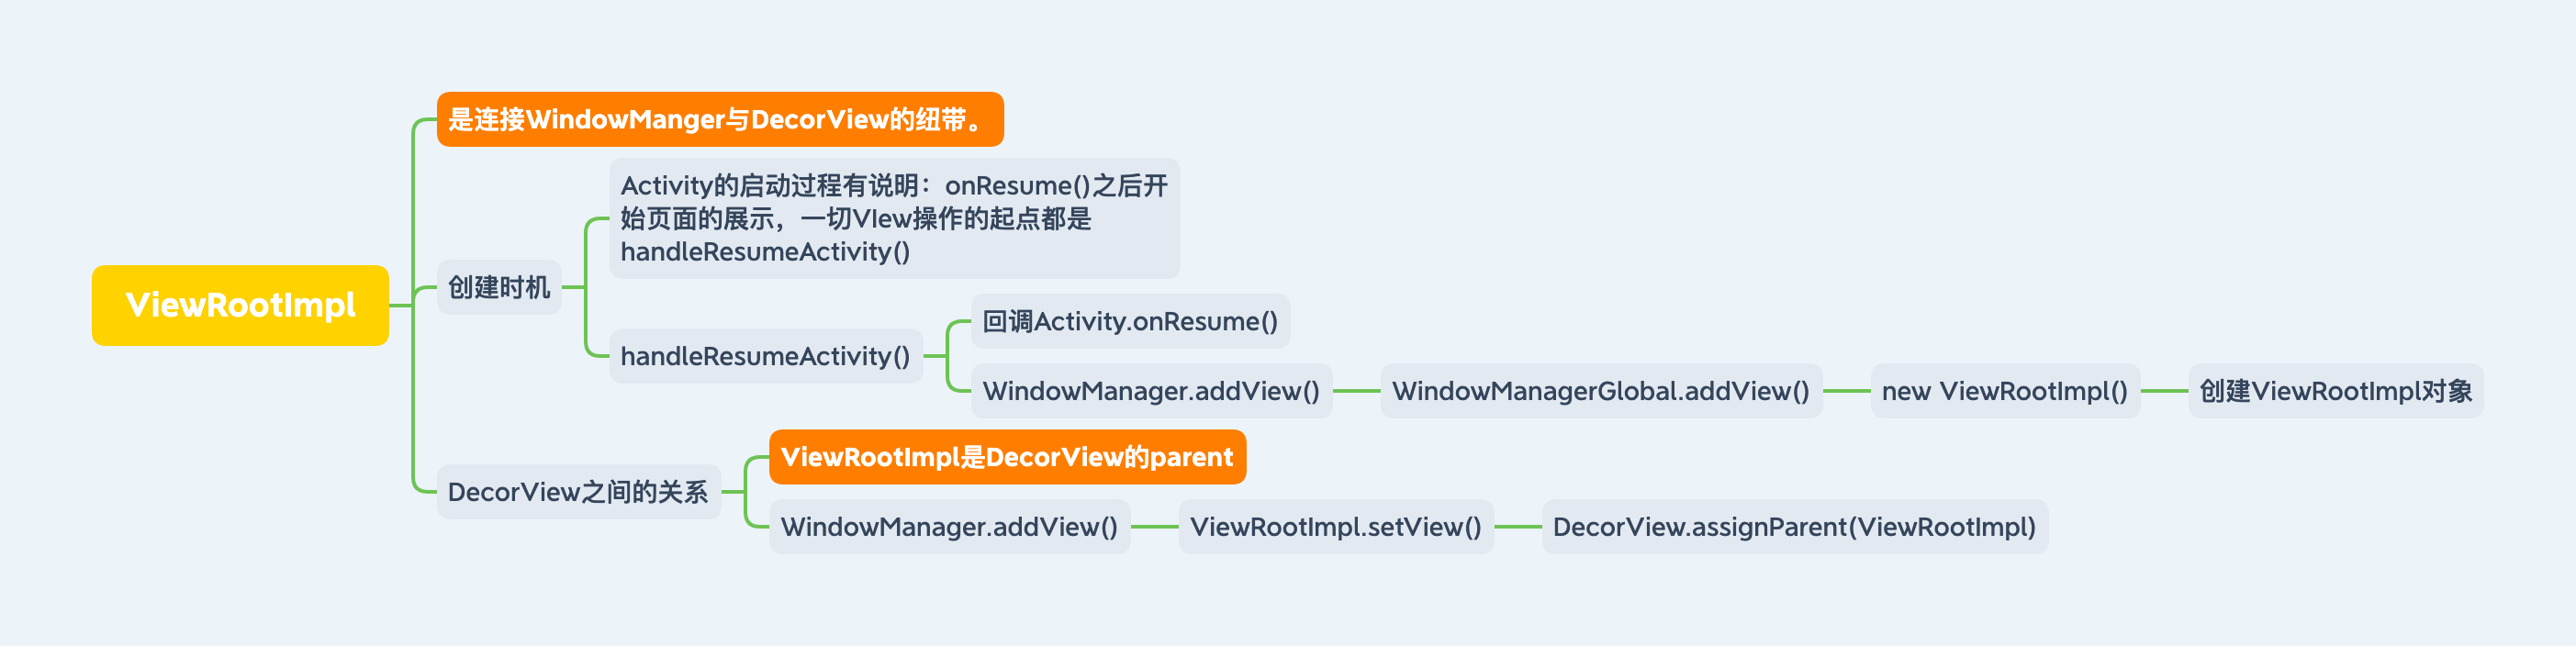
ViewRoot对应于ViewRootImpl类,是连接WindowManager和DecorView的纽带,View的三大流程均需通过ViewRoot完成。
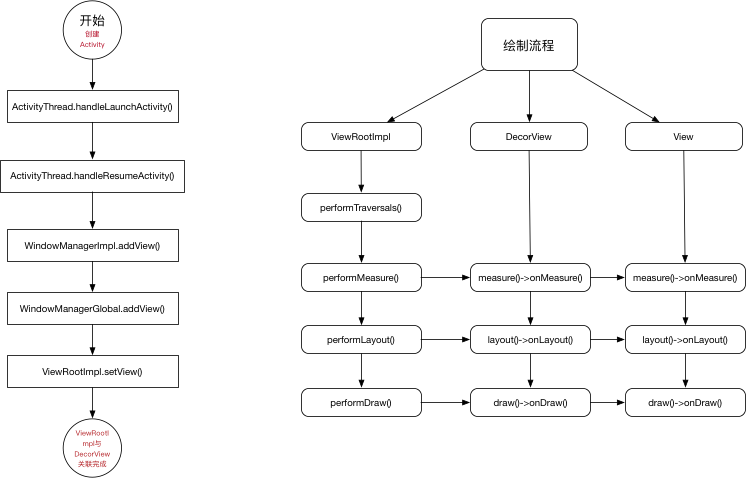
ViewRootImpl创建时机 当Activity创建时,最终是调用到ActivityThread的handleLaunchActivity来创建Activity。
1 2 3 4 5 6 7 8 9 10 11 12 13 14 15 16 private void handleLaunchActivity (ActivityClientRecord r, Intent customIntent, String reason) {Activity a = performLaunchActivity(r, customIntent);if (a != null ) {new Configuration (mConfiguration);Bundle oldState = r.state;false , r.isForward,
上述方法后续调用到了handleResumeActivity(),在这个方法中调用到了WindowManager.addView()将View传递至WindowManager
1 2 3 4 5 6 7 8 9 10 11 12 13 14 15 16 17 18 19 20 21 22 23 24 25 26 27 28 29 30 31 32 33 34 35 36 37 38 39 40 41 42 43 44 45 46 47 48 49 50 51 52 53 54 55 56 57 58 59 60 61 62 63 64 65 66 67 68 69 70 71 72 73 74 75 final void handleResumeActivity (IBinder token, boolean clearHide, boolean isForward, boolean reallyResume, int seq, String reason) {ActivityClientRecord r = mActivities.get(token);if (!checkAndUpdateLifecycleSeq(seq, r, "resumeActivity" )) {return ;true ;if (r!=null ){final Activity a = r.activity;View decor = r.window.getDecorView();ViewManager wm = a.getWindowManager();LayoutParams l = r.window.getAttributes();if (r.mPreserveWindow) {true ;false ;ViewRootImpl impl = decor.getViewRootImpl();if (impl != null ) {if (a.mVisibleFromClient) {if (!a.mWindowAdded) {true ;else {else if (!willBeVisible) {if (localLOGV) Slog.v("Launch " + r + " mStartedActivity set" );true ;if (!r.activity.mFinished && willBeVisible && r.activity.mDecor != null && !r.hideForNow) {if (r.activity.mVisibleFromClient) {void makeVisible () {if (!mWindowAdded) {ViewManager wm = getWindowManager();true ;
后续调用到了wm.addView()。将对应的DecorView传递进去。
1 2 3 4 5 6 7 8 9 10 11 12 13 14 15 16 17 18 19 20 21 22 23 24 25 26 27 28 29 30 31 32 33 34 35 36 37 38 39 40 41 42 public final class WindowManagerImpl implements WindowManager {private final WindowManagerGlobal mGlobal = WindowManagerGlobal.getInstance();private final Window mParentWindow;@Override public void addView (@NonNull View view, @NonNull ViewGroup.LayoutParams params) {public void addView (View view, ViewGroup.LayoutParams params, Display display, Window parentWindow) {View panelParentView = null ;synchronized (mLock) {new ViewRootImpl (view.getContext(), display);try {catch (RuntimeException e) {if (index >= 0 ) {true );throw e;
经过ActivityThread.handleResumeActivity() -> WindowManagerGlobal.addView() 创建了ViewRootImpl对象
补充理解:
setContentView()只是把业务布局填充进DecorView的content区域,此时 View 树已经“组装出来”,但还没有真正接入窗口绘制链路。真正把界面接到 Window 上的是WindowManager.addView() -> WindowManagerGlobal.addView() -> ViewRootImpl.setView()这一段。
也正是从ViewRootImpl.setView()开始,后续通过requestLayout() -> scheduleTraversals() -> performTraversals()才触发首轮measure/layout/draw。
所以可以把它理解成两步:先创建 View 树,再把 View 树挂到窗口并启动绘制。
与DecorView的关系 上述流程走完后,就把DecorView加载到了Window中。这个流程中将ViewRootImpl对象与DecorView进行了关联 。
1 2 3 4 5 6 7 8 9 10 11 12 13 14 15 16 public void setView (View view, WindowManager.LayoutParams attrs, View panelParentView) {synchronized (this ){this );
执行到ViewRootImpl.setView()设置DecorView,assignParent(root)。表示ViewRootImpl是DecorView的parent 。
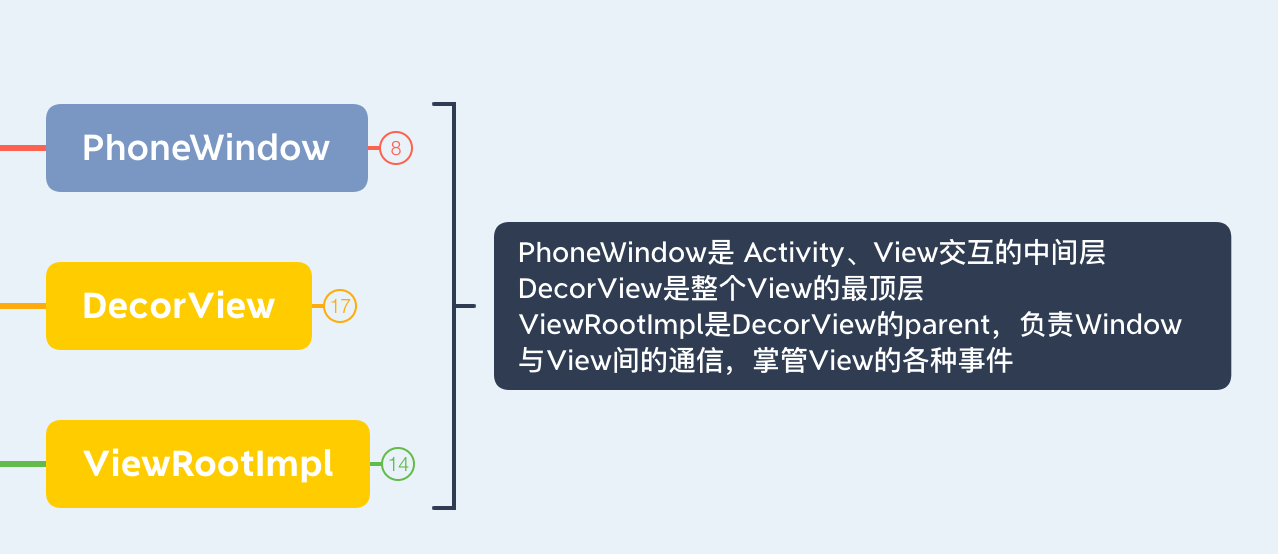
Activity、Window(PhoneWindow)、View(DecorView)、ViewRootImpl之间的关系?
PhoneWindow是Window的唯一子类,在Activity.attach()构建的实例,是Activity与View交互的中间层
DecorView是所有View的最顶层,ViewRootImpl是DecorView的parent,负责WindowManagerService与DecorView的通信。掌管View的各种事件,例如刷新、点击事件等
LayoutInflater
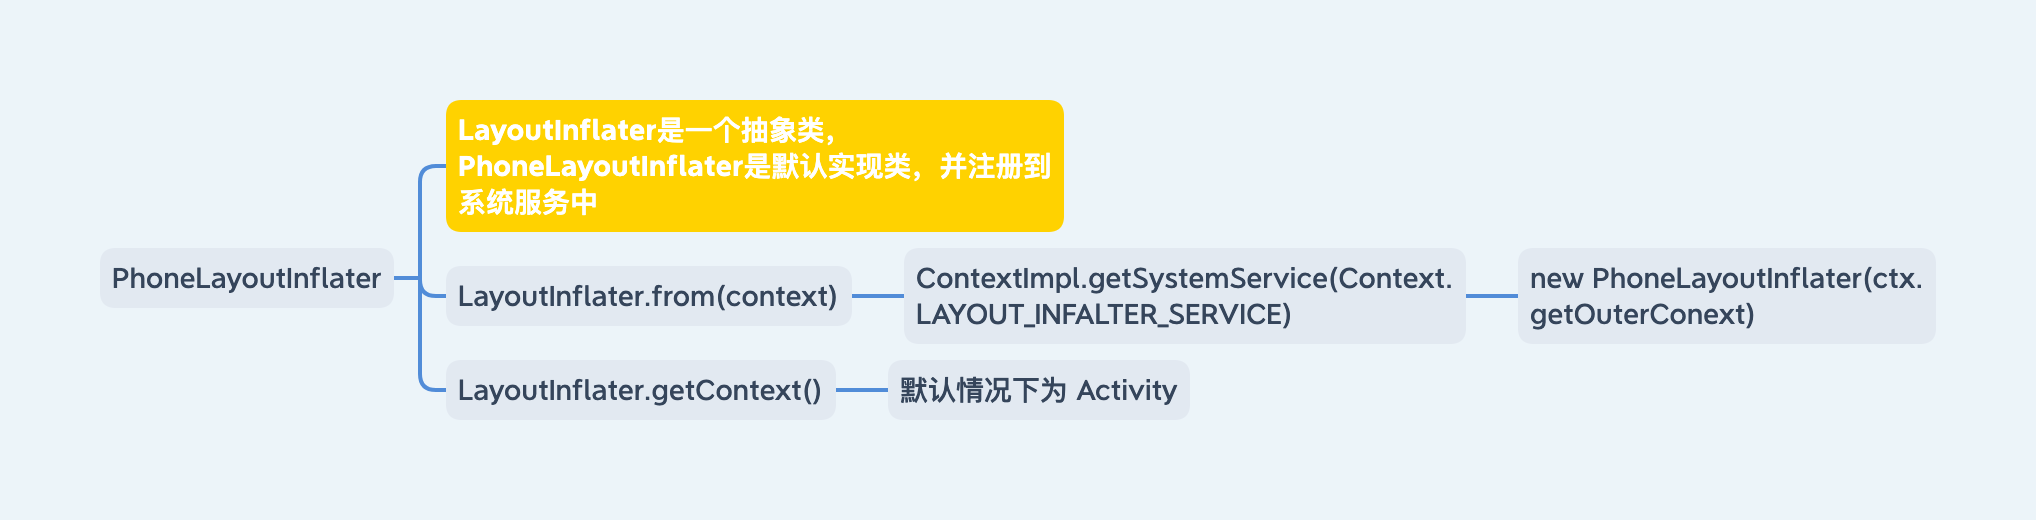
LayoutInflater是一个抽象类,具体实现类为PhoneLayoutInflater。主要用于进行布局加载。
PhoneLayoutInflater
通过系统注册服务可以得到LayoutInflater的实现类PhoneLayoutInflater
1 2 3 4 5 6 7 8 9 10 11 12 13 14 15 16 17 18 19 20 21 22 23 24 25 26 27 28 29 30 31 public static LayoutInflater from (Context context) {LayoutInflater LayoutInflater = if (LayoutInflater == null ) {throw new AssertionError ("LayoutInflater not found." );return LayoutInflater;@Override public Object getSystemService (String name) {if (LAYOUT_INFLATER_SERVICE.equals(name)) {if (mInflater == null ) {this );return mInflater;return getBaseContext().getSystemService(name);new CachedServiceFetcher <LayoutInflater>() {@Override public LayoutInflater createService (ContextImpl ctx) {return new PhoneLayoutInflater (ctx.getOuterContext());
PhoneLayoutInflater设置的context为ContextImpl.getOuterContext()
1 2 3 4 5 6 7 8 9 10 11 12 13 14 final void setOuterContext (Context context) {final Context getOuterContext () {return mOuterContext;private Activity performLaunchActivity (ActivityClientRecord r, Intent customIntent) {
一般从Activity、View、Dialog,Fragment获取的layoutInflater.getContext()为Activity
无论是哪种方式获取LayoutInflater,都是通过ContextImpl.getSystemService()获取的。
inflate()-加载布局
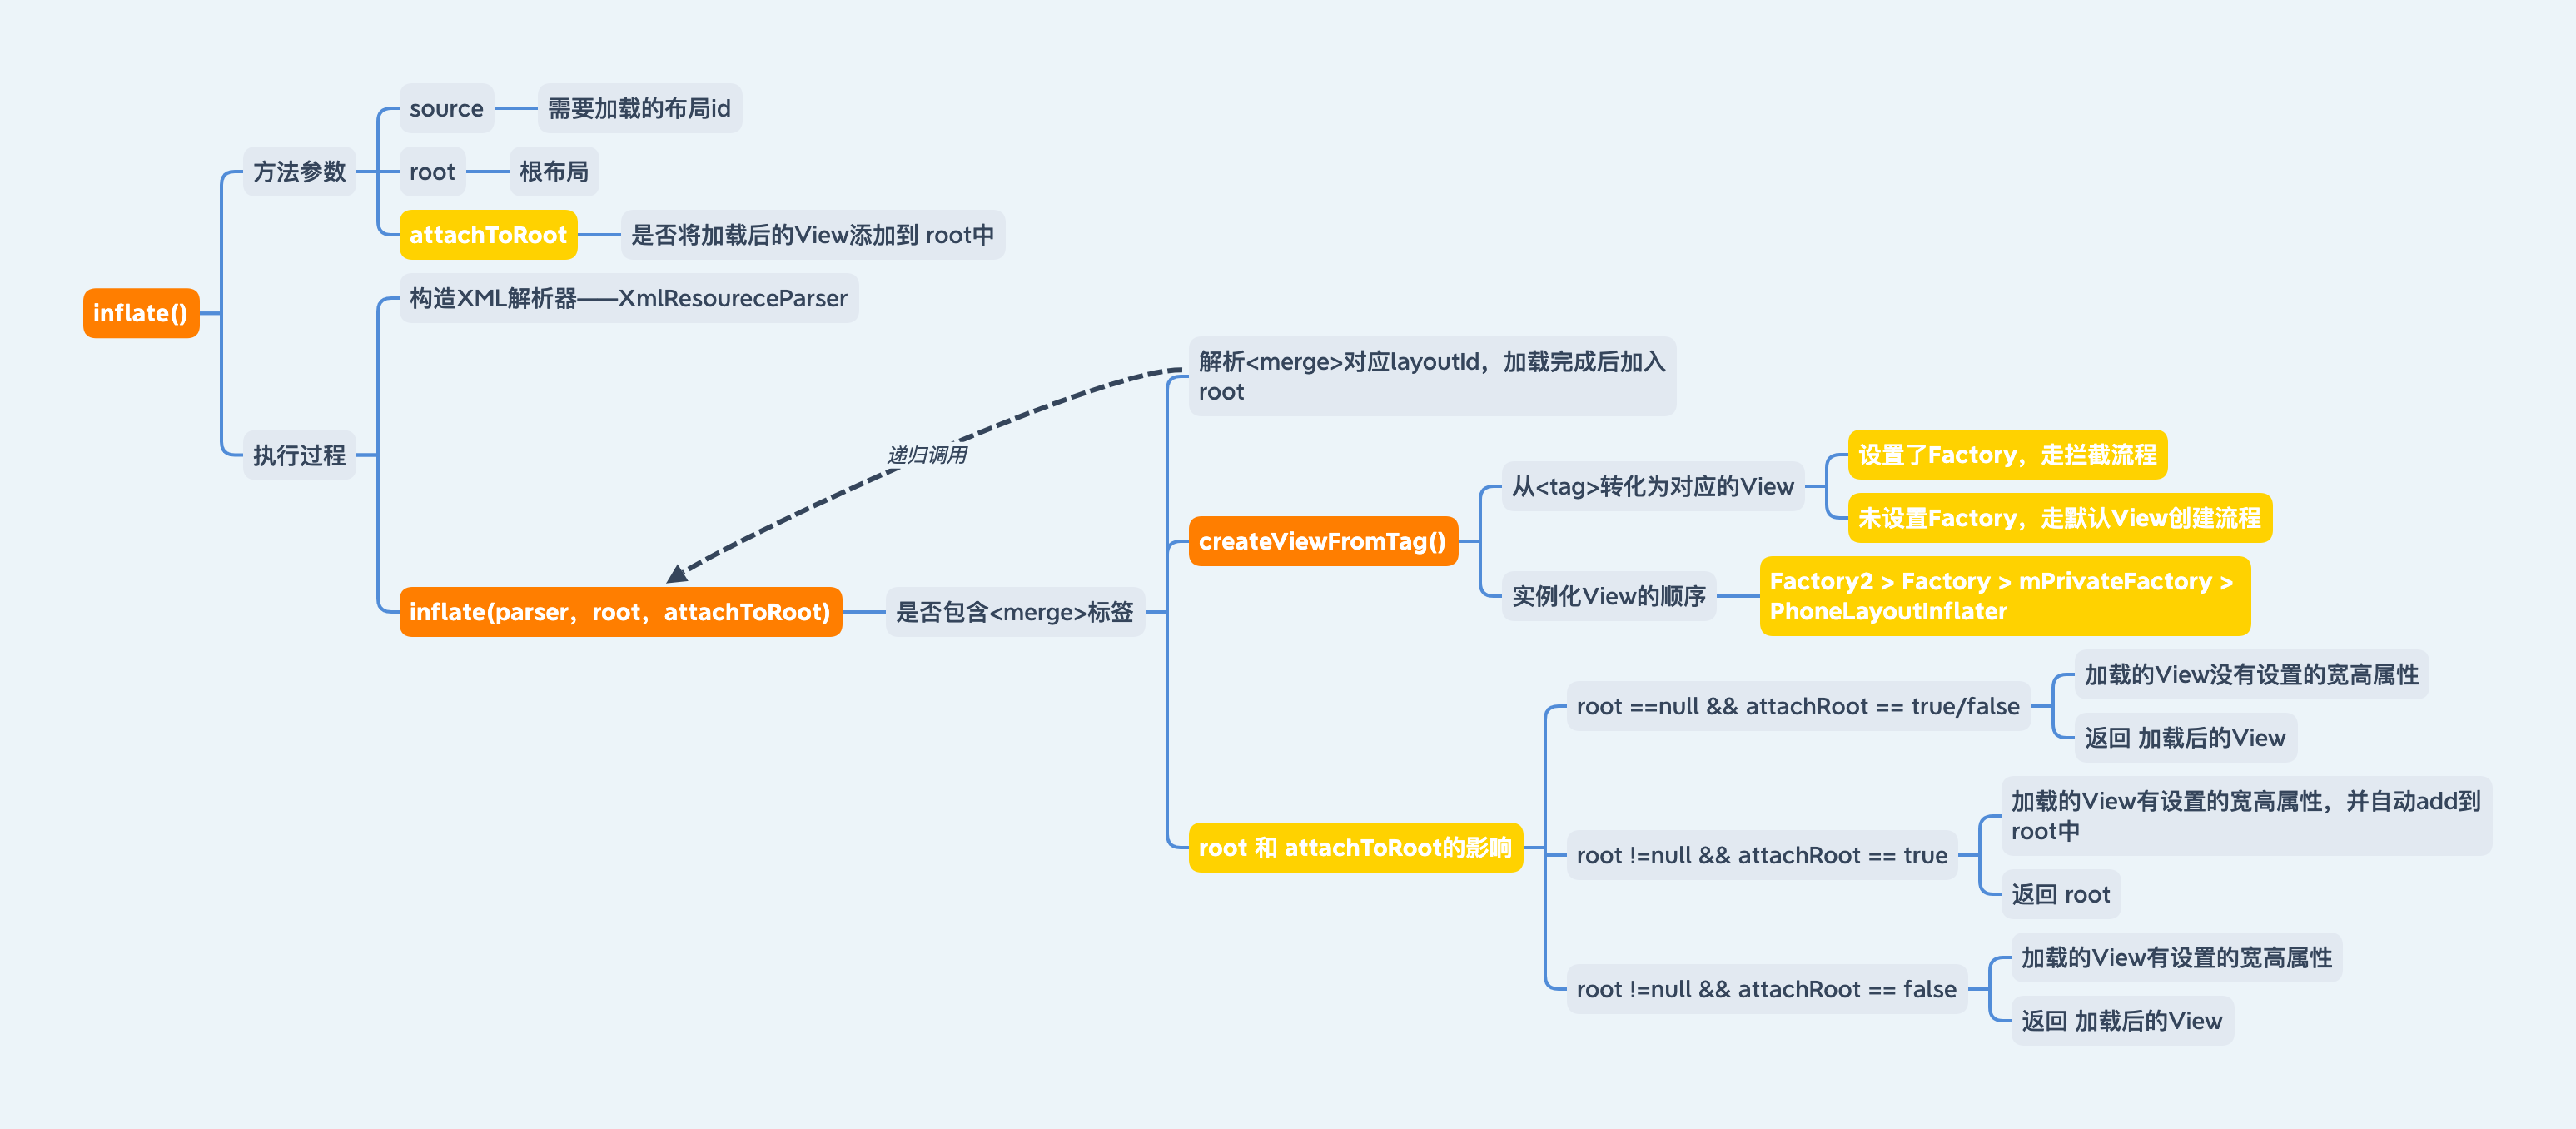
source:需要加载的layout id
root:根布局(为null则表示创建的是最顶层的布局)
*attachToRoot:是否添加到root中
1 2 3 4 5 6 7 8 9 10 11 12 13 14 15 16 17 18 19 20 21 22 23 24 25 26 27 28 29 30 31 32 33 34 35 36 37 38 39 40 41 42 43 44 45 46 47 48 49 50 51 52 53 54 55 56 57 58 59 60 61 62 63 64 65 66 67 68 69 70 71 72 73 74 75 76 77 78 79 80 81 82 83 84 85 86 87 88 89 90 91 92 93 94 95 96 97 98 99 100 101 102 103 104 105 106 107 108 109 110 111 112 113 114 115 116 117 118 119 120 121 122 123 124 125 126 127 128 129 130 131 132 133 134 135 136 137 138 139 140 141 142 143 144 145 146 147 148 149 150 151 152 153 154 public View inflate (@LayoutRes int resource, @Nullable ViewGroup root) {return inflate(resource, root, root != null );public View inflate (@LayoutRes int resource, @Nullable ViewGroup root, boolean attachToRoot) {final Resources res = getContext().getResources();final XmlResourceParser parser = res.getLayout(resource);try {return inflate(parser, root, attachToRoot);finally {public View inflate (XmlPullParser parser, @Nullable ViewGroup root, boolean attachToRoot) {synchronized (mConstructorArgs) {"inflate" );final Context inflaterContext = mContext;final AttributeSet attrs = Xml.asAttributeSet(parser);Context lastContext = (Context) mConstructorArgs[0 ];0 ] = inflaterContext;View result = root;try {int type;while ((type = parser.next()) != XmlPullParser.START_TAG &&if (type != XmlPullParser.START_TAG) {throw new InflateException (parser.getPositionDescription()": No start tag found!" );final String name = parser.getName();if (TAG_MERGE.equals(name)) {if (root == null || !attachToRoot) {throw new InflateException ("<merge /> can be used only with a valid " "ViewGroup root and attachToRoot=true" );false );else {final View temp = createViewFromTag(root, name, inflaterContext, attrs);LayoutParams params = null ;if (root != null ) {if (!attachToRoot) {true );if (root != null && attachToRoot) {if (root == null || !attachToRoot) {catch (XmlPullParserException e) {final InflateException ie = new InflateException (e.getMessage(), e);throw ie;catch (Exception e) {final InflateException ie = new InflateException (parser.getPositionDescription()": " + e.getMessage(), e);throw ie;finally {0 ] = lastContext;1 ] = null ;return result;void rInflate (XmlPullParser parser, View parent, Context context, AttributeSet attrs, boolean finishInflate) throws XmlPullParserException, IOException {final int depth = parser.getDepth();int type;boolean pendingRequestFocus = false ;while (((type = parser.next()) != XmlPullParser.END_TAG ||if (type != XmlPullParser.START_TAG) {continue ;final String name = parser.getName();if (TAG_REQUEST_FOCUS.equals(name)) {true ;else if (TAG_TAG.equals(name)) {else if (TAG_INCLUDE.equals(name)) {if (parser.getDepth() == 0 ) {throw new InflateException ("<include /> cannot be the root element" );else if (TAG_MERGE.equals(name)) {throw new InflateException ("<merge /> must be the root element" );else {final View view = createViewFromTag(parent, name, context, attrs);final ViewGroup viewGroup = (ViewGroup) parent;final ViewGroup.LayoutParams params = viewGroup.generateLayoutParams(attrs);true );if (pendingRequestFocus) {if (finishInflate) {
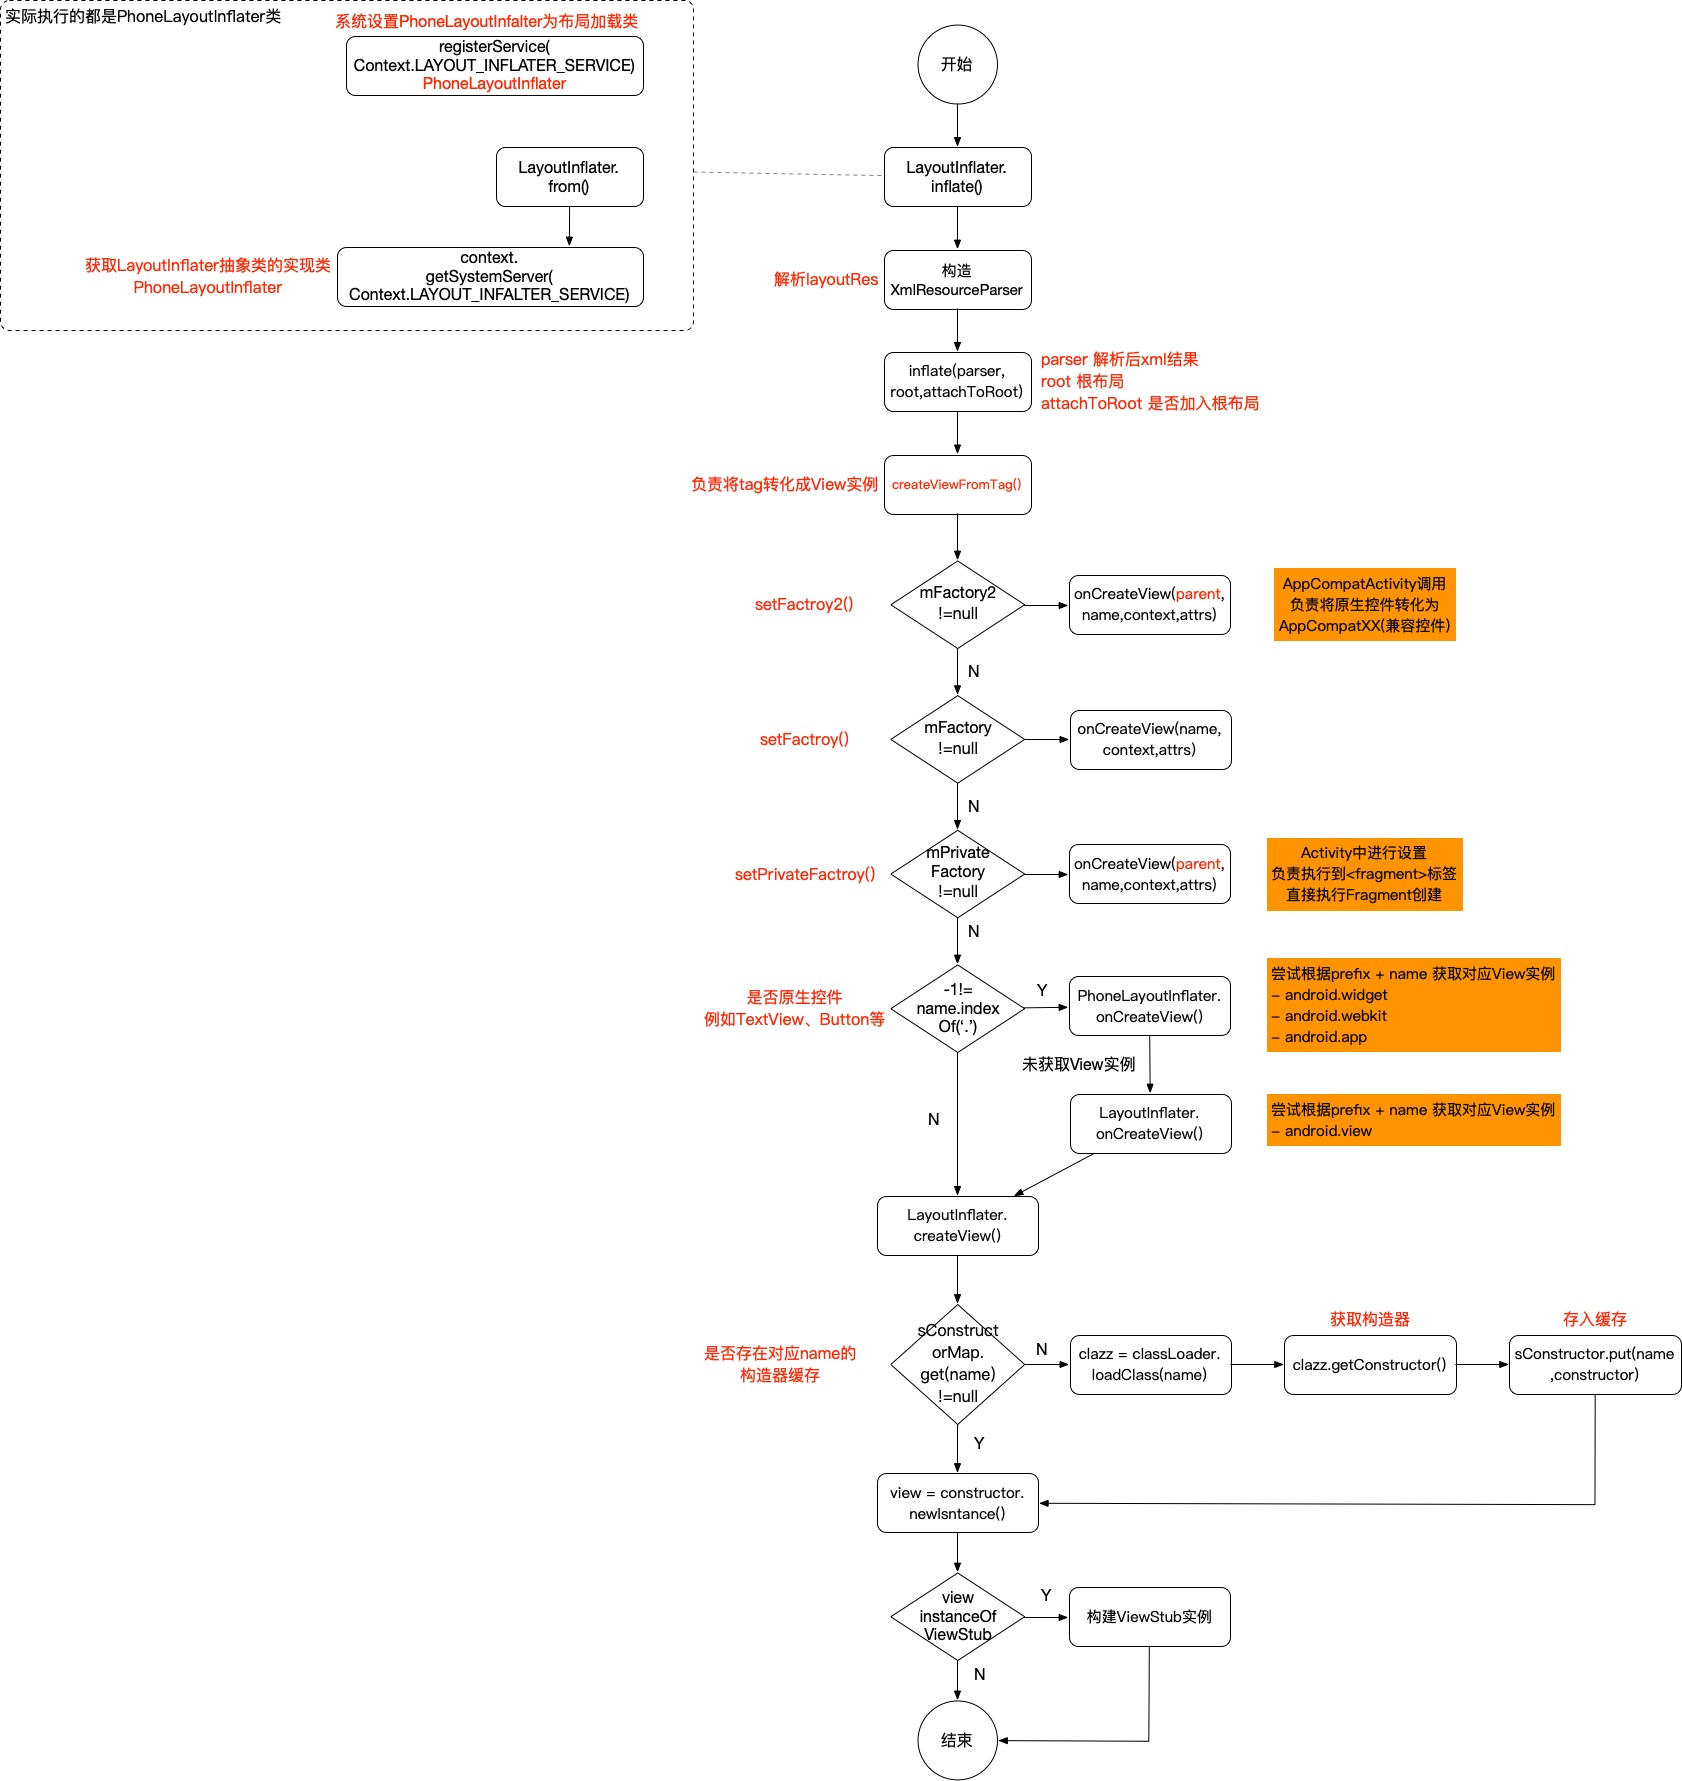
layoutInflater.inflate()主要是调用createViewFromTag()从xml生成view的。
* createViewFromTag()
主要负责将<tag>创建成View对象
1 2 3 4 5 6 7 8 9 10 11 12 13 14 15 16 17 18 19 20 21 22 23 24 25 26 27 28 29 30 31 32 33 34 35 36 37 38 39 40 41 42 43 44 45 46 47 48 49 50 51 52 53 54 55 56 57 58 59 60 61 createViewFromTag (View parent, String name, Context context, AttributeSet attrs, boolean ignoreThemeAttr) {if (name.equals("view" )) {null , "class" );if (!ignoreThemeAttr) {final TypedArray ta = context.obtainStyledAttributes(attrs, ATTRS_THEME);final int themeResId = ta.getResourceId(0 , 0 );if (themeResId != 0 ) {new ContextThemeWrapper (context, themeResId);if (name.equals(TAG_1995)) {return new BlinkLayout (context, attrs);try {if (mFactory2 != null ) {else if (mFactory != null ) {else {null ;if (view == null && mPrivateFactory != null ) {if (view == null ) {final Object lastContext = mConstructorArgs[0 ];0 ] = context;try {if (-1 == name.indexOf('.' )) {else {null , attrs);finally {0 ] = lastContext;return view;
createViewFromTag()主要做了以下几步:
如果为<view>标签,读取class属性做为类名
1 <view class ="LinearLayout" /> 等价于<LinearLayout > </LinearLayout >
应用ContextThemeWrapper为View设置主题Theme
使用Factory/Factory2/mPrivateFactory实例化View,相当于拦截
实例化View的优先顺序为Factory2 > Factory > mPrivateFactory > PhoneLayoutInflater
未设置以上factory,执行View的默认创建流程
主要通过PhoneLayoutInflater执行
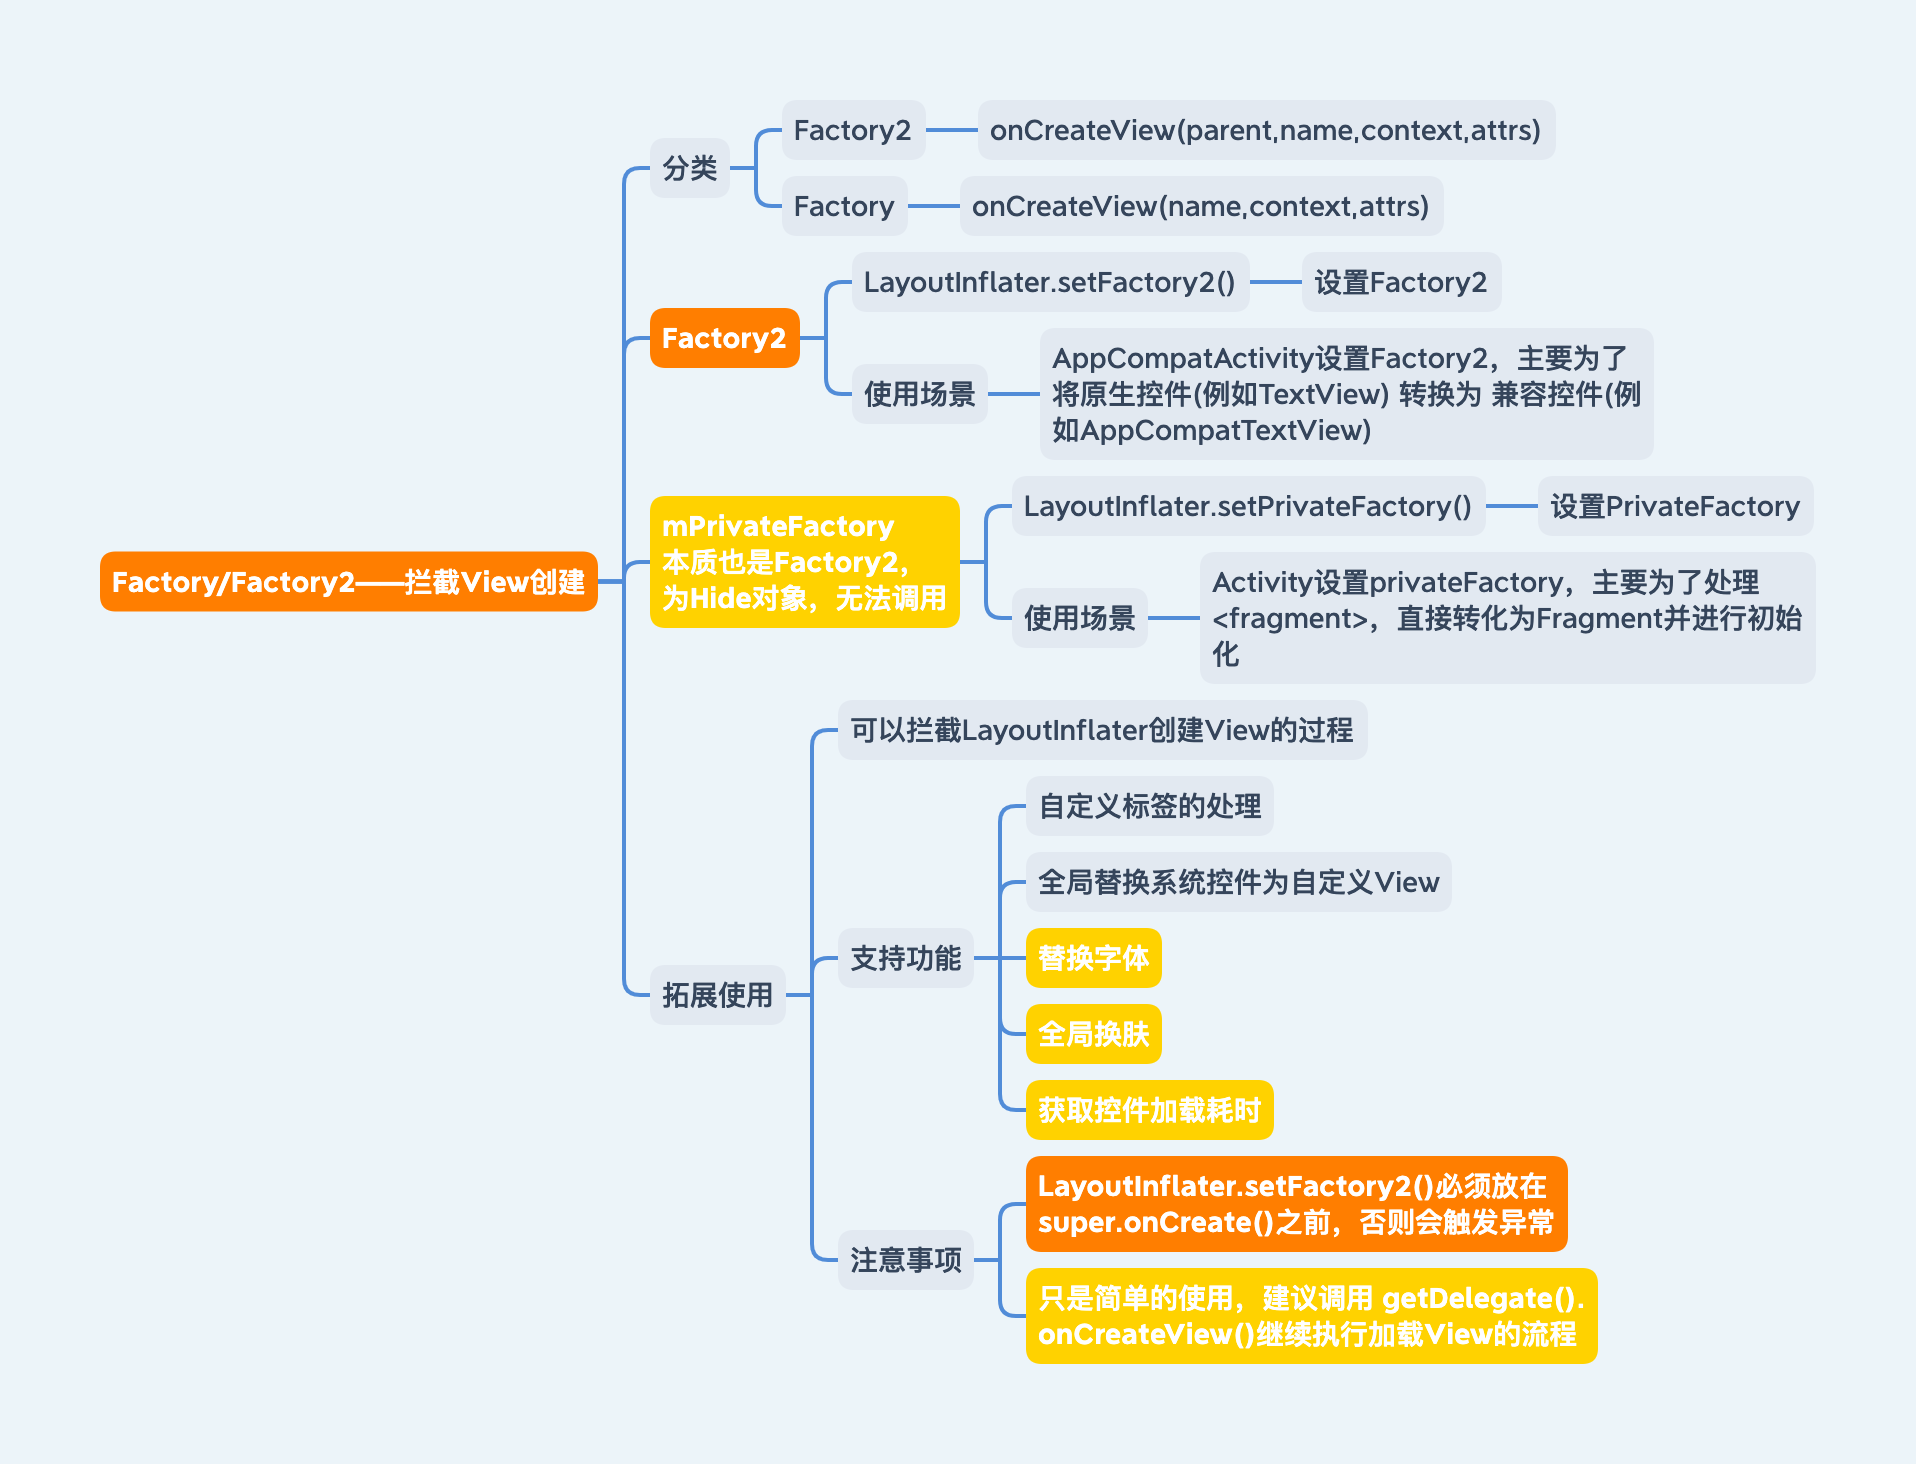
Factory/Factory2-拦截View创建
在上节有说到Factory/Factory2执行相当于拦截的功能,hookView创建的流程
mPrivateFactory实现了Factory2接口,主要用于拦截<fragment>标签处理
1
2
3
4
5
6
7
8
9
10
11
private Factory mFactory;private Factory2 mFactory2;private Factory2 mPrivateFactory;public interface Factory {public View onCreateView (String name, Context context, AttributeSet attrs) ;public interface Factory2 extends Factory {public View onCreateView (View parent, String name, Context context, AttributeSet attrs) ;
Factory2相对于Factory在onCreateView()多传入了parent
Factory2 设置Factory2的方法
1
2
3
4
5
6
7
8
9
10
11
12
13
14
15
public void setFactory2 (Factory2 factory) {if (mFactorySet) { throw new IllegalStateException ("A factory has already been set on this LayoutInflater" );if (factory == null ) {throw new NullPointerException ("Given factory can not be null" );true ;if (mFactory == null ) {else {new FactoryMerger (factory, factory, mFactory, mFactory2);
1
2
3
4
5
6
7
8
9
10
11
12
13
14
15
16
17
18
19
20
21
22
23
24
25
26
private static class FactoryMerger implements Factory2 {private final Factory mF1, mF2;private final Factory2 mF12, mF22;public View onCreateView (String name, Context context, AttributeSet attrs) {View v = mF1.onCreateView(name, context, attrs);if (v != null ) return v;return mF2.onCreateView(name, context, attrs);public View onCreateView (View parent, String name, Context context, AttributeSet attrs) {View v = mF12 != null ? mF12.onCreateView(parent, name, context, attrs)if (v != null ) return v;return mF22 != null ? mF22.onCreateView(parent, name, context, attrs)
最终都是通过FactoryMerger执行的onCreateView
何处调用setFactory2() 1 2 3 4 5 6 7 8 9 10 11 12 13 14 15 16 17 18 19 20 21 22 23 24 25 26 27 28 29 30 31 32 33 34 35 36 37 public void installViewFactory () {LayoutInflater layoutInflater = LayoutInflater.from(this .mContext);if (layoutInflater.getFactory() == null ) {this );else if (!(layoutInflater.getFactory2() instanceof AppCompatDelegateImpl)) {"AppCompatDelegate" , "The Activity's LayoutInflater already has a Factory installed so we can not install AppCompat's" );public final View onCreateView (View parent, String name, Context context, AttributeSet attrs) {return this .createView(parent, name, context, attrs);public View createView (View parent, String name, @NonNull Context context, @NonNull AttributeSet attrs) {if (this .mAppCompatViewInflater == null ) {TypedArray a = this .mContext.obtainStyledAttributes(styleable.AppCompatTheme);String viewInflaterClassName = a.getString(styleable.AppCompatTheme_viewInflaterClass);if (viewInflaterClassName != null && !AppCompatViewInflater.class.getName().equals(viewInflaterClassName)) {try {Class viewInflaterClass = Class.forName(viewInflaterClassName);this .mAppCompatViewInflater = (AppCompatViewInflater)viewInflaterClass.getDeclaredConstructor().newInstance();catch (Throwable var8) {"AppCompatDelegate" , "Failed to instantiate custom view inflater " + viewInflaterClassName + ". Falling back to default." , var8);this .mAppCompatViewInflater = new AppCompatViewInflater ();else {this .mAppCompatViewInflater = new AppCompatViewInflater ();return this .mAppCompatViewInflater.createView(...);
通过AppCompatViewInflater去执行View的创建
1 2 3 4 5 6 7 8 9 10 11 12 13 14 15 16 17 18 final View createView (View parent, String name, @NonNull Context context, @NonNull AttributeSet attrs, boolean inheritContext, boolean readAndroidTheme, boolean readAppTheme, boolean wrapContext) {switch (name) {case "TextView" :break ;@NonNull protected AppCompatTextView createTextView (Context context, AttributeSet attrs) {return new AppCompatTextView (context, attrs);
此处可以在使用到AppCompatActivity时,将原先的<TextView>转换为AppCompatTextView
mPrivateFactory
系统hide对象,无法被外界使用,主要处理<fragment>
1 2 3 4 5 6 7 public void setPrivateFactory (Factory2 factory) {if (mPrivateFactory == null ) {else {new FactoryMerger (factory, factory, mPrivateFactory, mPrivateFactory);
何处调用setPrivateFactory() 1 2 3 4 5 6 7 8 9 10 11 12 13 14 15 16 17 18 19 20 21 final void attach (Context context, ActivityThread aThread, Instrumentation instr, IBinder token, int ident, Application application, Intent intent, ActivityInfo info, CharSequence title, Activity parent, String id, NonConfigurationInstances lastNonConfigurationInstances, Configuration config, String referrer, IVoiceInteractor voiceInteractor, Window window, ActivityConfigCallback activityConfigCallback) {this ); public View onCreateView (View parent, String name, Context context, AttributeSet attrs) {if (!"fragment" .equals(name)) {return onCreateView(name, context, attrs);return mFragments.onCreateView(parent, name, context, attrs);
拓展使用 系统通过Factory提供hook方法,方便拦截LayoutInflater创建View的过程。支持以下应用场景:
支持对自定义标签名称的处理
全局替换系统控件为自定义View
替换字体 全局换肤 获取控件加载耗时
针对以上场景,实现部分关键代码以供参考
获取控件加载耗时 1 2 3 4 5 6 7 8 9 10 11 12 13 14 15 16 17 18 19 20 21 22 23 24 25 26 @Override protected void onCreate (@Nullable Bundle savedInstanceState) {super .onCreate(savedInstanceState);private void setFactory2 () {new LayoutInflater .Factory2() {@Override public View onCreateView (View parent, String name, Context context, AttributeSet attrs) {long startTime = System.currentTimeMillis();View view = getDelegate().createView(parent, name, context, attrs);long costTime = System.currentTimeMillis() - startTime;"costTime" ,costTime+"" );return view;@Override public View onCreateView (String name, Context context, AttributeSet attrs) {return null ;
setFactory2()不可以放到super.onCreate()之后,会触发A factory has already been set on this LayoutInflater异常,原因就在于setFactory2()最多支持设置一个。
替换字体 1 2 3 4 5 6 7 8 9 10 11 12 13 14 15 16 17 private void setFontFactory2 () {new LayoutInflater .Factory2() {@Override public View onCreateView (View parent, String name, Context context, AttributeSet attrs) {View view = getDelegate().createView(parent, name, context, attrs);if (view instanceof TextView ) {return view;@Override public View onCreateView (String name, Context context, AttributeSet attrs) {return null ;
只要执行了getDelegate().createView()可以保证原生控件->兼容控件功能正常。
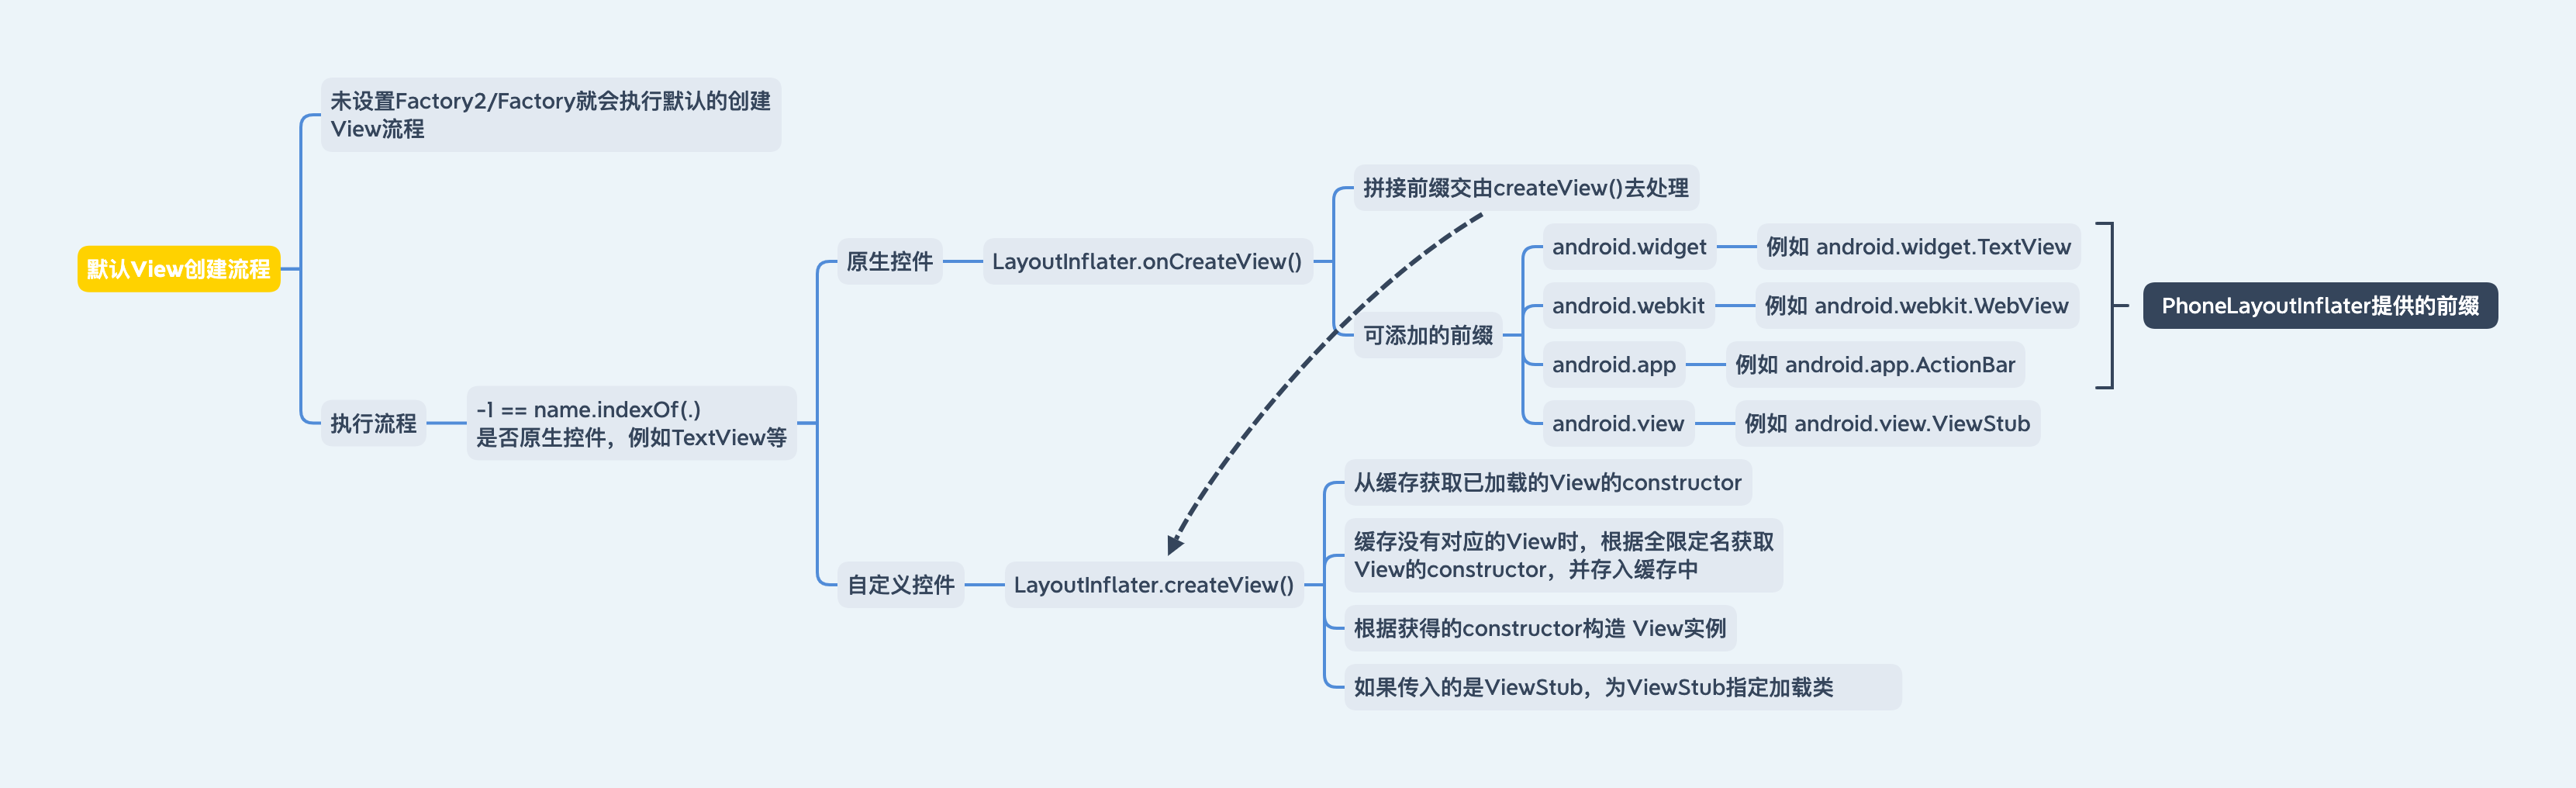
View默认创建流程
未设置Factory/Factory2就会执行默认的View创建流程
1 2 3 4 5 6 7 8 9 10 11 12 13 14 15 16 17 18 19 createViewFromTag (View parent, String name, Context context, AttributeSet attrs, boolean ignoreThemeAttr) {if (view == null ) {final Object lastContext = mConstructorArgs[0 ];0 ] = context;try {if (-1 == name.indexOf('.' )) {else {null , attrs);finally {0 ] = lastContext;
系统提供View
例如<TextView/>、<Button/>等
1 2 3 4 5 6 7 8 9 10 11 12 13 14 15 16 17 18 19 20 21 22 23 24 25 26 27 28 29 30 31 public class PhoneLayoutInflater extends LayoutInflater {private static final String[] sClassPrefixList = {"android.widget." ,"android.webkit." ,"android.app." @Override protected View onCreateView (String name, AttributeSet attrs) throws ClassNotFoundException {for (String prefix : sClassPrefixList) {try {View view = createView(name, prefix, attrs);if (view != null ) {return view;catch (ClassNotFoundException e) {return super .onCreateView(name, attrs);protected View onCreateView (String name, AttributeSet attrs) throws ClassNotFoundException {return createView(name, "android.view." , attrs);
优先判断
android.widget.* 例如android.widget.TextViewandroid.webkit.* 例如android.webkit.WebViewandroid.app.* 例如android.app.ActionBar
是否有对应nmae的View实例存在
都不存在,就在android.view.*找寻对应View实例 例如android.view.ViewStub
自定义View
例如android.support.v7.widget.RecyclerView等
1 2 3 4 5 6 7 8 9 10 11 12 13 14 15 16 17 18 19 20 21 22 23 24 25 26 27 28 29 30 31 32 33 34 35 36 37 38 39 40 41 42 43 44 45 46 47 48 49 50 51 52 53 54 55 56 57 58 59 60 61 62 63 64 65 66 67 68 69 public final View createView (String name, String prefix, AttributeSet attrs) throws ClassNotFoundException, InflateException {extends View > constructor = sConstructorMap.get(name);if (constructor != null && !verifyClassLoader(constructor)) {null ;extends View > clazz = null ;try {if (constructor == null ) {null ? (prefix + name) : name).asSubclass(View.class);if (mFilter != null && clazz != null ) {boolean allowed = mFilter.onLoadClass(clazz);if (!allowed) {true );else {if (mFilter != null ) {Boolean allowedState = mFilterMap.get(name);if (allowedState == null ) {null ? (prefix + name) : name).asSubclass(View.class);boolean allowed = clazz != null && mFilter.onLoadClass(clazz);if (!allowed) {else if (allowedState.equals(Boolean.FALSE)) {Object lastContext = mConstructorArgs[0 ];if (mConstructorArgs[0 ] == null ) {0 ] = mContext;1 ] = attrs;final View view = constructor.newInstance(args);if (view instanceof ViewStub) {final ViewStub viewStub = (ViewStub) view;0 ]));0 ] = lastContext;return view;
执行流程 View默认创建流程分为:
<tag>不包含.,用于处理<TextView>、<WebView>等标签,此时需要拼接android.widget. 或 android.webkit. 或 android.app. 前缀(实现位于PhoneLayoutInflater ),都没有找到对应的View实例时,就会在添加android.view.再去加载。<tag>包含.,此时的实例View分为以下几步:
构建View的缓存,缓存的是constructor,根据name获取constructor
缓存中不存在时,需要根据prefix+name获取View的constructor,并存入缓存中
根据constructor构造View实例——constructor.newInstance()
如果需要处理ViewStub,为ViewStub指定加载类
总结
View的绘制流程触发 调用了ViewRootImpl.setView(decorView)将DecorView与ViewRootImpl进行了关联。View的绘制流程就是从ViewRoot开始的。
1 2 3 4 5 6 7 8 9 10 11 12 13 14 15 16 17 18 19 20 21 22 23 24 25 26 27 28 29 30 31 32 33 34 35 36 37 38 39 40 41 42 43 44 45 46 47 48 49 50 51 52 53 54 55 56 57 58 59 60 61 62 63 64 65 66 67 public void setView (View view, WindowManager.LayoutParams attrs, View panelParentView) {synchronized (this ){this );@Override public void requestLayout () {if (!mHandlingLayoutInLayoutRequest) {true ;void scheduleTraversals () {if (!mTraversalScheduled) {true ;null );if (!mUnbufferedInputDispatch) {final class TraversalRunnable implements Runnable {@Override public void run () {final TraversalRunnable mTraversalRunnable = new TraversalRunnable ();void doTraversal () {if (mTraversalScheduled) {false ;if (mProfile) {"ViewAncestor" );if (mProfile) {false ;
ViewRootImpl.setView()中最后调用到了performTraversals()在这个方法中开始View的绘制流程
1 2 3 4 5 6 7 8 9 10 11 12 13 14 15 16 17 18 19 20 21 22 23 24 25 26 27 28 29 30 31 32 33 34 private void performTraversals () {boolean layoutRequested = mLayoutRequested && (!mStopped || mReportNextDraw);if (!mStopped || mReportNextDraw) {int childHeightMeasureSpec = getRootMeasureSpec(mHeight, lp.height);int childHeightMeasureSpec = getRootMeasureSpec(mHeight, lp.height);if (layoutRequested){final boolean didLayout = layoutRequested && (!mStopped || mReportNextDraw);if (didLayout){if (!cancelDraw && !newSurface) {if (mPendingTransitions != null && mPendingTransitions.size() > 0 ) {for (int i = 0 ; i < mPendingTransitions.size(); ++i) {
通过以上流程分析:View的绘制流程是从ViewRootImpl中开始的,先调用performTraversals()开始绘制,随后调用内部的performMeasure()开始Measure过程,调用performLayout(),开始Layout过程,最后调用performDraw()开始Draw,完成后就可以现在在屏幕上。
如上图所示,performTraversals()依次调用performMeasure(),performLayout(),performDraw()完成View的绘制。
补充:requestLayout()/invalidate()最终都会汇聚到scheduleTraversals(),由Choreographer在下一帧驱动doTraversal()。
scheduleTraversals()会先插入同步屏障,再通过CALLBACK_TRAVERSAL执行performTraversals()。在doTraversal()开始前会移除同步屏障。
mTraversalScheduled用于合并同一帧内的重复请求,避免无意义重复遍历。
View工作流程
主要是指measure(测量),layout(布局),draw(绘制)三大流程。
measure:确定“要多大”(measuredWidth/measuredHeight)。layout:确定“放哪里”(left/top/right/bottom)。draw:确定“画什么”。
measure-测量
起点位于performMeasure()。
1 2 3 4 5 6 7 8 9 private void performMeasure (int childWidthMeasureSpec, int childHeightMeasureSpec) {try {finally {
MeasureSpec
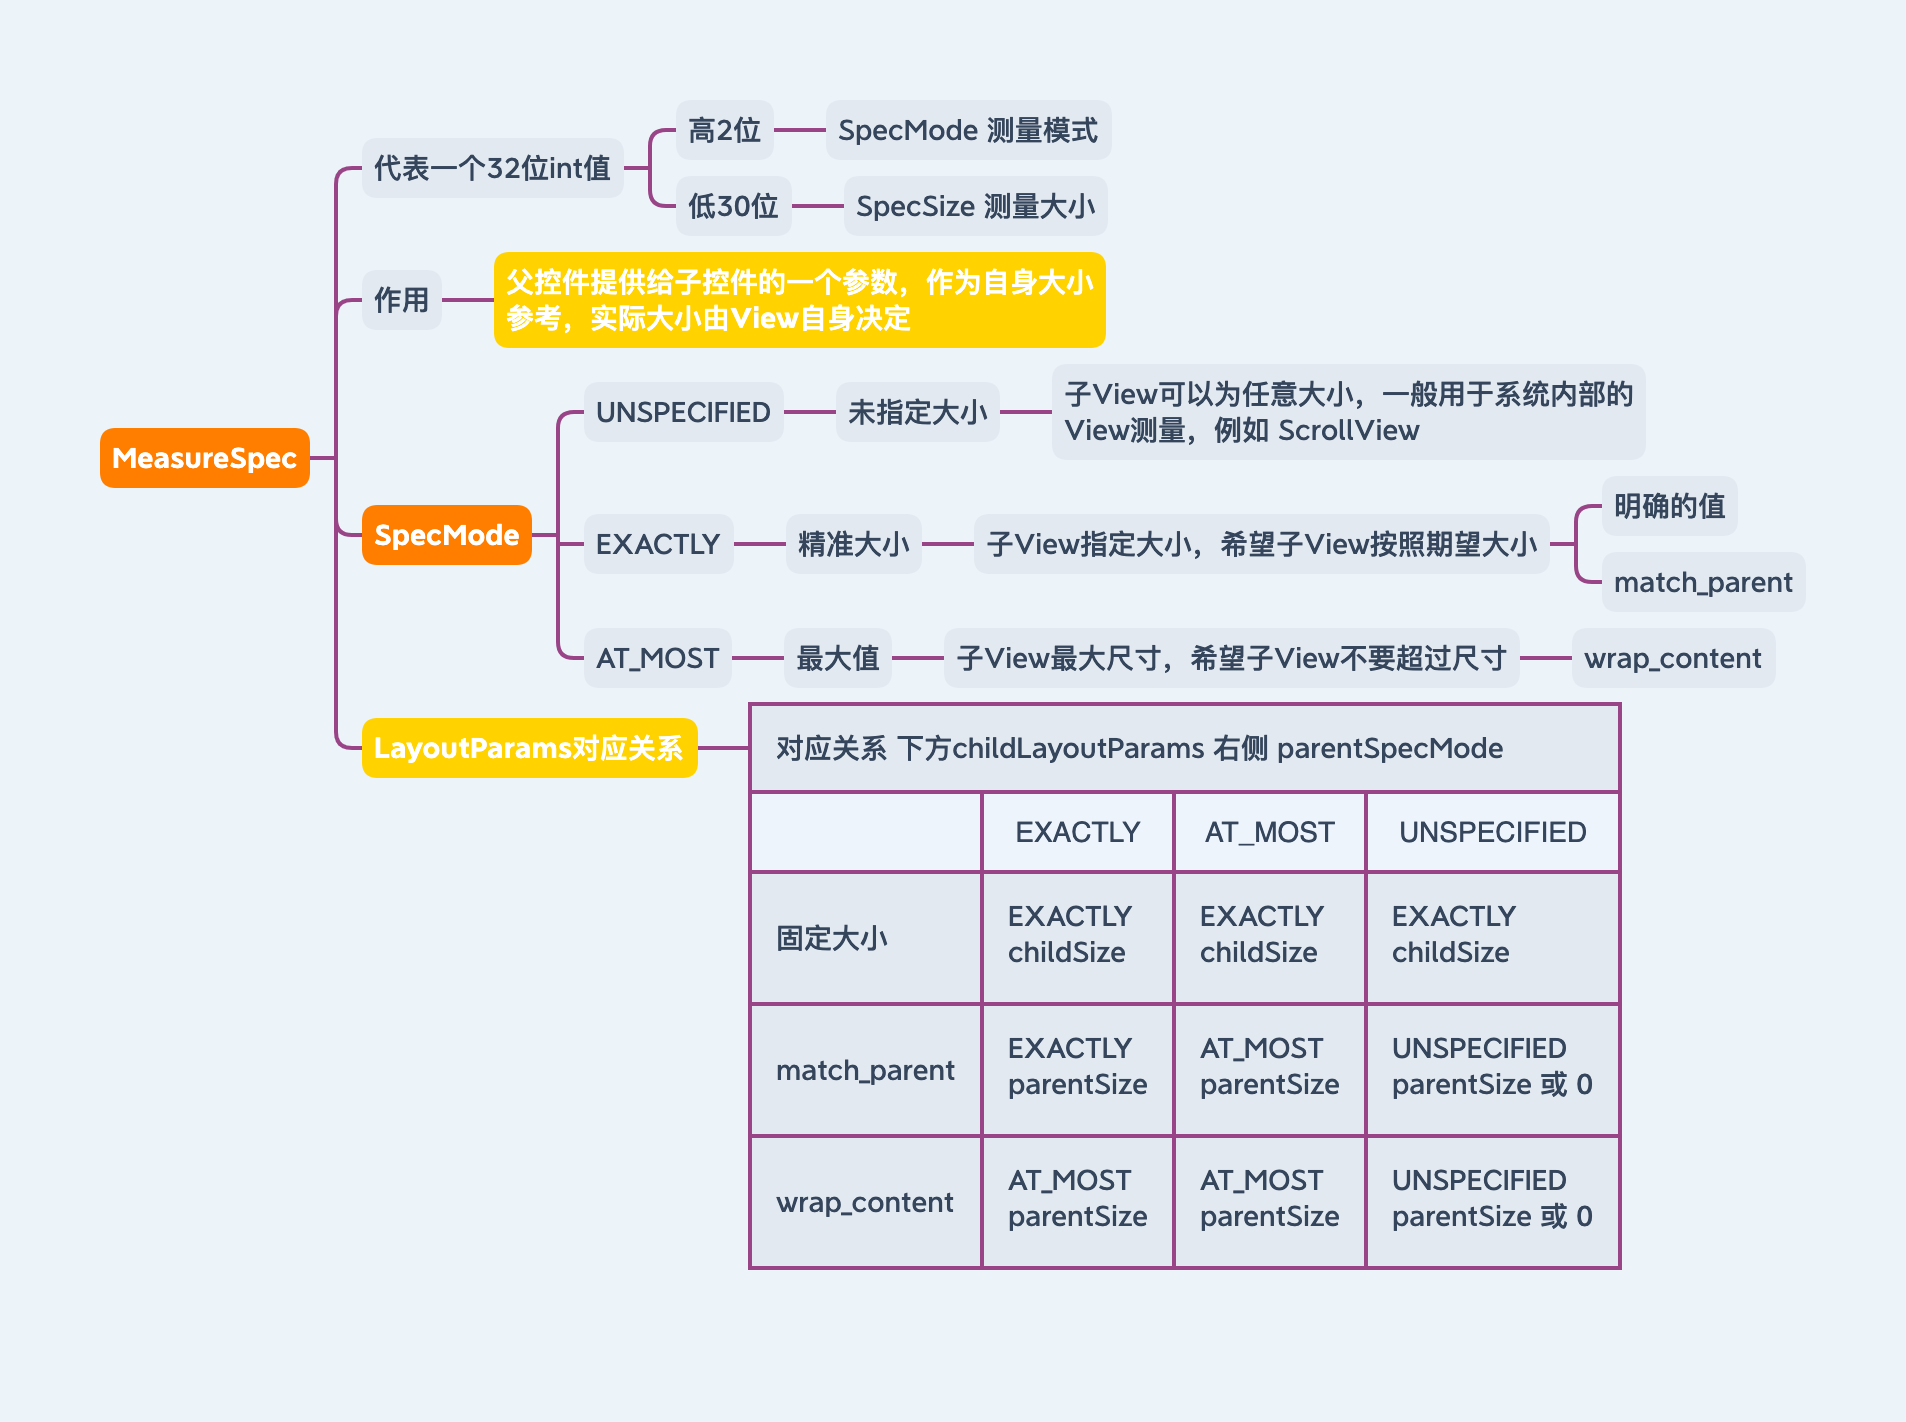
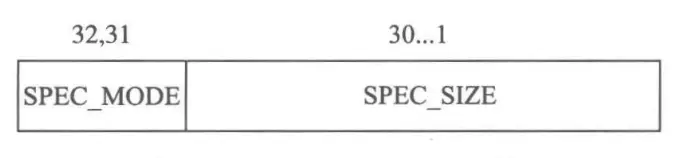
MeasureSpec代表一个32位int值,高2位代表SpecMode(测量模式),低30位代表SpecSize(某种测量模式下的规格大小)。
作用:父控件提供给子View的一个参数,作为设定自身大小参考,实际大小还是有子View自身决定。
结构 1 2 3 4 5 6 7 8 9 10 11 12 13 14 15 16 17 18 19 20 21 22 public static class MeasureSpec {private static final int MODE_SHIFT = 30 ;private static final int MODE_MASK = 0x3 << MODE_SHIFT;@IntDef({UNSPECIFIED, EXACTLY, AT_MOST}) @Retention(RetentionPolicy.SOURCE) public @interface MeasureSpecMode {}public static final int UNSPECIFIED = 0 << MODE_SHIFT;public static final int EXACTLY = 1 << MODE_SHIFT;public static final int AT_MOST = 2 << MODE_SHIFT;@MeasureSpecMode public static int getMode (int measureSpec) {return (measureSpec & MODE_MASK);public static int getSize (int measureSpec) {return (measureSpec & ~MODE_MASK);
SpecMode分为三类:
UNSPECIFIED:未指定模式 。父控件不对子控件添加束缚,子元素可以为任意大小,一般用于系统内部的测量。比如ScrollViewEXACTLY:精确模式 。父控件为子View指定精确大小,希望子View完全按照自己给的尺寸处理大小。一般是设置了明确的值或是MATCH_PARENTAT_MOST:最大模式 。父控件为子View指定最大尺寸,希望子View不要超过这个尺寸。一般对应WRAP_CONTENT
MeasureSpec与LayoutParams的关系 每一个View,都持有一个MeasureSpec,里面保存了View的尺寸。我们也可以使用LayoutParams指定View的尺寸。所以在View测量的时候,系统会将LayoutParams在父容器的约束下转换成MeasureSpec,然后根据转换后的值确定宽高。
转换后的MeasureSpec是由LayoutParams和父容器的MeasureSpec一起决定的。
下:childLayoutParams 右:parentSpecMode
EXACTLY
AT_MOST
UNSPECIFIED
固定大小
Exactly
Exactly
Exactly
match_parent
Exactly
AT_MOST
UNSPECIFIED
wrap_content
AT_MOST
AT_MOST
UNSPECIFIED
根据ViewGroup.getChildMeasureSpec()得出上表。
可以把这个转换过程理解成“父约束向下传递”:
LayoutParams表达的是子View的尺寸意图,例如“我想要固定值 / match_parent / wrap_content”。父容器的MeasureSpec表达的是外部约束,例如“你必须这么大 / 你最多这么大 / 你自己决定”。
系统会把这两者合并,生成子View真正收到的MeasureSpec。
因此match_parent和wrap_content都不是最终尺寸,它们只是参与计算的输入条件,真正决定子View测量边界的还是父容器给出的约束。
DecorView转换MeasureSpec
DecorView的转换由Window的尺寸和自身的LayoutParams决定。
1 2 3 4 5 6 7 8 9 10 11 12 13 14 15 16 17 18 19 20 21 22 23 24 25 26 27 28 29 30 31 private void performTraversals () {int childWidthMeasureSpec = getRootMeasureSpec(mWidth, lp.width);int childHeightMeasureSpec = getRootMeasureSpec(mHeight, lp.height);private static int getRootMeasureSpec (int windowSize, int rootDimension) {int measureSpec;switch (rootDimension) {case ViewGroup.LayoutParams.MATCH_PARENT:break ;case ViewGroup.LayoutParams.WRAP_CONTENT:break ;default :break ;return measureSpec;
View的measure过程
主要是由measure()方法完成
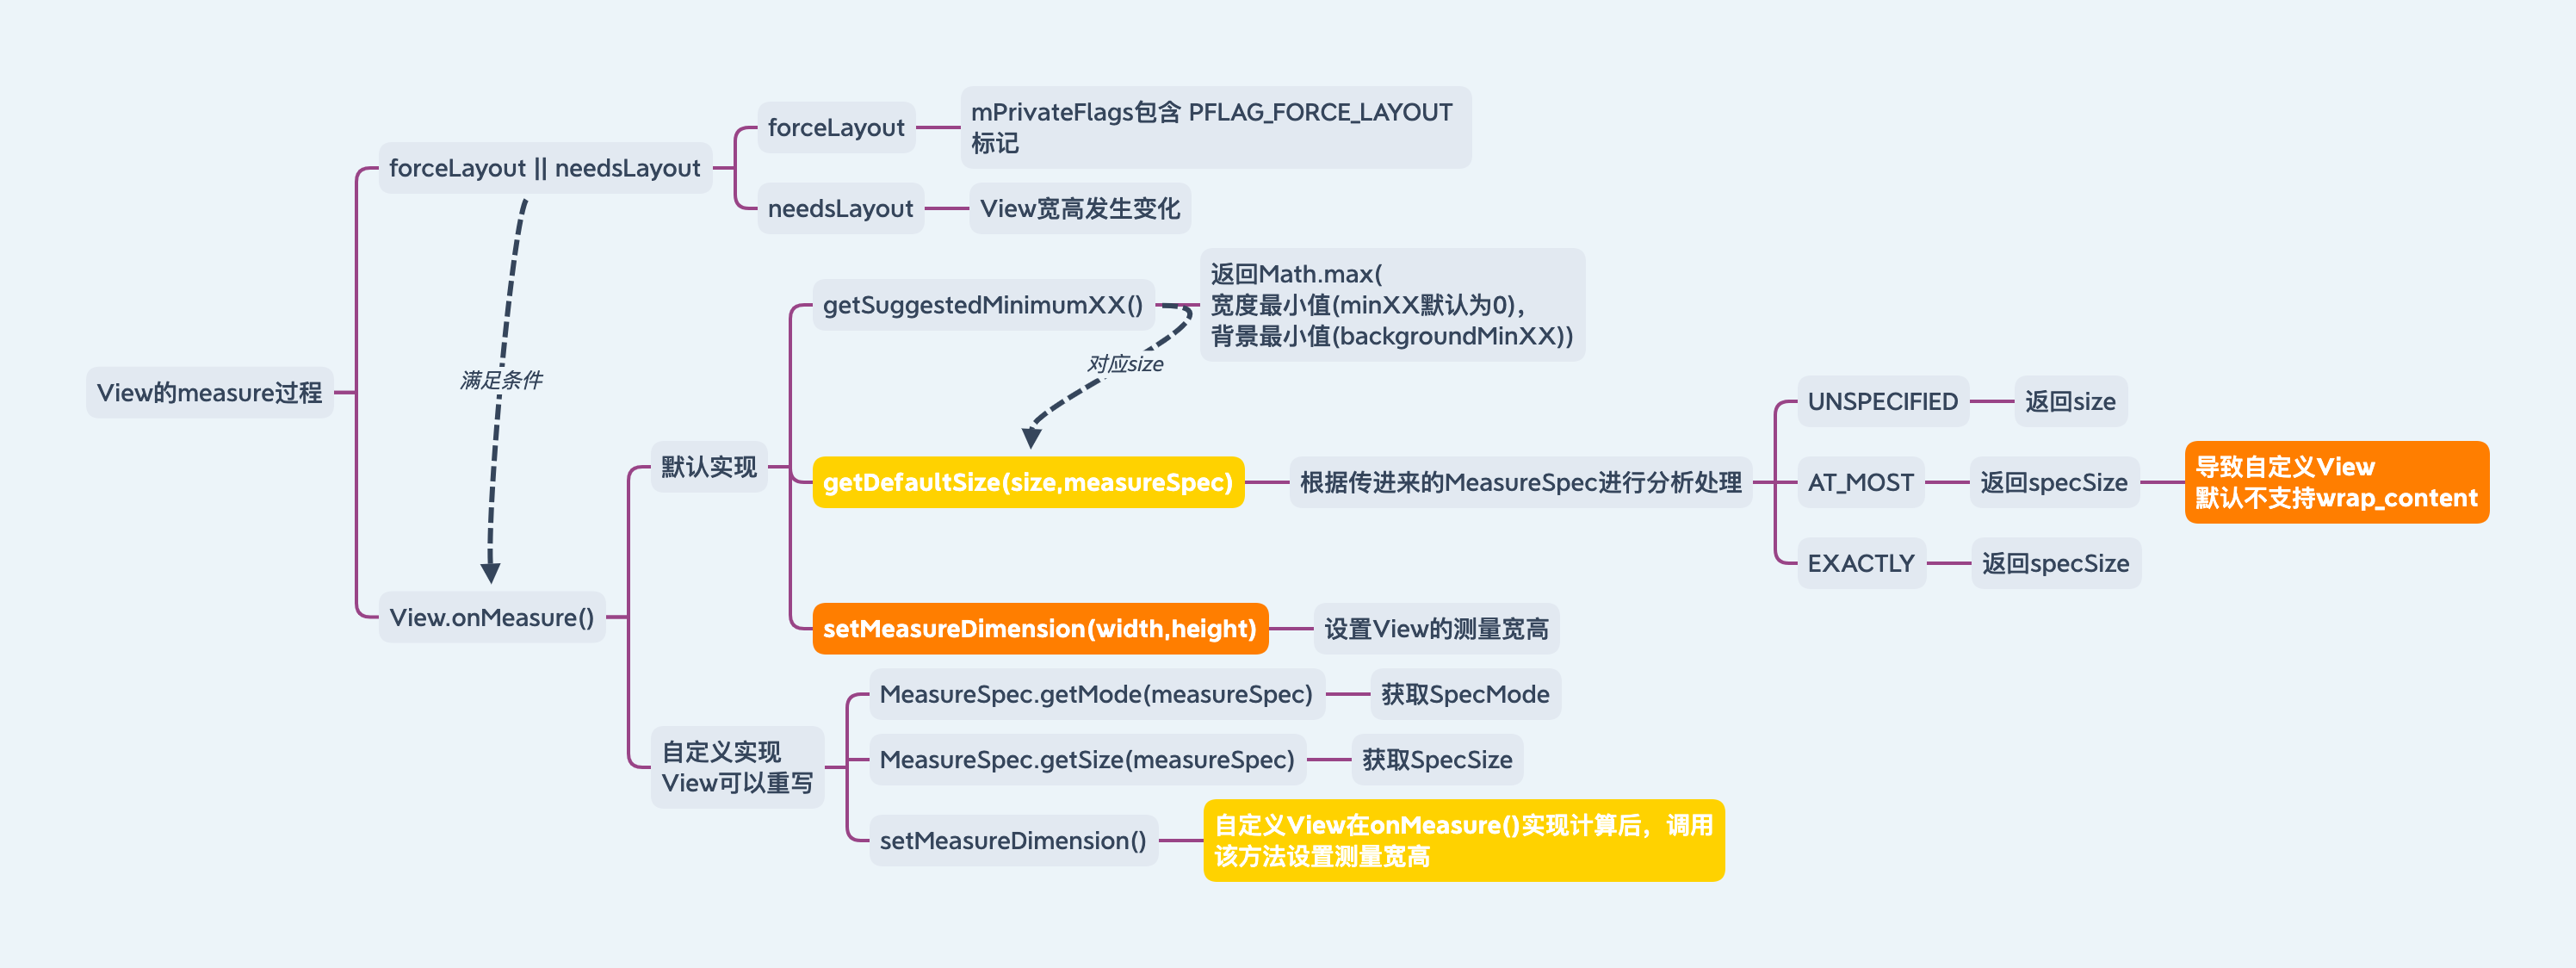
1 2 3 4 5 6 7 8 9 10 11 12 13 14 15 16 17 18 19 20 21 22 23 24 25 26 27 28 29 public final void measure (int widthMeasureSpec, int heightMeasureSpec) {final boolean forceLayout = (mPrivateFlags & PFLAG_FORCE_LAYOUT) == PFLAG_FORCE_LAYOUT;final boolean needsLayout = specChangedif (forceLayout || needsLayout) {int cacheIndex = forceLayout ? -1 : mMeasureCache.indexOfKey(key);if (cacheIndex < 0 || sIgnoreMeasureCache) {else {long value = mMeasureCache.valueAt(cacheIndex);int ) (value >> 32 ), (int ) value);
在measure()中调用onMeasure()去进行实际的测量
1 2 3 4 5 6 7 8 9 10 11 12 13 14 15 16 17 18 19 20 21 22 23 24 25 26 27 28 29 30 31 32 33 34 35 36 37 38 39 40 41 42 43 44 45 46 47 48 49 50 51 52 53 54 55 56 57 58 59 60 61 62 63 protected void onMeasure (int widthMeasureSpec, int heightMeasureSpec) {protected final void setMeasuredDimension (int measuredWidth, int measuredHeight) {boolean optical = isLayoutModeOptical(this );if (optical != isLayoutModeOptical(mParent)) {Insets insets = getOpticalInsets();int opticalWidth = insets.left + insets.right;int opticalHeight = insets.top + insets.bottom;private void setMeasuredDimensionRaw (int measuredWidth, int measuredHeight) {public static int getDefaultSize (int size, int measureSpec) {int result = size;int specMode = MeasureSpec.getMode(measureSpec);int specSize = MeasureSpec.getSize(measureSpec);switch (specMode) {case MeasureSpec.UNSPECIFIED:break ;case MeasureSpec.AT_MOST:case MeasureSpec.EXACTLY:break ;return result;protected int getSuggestedMinimumHeight () {return (mBackground == null ) ? mMinHeight : max(mMinHeight, mBackground.getMinimumHeight());protected int getSuggestedMinimumWidth () {return (mBackground == null ) ? mMinWidth : max(mMinWidth, mBackground.getMinimumWidth());public int getMinimumWidth () {final int intrinsicWidth = getIntrinsicWidth();return intrinsicWidth > 0 ? intrinsicWidth : 0 ;
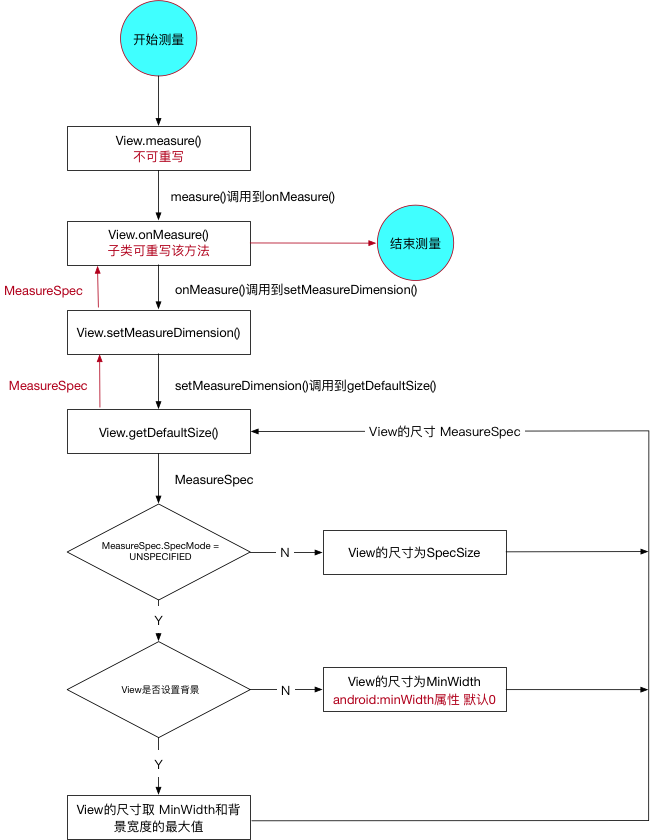
结合上述流程图,简单分析View的Measure过程
系统在绘制开始时会调用View.measure(),这个方法是final的,无法被重写
后续调用View.onMeasure(),自定义View时可以按照自己的需求对这个方法进行重写
onMeasure()中调用到setMeasuredDimension()对View进行宽高的设置需要使用getDefaultSize()去获取最终显示出的宽高
在getDefaultSize()中需要对传进来的MeasureSpec进行分析处理
SpecMode若为UNSPECIFIED,则最终尺寸为传进来的SpecSize
SpecMode为AT_MOST,EXACTLY,还需要额外判断View是否有背景
有背景,最终尺寸就为View的最小尺寸和背景尺寸的最大值
没背景,最终尺寸就为View的最小尺寸
取到最终尺寸后,数据回溯到onMeasure()中,即完成测量(Measure)过程
在上述分析中,自定义View中使用wrap_content时,specMode为AT_MOST,尺寸为父控件剩余大小,效果与使用match_parent一致。这也是自定义View中常碰到的问题 为何自定义View是wrap_content无效? 解决方法就是 自己重写onMeasure()对wrap_content特殊处理。
1 2 3 4 5 6 7 8 9 10 11 12 13 14 15 16 public void onMeasure (int widthMeasureSpec,int heightMeasureSpec) {super .onMeasure(widthMeasureSpec,heightMeasureSpec);int widthSpecMode = MeasureSpec.getMode(widthMeasureSpec);int heightSpecMode = MeasureSpec.getMode(heightMeasureSpec);int widthSpecSize = MeasureSpec.getSize(widthMeasureSpec);int heightSpecSize = MeasureSpec.getSize(heightMeasureSpec);if (widthSpecMode == MeasureSpec.AT_MOST && heightSpecMode == MeasureSpec.AT_MOST){else if (widthSpecMode == MeasureSpec.AT_MOST){else if (heightSpecMode == MeasureSpec.AT_MOST){
补充:onMeasure()可能被多次调用(父容器二次测量、约束变化、requestLayout()等)。
onMeasure()里建议只做尺寸计算,避免网络/线程等副作用逻辑。直接继承View时可优先使用resolveSize()收敛AT_MOST场景,保证wrap_content行为稳定。
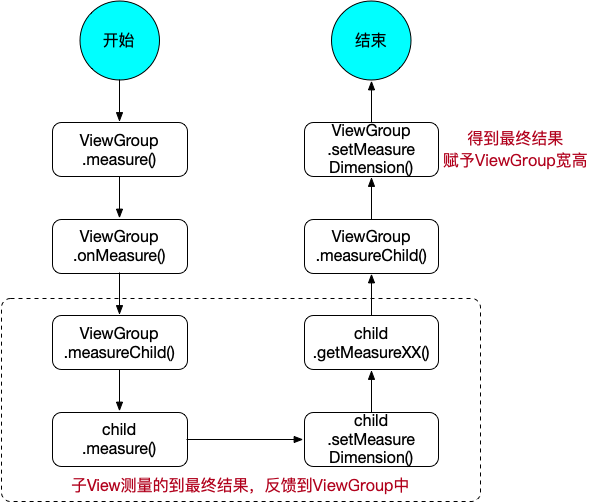
ViewGroup的measure过程
除了完成自身的measure过程之外,还要去遍历调用所有子元素的measure方法,各个子元素再去递归执行这个过程。
先Measure子View,再Measure自己
ViewGroup中没有定义onMeasure(),定义了一个measureChildren()。
1 2 3 4 5 6 7 8 9 10 11 12 protected void measureChildren (int widthMeasureSpec, int heightMeasureSpec) {final int size = mChildrenCount;final View[] children = mChildren;for (int i = 0 ; i < size; ++i) {final View child = children[i];if ((child.mViewFlags & VISIBILITY_MASK) != GONE) {
循环调用measureChild()
1 2 3 4 5 6 7 8 9 10 11 12 13 14 15 16 17 18 19 20 21 22 23 24 25 26 27 28 29 30 31 32 33 34 35 36 37 38 39 40 41 42 43 44 45 46 47 48 49 50 51 52 53 54 55 56 57 58 59 60 61 62 63 64 65 66 67 68 69 70 71 72 73 74 75 76 77 78 79 80 81 82 83 84 protected void measureChild (View child, int parentWidthMeasureSpec, int parentHeightMeasureSpec) {final LayoutParams lp = child.getLayoutParams();final int childWidthMeasureSpec = getChildMeasureSpec(parentWidthMeasureSpec,final int childHeightMeasureSpec = getChildMeasureSpec(parentHeightMeasureSpec,public static int getChildMeasureSpec (int spec, int padding, int childDimension) {int specMode = MeasureSpec.getMode(spec);int specSize = MeasureSpec.getSize(spec);int size = Math.max(0 , specSize - padding);int resultSize = 0 ;int resultMode = 0 ;switch (specMode) {case MeasureSpec.EXACTLY:if (childDimension >= 0 ) {else if (childDimension == LayoutParams.MATCH_PARENT) {else if (childDimension == LayoutParams.WRAP_CONTENT) {break ;case MeasureSpec.AT_MOST:if (childDimension >= 0 ) {else if (childDimension == LayoutParams.MATCH_PARENT) {else if (childDimension == LayoutParams.WRAP_CONTENT) {break ;case MeasureSpec.UNSPECIFIED:if (childDimension >= 0 ) {else if (childDimension == LayoutParams.MATCH_PARENT) {0 : size;else if (childDimension == LayoutParams.WRAP_CONTENT) {0 : size;break ;return MeasureSpec.makeMeasureSpec(resultSize, resultMode);
由于ViewGroup有不同布局的需要,很难统一,所以没有提供统一的onMeasure()方法,而是让子类自己去实现onMeasure()。
根据上述流程图,简单总结一下:
ViewGroup调用自身的measureChildren(),里面遍历自己的子View
遍历后调用measureChild(),准备给每一个子View计算它的MeasureSpec
调用getChildMeasureSpec()计算子View的MeasureSpec,需要结合父布局的MeasureSpec以及子View的LayoutParams共同得出结果
调用子View的measure(),完成子View的测量过程。
合并子View的测量值,得到ViewGroup的测量值
补充:为什么一个View可能会被测量多次?
测量过程并不保证“每个子View只会走一次measure()”。
当父容器需要根据部分子View结果反推剩余空间时,后续子View可能会重新测量。
某些布局策略(例如依赖剩余空间分配、兄弟节点尺寸联动、权重计算)也可能触发多轮测量。
所以自定义ViewGroup时不要把“子View只测一次”当成前提,onMeasure()需要保证可重复执行且结果稳定。
补充:自定义ViewGroup测量实践
优先使用measureChildWithMargins()并结合MarginLayoutParams处理外边距。
onMeasure()结束前必须调用setMeasuredDimension()。对有依赖关系的子View,通常先测固定项再测依赖项,避免反复回流测量。
拓展
在Activity启动时获取View的尺寸?
不建议在onCreate()直接读取getWidth()/getHeight(),此时常为0。
在 Activity#onWindowFocusChanged 回调中获取宽高。当Activity得到焦点或失去焦点的时候,这个方法都会被频繁调用
view.post(runnable),在 runnable 中获取宽高。利用Handler通信机制,发送一个Runnable在MessageQueue中,当layout处理结束时会发送消息通知UI线程,可以获取到实际宽高。
ViewTreeObserver 添加 OnGlobalLayoutListener,在 onGlobalLayout 回调中获取宽高。监听全局View的变化事件,使用后需要注意移除OnGlobalLayoutListener 监听,以免造成内存泄露
调用 view.measure(),再通过 getMeasuredWidth 和 getMeasuredHeight 获取宽高手动对view进行measure来得到View的尺寸。
不同ViewGroup实现的getChildMeasureSpec()可能导致不同结果
每种ViewGroup的子类测量策略(getChildMeasureSpec())不尽相同,就会导致显示结果不一致。
1 2 3 4 5 6 7 8 9 10 11 12 13 14 15 16 17 18 <FrameLayout android:layout_width ="match_parent" android:layout_height ="300dp" android:background ="@color/colorAccent" > <Button android:layout_width ="match_parent" android:layout_height ="400dp" /> </FrameLayout > <RelativeLayout android:layout_width ="match_parent" android:layout_height ="300dp" > <Button android:layout_width ="match_parent" android:layout_height ="400dp" /> </RelativeLayout >
在FrameLayout和RelativeLayout中,Button显示效果不一致,
FrameLayout中Button高度为400dpRelativeLayout中Button高度为300dp
FrameLayout遵循默认的ViewGroup.getChildMeasureSpec(),RelativeLayout重写getChildMeasureSpec()。
layout-布局
ViewGroup用来确定子元素的位置,当ViewGroup位置被确定后,在onLayout()中遍历所有子View,并调用其layout()。
先layout自身后layout子元素。
起点位于performLayout()
1 2 3 4 5 6 7 8 9 10 11 12 13 14 15 16 17 18 19 20 21 22 23 24 25 26 27 28 29 30 31 32 33 34 35 36 37 38 39 40 41 42 43 private void performLayout (WindowManager.LayoutParams lp, int desiredWindowWidth, int desiredWindowHeight) {true ;final View host = mView;0 , 0 , host.getMeasuredWidth(), host.getMeasuredHeight());int numViewsRequestingLayout = mLayoutRequesters.size();if (numViewsRequestingLayout > 0 ) {false );if (validLayoutRequesters != null ) {0 , 0 , host.getMeasuredWidth(), host.getMeasuredHeight()); true ); if (validLayoutRequesters != null ) {final ArrayList<View> finalRequesters = validLayoutRequesters;new Runnable () {@Override public void run () {int numValidRequests = finalRequesters.size();for (int i = 0 ; i < numValidRequests; ++i) {final View view = finalRequesters.get(i);"View" , "requestLayout() improperly called by " + view +" during second layout pass: posting in next frame" );
主要执行了三步:
执行DecorView的layout过程
执行调用过requestLayout()的View(包含PFLAG_FORCE_LAYOUT标志)的measure和layout
还没调用过requestLayout()的View加入到队列中,等待下一帧绘制时执行
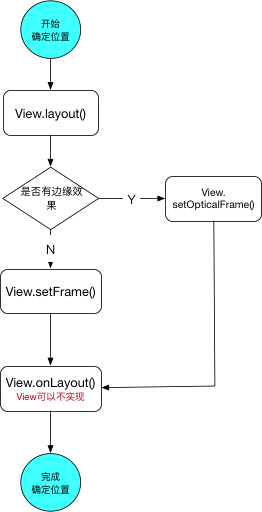
View的layout过程
主要是由View的layout()方法实现
1 2 3 4 5 6 7 8 9 10 11 12 13 14 15 16 17 18 19 20 21 22 23 24 25 26 27 28 29 30 31 32 33 34 35 36 37 38 39 40 41 42 43 44 45 46 47 48 49 50 51 52 53 54 55 56 57 58 59 60 61 62 63 64 65 66 67 68 69 70 71 72 73 74 75 76 77 78 79 80 public void layout (int l, int t, int r, int b) {if ((mPrivateFlags3 & PFLAG3_MEASURE_NEEDED_BEFORE_LAYOUT) != 0 ) {int oldL = mLeft;int oldT = mTop;int oldB = mBottom;int oldR = mRight;boolean changed = isLayoutModeOptical(mParent) ?if (changed || (mPrivateFlags & PFLAG_LAYOUT_REQUIRED) == PFLAG_LAYOUT_REQUIRED) {this , l, t, r, b, oldL, oldT, oldR, oldB); protected void onLayout (boolean changed, int left, int top, int right, int bottom) {private boolean setOpticalFrame (int left, int top, int right, int bottom) {Insets parentInsets = mParent instanceof View ?Insets childInsets = getOpticalInsets();return setFrame(protected boolean setFrame (int left, int top, int right, int bottom) {boolean changed = false ;if (mLeft != left || mRight != right || mTop != top || mBottom != bottom) {true ;int drawn = mPrivateFlags & PFLAG_DRAWN;int oldWidth = mRight - mLeft;int oldHeight = mBottom - mTop;int newWidth = right - left;int newHeight = bottom - top;boolean sizeChanged = (newWidth != oldWidth) || (newHeight != oldHeight);public static boolean isLayoutModeOptical (Object o) {return o instanceof ViewGroup && ((ViewGroup) o).isLayoutModeOptical();
按照流程图总结一下:
View调用layout()开始布局过程(确定最终宽高以及四个顶点的位置)
根据是否有边缘效果(例如发光,阴影)
有边缘效果,调用setOpticalFrame()去除边缘的影响,最终还是调用setFrame()设立自己的四个顶点
无边缘效果,调用setFrame()设立自己的四个顶点
最后调用onLayout()最终确立宽高以及四点坐标。
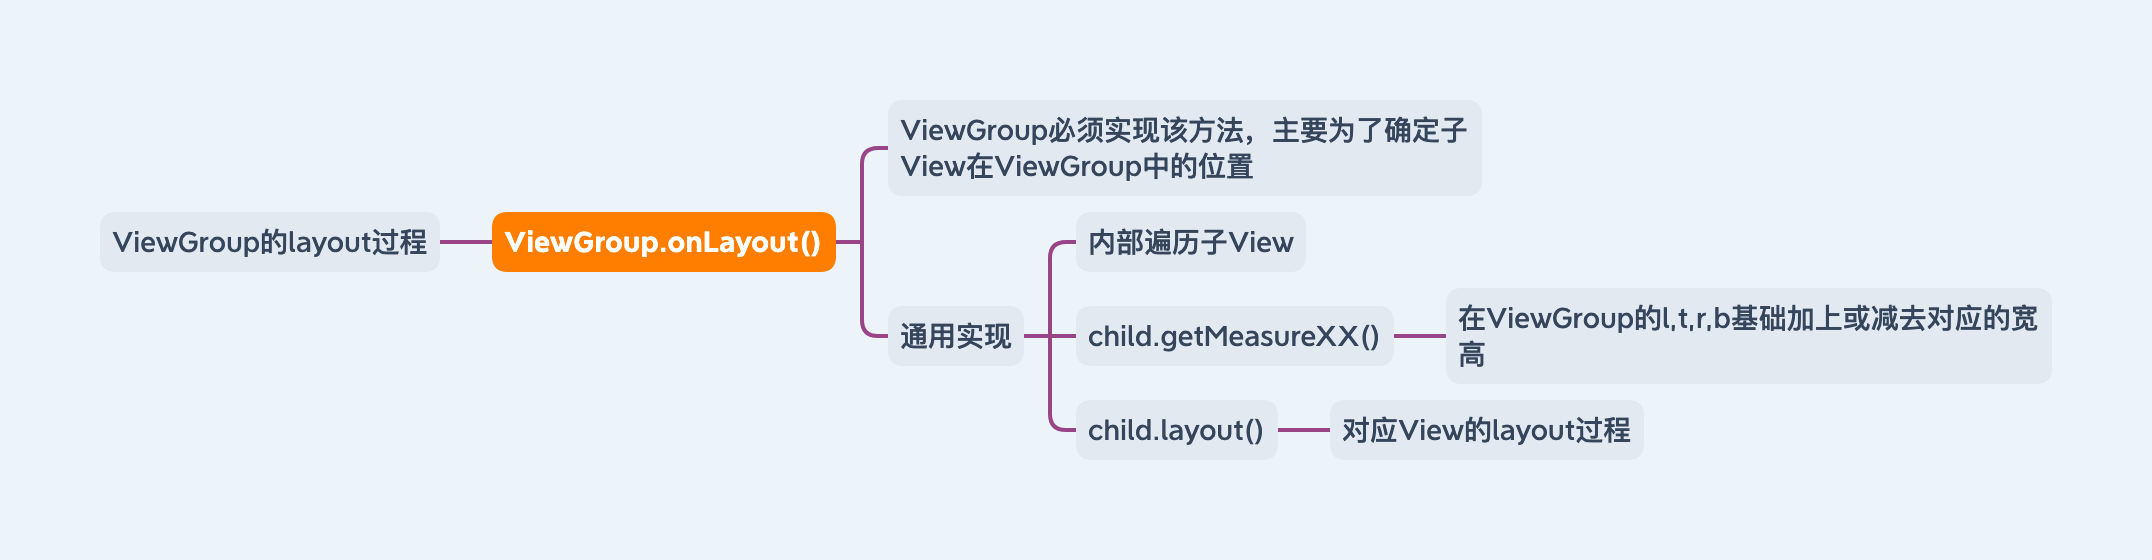
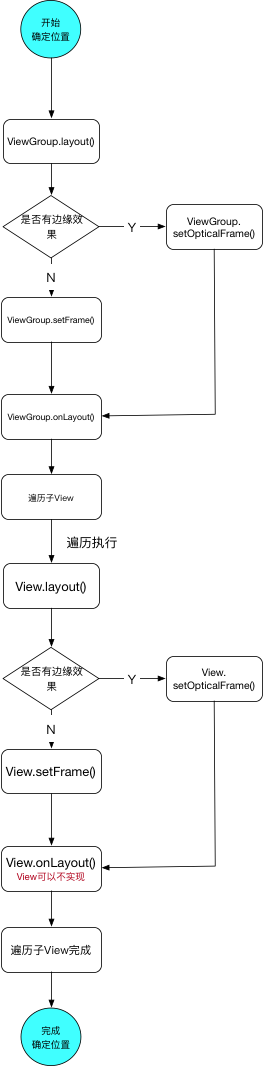
ViewGroup的layout过程
当有子View存在的时候,需要遍历子View进行layout过程。即需要在onLayout()方法实现子View的layout。
1 2 3 4 5 6 7 8 9 10 11 12 13 14 15 16 17 18 19 20 21 22 23 24 25 26 27 28 29 30 31 32 33 34 35 36 37 38 39 40 @Override public final void layout (int l, int t, int r, int b) {if (!mSuppressLayout && (mTransition == null || !mTransition.isChangingLayout())) {if (mTransition != null ) {this );super .layout(l, t, r, b);else {true ;@Override protected abstract void onLayout (boolean changed, int l, int t, int r, int b) ;protected void onLayout (boolean changed,int left,int top,int right,int bottom) {for (int i = 0 ; i <getChildCount();i++){View child = getChildAt(i);int childTop = Top;int childLeft = Left;int childBottom = Bottom;int childRight = Right;private void setChildFrame (child,int l,int t,int r,int b) {
按照流程图简单总结一下:
先调用ViewGroup的layout(),先对ViewGroup进行布局过程
在ViewGroup的onLayout()中实现子View的遍历布局过程
对遍历的子View按照ViewGroup的要求进行顶点坐标的计算,计算完成后调用子View的layout()
拓展:
View的测量宽/高(getMeasuredWidth()/getMeasuredHeight())与最终得到的宽/高(getWidth()/getHeight())有什么区别?
1 2 3 4 5 6 7 8 9 10 11 12 13 14 15 16 17 18 19 20 21 22 public final int getMeasuredWidth () {return mMeasuredWidth & MEASURED_SIZE_MASK;public final int getMeasuredHeight () {return mMeasuredHeight & MEASURED_SIZE_MASK;private void setMeasuredDimensionRaw (int measuredWidth, int measuredHeight) {public final int getWidth () {return mRight - mLeft;public final int getHeight () {return mBottom - mTop;
两者的比较
类型
何时赋值
赋值方法
使用场景
View测量结束宽/高
View的measure过程
setMeasuredDimension()在onLayout()获取View的宽/高
View最终宽/高
View的layout过程
layout()对top,left,right,bottom进行操作onLayout()结束后获取最终宽/高
一般情况下,二者返回的数据是相同的,除非人为对View的layout()进行重写。
1 2 3 public void layout (int l,int t,int r,int b) {super .layout(l,t,r+100 ,b+100 );
上述代码就会导致View最终结果与测量时不同。
补充:onSizeChanged()更适合处理“尺寸变化触发的缓存重建”(路径、渐变、裁剪区等);onLayout()更偏向子View摆放策略。
draw-绘制
draw作用主要将View绘制在屏幕上面
draw过程,先draw自身再draw子View
起点是performDraw()
1 2 3 4 5 6 7 8 9 10 11 12 13 14 15 16 17 18 19 20 21 22 private void performDraw () {boolean canUseAsync = draw(fullRedrawNeeded);private boolean draw (boolean fullRedrawNeeded) {if (!dirty.isEmpty() || mIsAnimating || accessibilityFocusDirty) {if (mAttachInfo.mThreadedRenderer != null && mAttachInfo.mThreadedRenderer.isEnabled()) {this , callback); else {if (!drawSoftware(surface, mAttachInfo, xOffset, yOffset,return false ;
View的draw过程
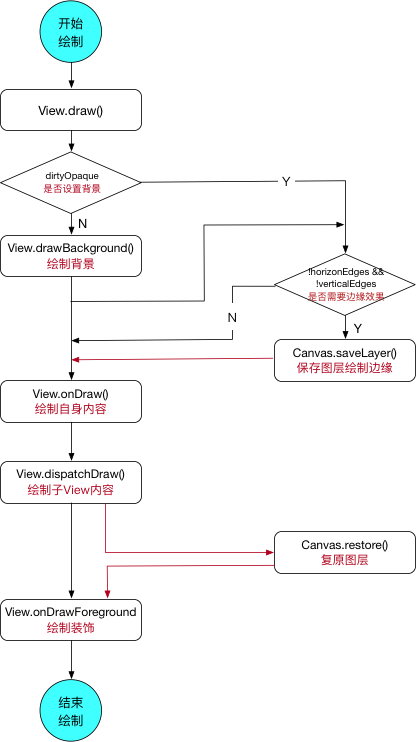
View的draw过程,从View.draw()开始
1 2 3 4 5 6 7 8 9 10 11 12 13 14 15 16 17 18 19 20 21 22 23 24 25 26 27 28 29 30 31 32 33 34 35 36 37 38 39 40 41 42 43 44 45 46 47 48 49 50 51 52 53 54 55 56 57 58 59 60 61 62 63 64 65 66 67 68 69 70 71 72 73 74 75 76 77 78 79 80 81 82 83 84 85 86 87 88 89 90 91 92 93 94 95 96 97 98 99 100 101 102 103 104 105 106 107 108 109 110 111 112 113 114 115 116 117 118 119 120 121 122 123 124 125 126 127 128 129 130 public void draw (Canvas canvas) {final boolean dirtyOpaque = (privateFlags & PFLAG_DIRTY_MASK) == PFLAG_DIRTY_OPAQUE &&null || !mAttachInfo.mIgnoreDirtyState);int saveCount;if (!dirtyOpaque) {final int viewFlags = mViewFlags;boolean horizontalEdges = (viewFlags & FADING_EDGE_HORIZONTAL) != 0 ;boolean verticalEdges = (viewFlags & FADING_EDGE_VERTICAL) != 0 ;if (!horizontalEdges && !verticalEdges){if (!dirtyOpaque) onDraw(canvas);return ; int solidColor = getSolidColor();if (solidColor == 0 ) {final int flags = Canvas.HAS_ALPHA_LAYER_SAVE_FLAG;if (drawTop) {null , flags);if (drawBottom) {null , flags);if (drawLeft) {null , flags);if (drawRight) {null , flags);else {if (!dirtyOpaque) onDraw(canvas);private void drawBackground (Canvas canvas) {final Drawable background = mBackground;if (background == null ) {return ;final int scrollX = mScrollX;final int scrollY = mScrollY;if ((scrollX | scrollY) == 0 ) {else {protected void onDraw (Canvas canvas) {protected void dispatchDraw (Canvas canvas) {public void onDrawForeground (Canvas canvas) {final Drawable foreground = mForegroundInfo != null ? mForegroundInfo.mDrawable : null ;if (foreground != null ) {if (mForegroundInfo.mBoundsChanged) {false ;final Rect selfBounds = mForegroundInfo.mSelfBounds;final Rect overlayBounds = mForegroundInfo.mOverlayBounds;if (mForegroundInfo.mInsidePadding) {0 , 0 , getWidth(), getHeight());else {final int ld = getLayoutDirection();
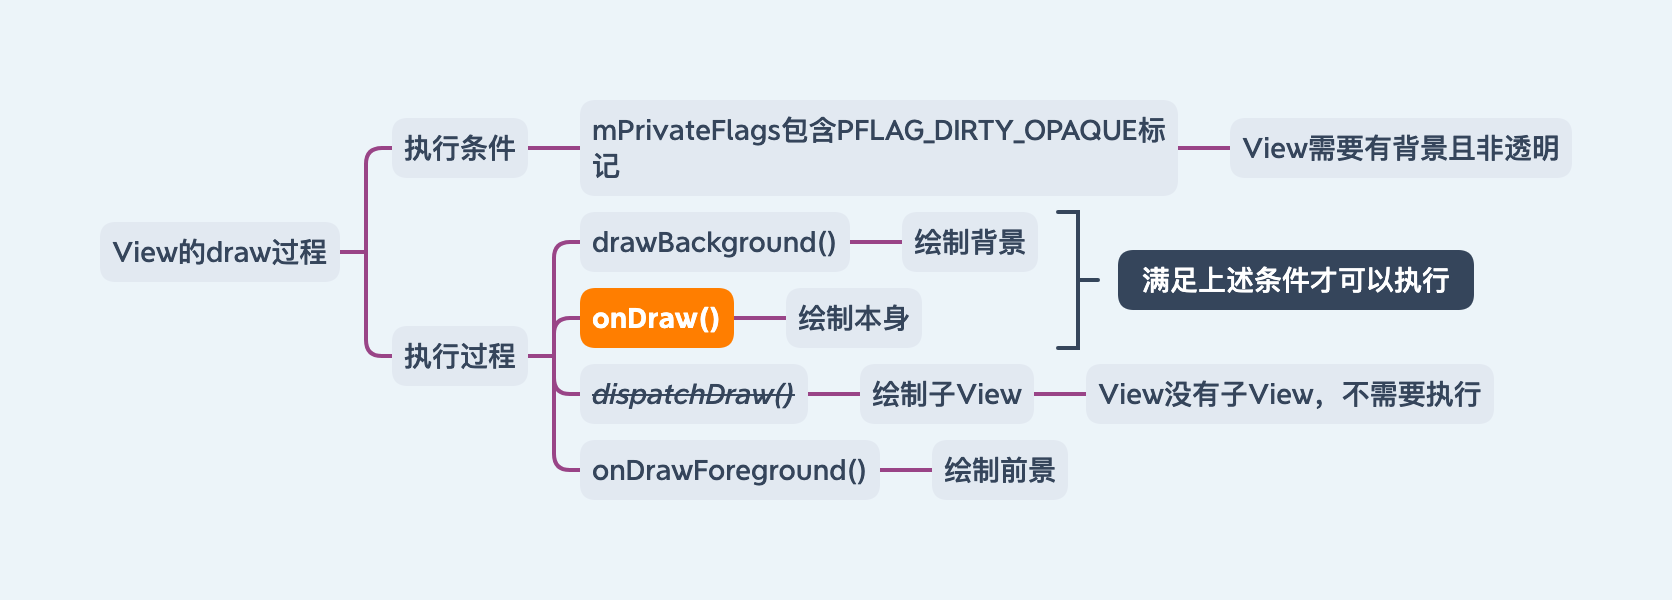
结合上述流程图分析Draw过程:
先调用View.draw()方法开始Draw流程
如果需要dirtyOpaque,就绘制背景drawBackground()
如果需要显示边缘效果,就进行保存画布canvas.saveLayer()
如果需要dirtyOpaque,绘制自身的内容onDraw() – 自定义View必须实现
调用dispatchDraw()绘制子View
如果需要显示边缘效果,绘制后,还原画布canvas.restore()
调用drawForeground()绘制装饰,例如滚动条或前景
从职责划分上可以把这几个方法这样理解:
draw():整个绘制流程的总入口,负责把各阶段串起来。onDraw():绘制当前View自己的内容。dispatchDraw():负责把绘制机会继续分发给子View。onDrawForeground():负责前景、滚动条等装饰性内容。
对于ViewGroup来说,很多时候真正的重点在dispatchDraw();如果一个ViewGroup还想自己额外绘制内容,通常还要注意willNotDraw标记的影响(下文拓展会继续说明)。
补充:onDraw()性能建议
避免在onDraw()里频繁创建对象(Paint/Path/Rect),改为成员变量复用。
尺寸相关计算尽量放在onSizeChanged(),减少每帧重复计算。
大量重绘优先局部刷新(脏区),避免无意义全量刷新。
ViewGroup的draw过程
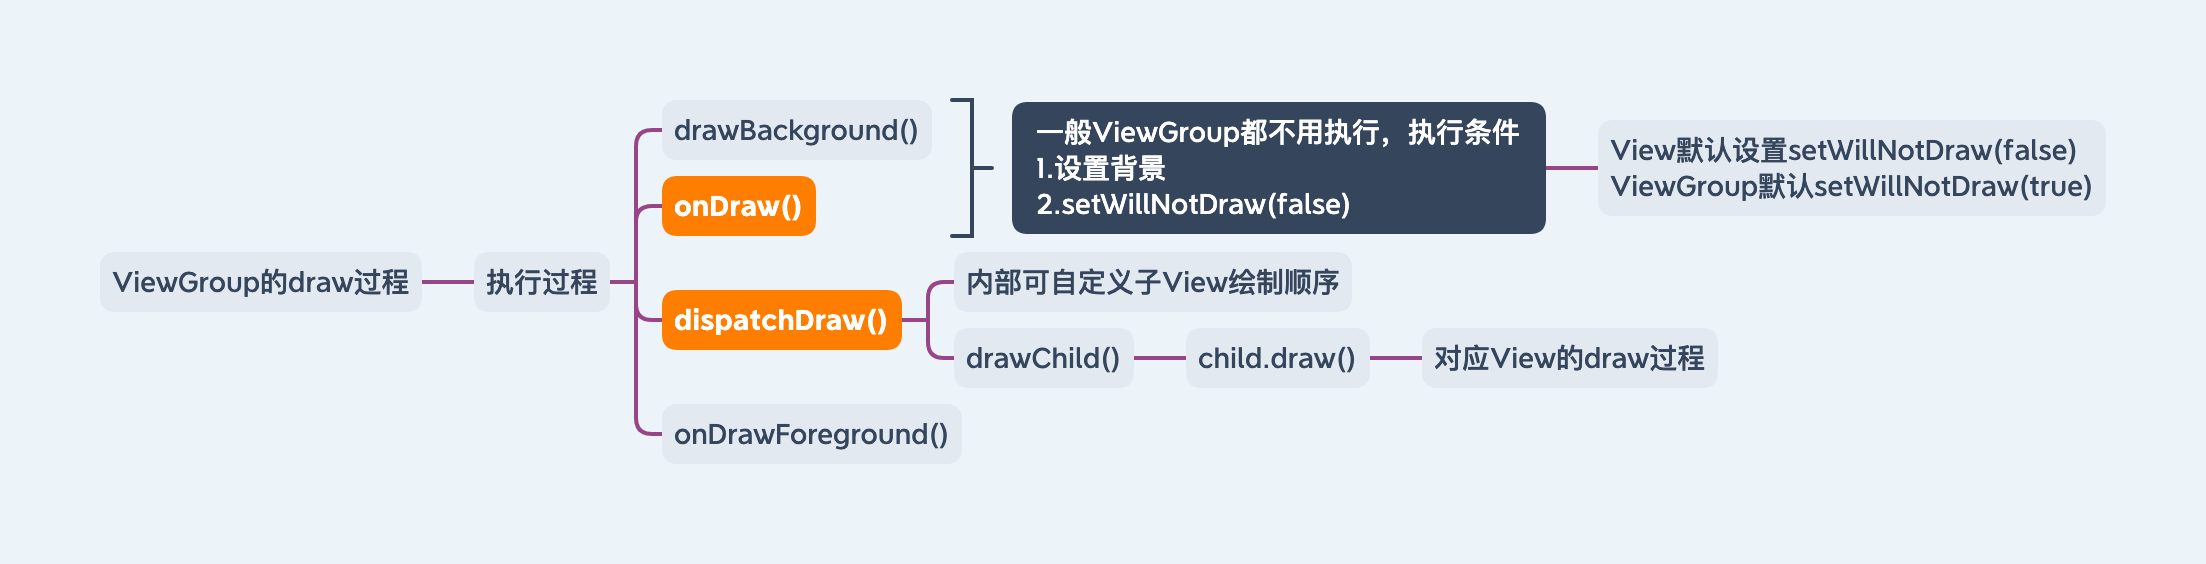
ViewGroup的draw过程主要调整了上述源码中的dispatchDraw(),在其内部进行了子View的遍历以及绘制过程
1 2 3 4 5 6 7 8 9 10 11 12 13 14 15 16 17 18 19 20 21 22 23 24 25 26 27 28 29 30 31 32 33 34 35 protected void dispatchDraw (Canvas canvas) {boolean usingRenderNodeProperties = canvas.isRecordingFor(mRenderNode);final int childrenCount = mChildrenCount;final View[] children = mChildren;for (int i = 0 ; i < childrenCount; i++) {while (transientIndex >= 0 && mTransientIndices.get(transientIndex) == i) {final View transientChild = mTransientViews.get(transientIndex);if ((transientChild.mViewFlags & VISIBILITY_MASK) == VISIBLE ||null ) {if (transientIndex >= transientCount) {1 ;final int childIndex = getAndVerifyPreorderedIndex(childrenCount, i, customOrder);final View child = getAndVerifyPreorderedView(preorderedList, children, childIndex);if ((child.mViewFlags & VISIBILITY_MASK) == VISIBLE || child.getAnimation() != null ) {protected boolean drawChild (Canvas canvas, View child, long drawingTime) {return child.draw(canvas, this , drawingTime);
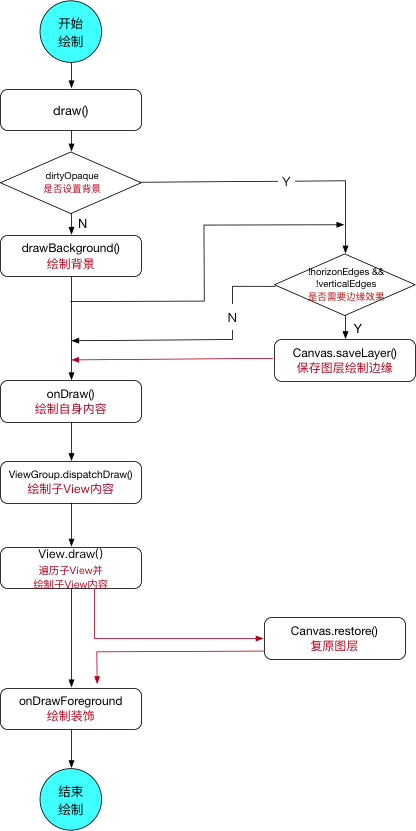
结合上述流程图分析ViewGroup的Draw过程:
draw过程与上述View的draw过程一致
dispatchDraw()默认实现,内部包含了子View的遍历以及绘制
拓展:
View.setWillNotDraw()有什么意义?
1 2 3 4 public void setWillNotDraw (boolean willNotDraw) {0 , DRAW_MASK);
如果一个View不需要绘制任何内容,设置这个标记为true,系统就会进行相应优化。
View默认不开启willNotDraw标记位,ViewGroup默认开启。
ViewGroup修改子View绘制顺序
ViewGroup.java 1 2 3 4 5 6 7 8 9 10 11 12 13 14 15 16 17 18 19 20 21 22 23 24 25 26 27 28 29 30 31 32 33 34 35 36 37 38 39 40 41 42 43 44 45 46 47 48 49 50 51 52 53 54 55 56 57 58 59 60 61 62 63 64 65 66 67 68 69 70 71 72 73 74 75 76 77 78 79 80 81 82 83 84 85 86 87 88 89 90 91 92 93 94 95 96 97 98 99 100 101 102 103 104 protected void dispatchDraw (Canvas canvas) {final ArrayList<View> preorderedList = usingRenderNodePropertiesnull : buildOrderedChildList();final boolean customOrder = preorderedList == null for (int i = 0 ; i < childrenCount; i++) {while (transientIndex >= 0 && mTransientIndices.get(transientIndex) == i) {final View transientChild = mTransientViews.get(transientIndex);if ((transientChild.mViewFlags & VISIBILITY_MASK) == VISIBLE ||null ) {if (transientIndex >= transientCount) {1 ;final int childIndex = getAndVerifyPreorderedIndex(childrenCount, i, customOrder);final View child = getAndVerifyPreorderedView(preorderedList, children, childIndex);if ((child.mViewFlags & VISIBILITY_MASK) == VISIBLE || child.getAnimation() != null ) {protected boolean isChildrenDrawingOrderEnabled () {return (mGroupFlags & FLAG_USE_CHILD_DRAWING_ORDER) == FLAG_USE_CHILD_DRAWING_ORDER;protected void setChildrenDrawingOrderEnabled (boolean enabled) {buildOrderedChildList () {final int childrenCount = mChildrenCount;if (childrenCount <= 1 || !hasChildWithZ()) return null ;if (mPreSortedChildren == null ) {new ArrayList <>(childrenCount);else {final boolean customOrder = isChildrenDrawingOrderEnabled();for (int i = 0 ; i < childrenCount; i++) {final int childIndex = getAndVerifyPreorderedIndex(childrenCount, i, customOrder);final View nextChild = mChildren[childIndex];final float currentZ = nextChild.getZ();int insertIndex = i;while (insertIndex > 0 && mPreSortedChildren.get(insertIndex - 1 ).getZ() > currentZ) {return mPreSortedChildren;private int getAndVerifyPreorderedIndex (int childrenCount, int i, boolean customOrder) {final int childIndex;if (customOrder) {final int childIndex1 = getChildDrawingOrder(childrenCount, i);if (childIndex1 >= childrenCount) {throw new IndexOutOfBoundsException ("getChildDrawingOrder() " "returned invalid index " + childIndex1" (child count is " + childrenCount + ")" );else {return childIndex;protected int getChildDrawingOrder (int childCount, int i) {return i;private static View getAndVerifyPreorderedView (ArrayList<View> preorderedList, View[] children, int childIndex) {final View child;if (preorderedList != null ) {if (child == null ) {throw new RuntimeException ("Invalid preorderedList contained null child at index " else {return child;
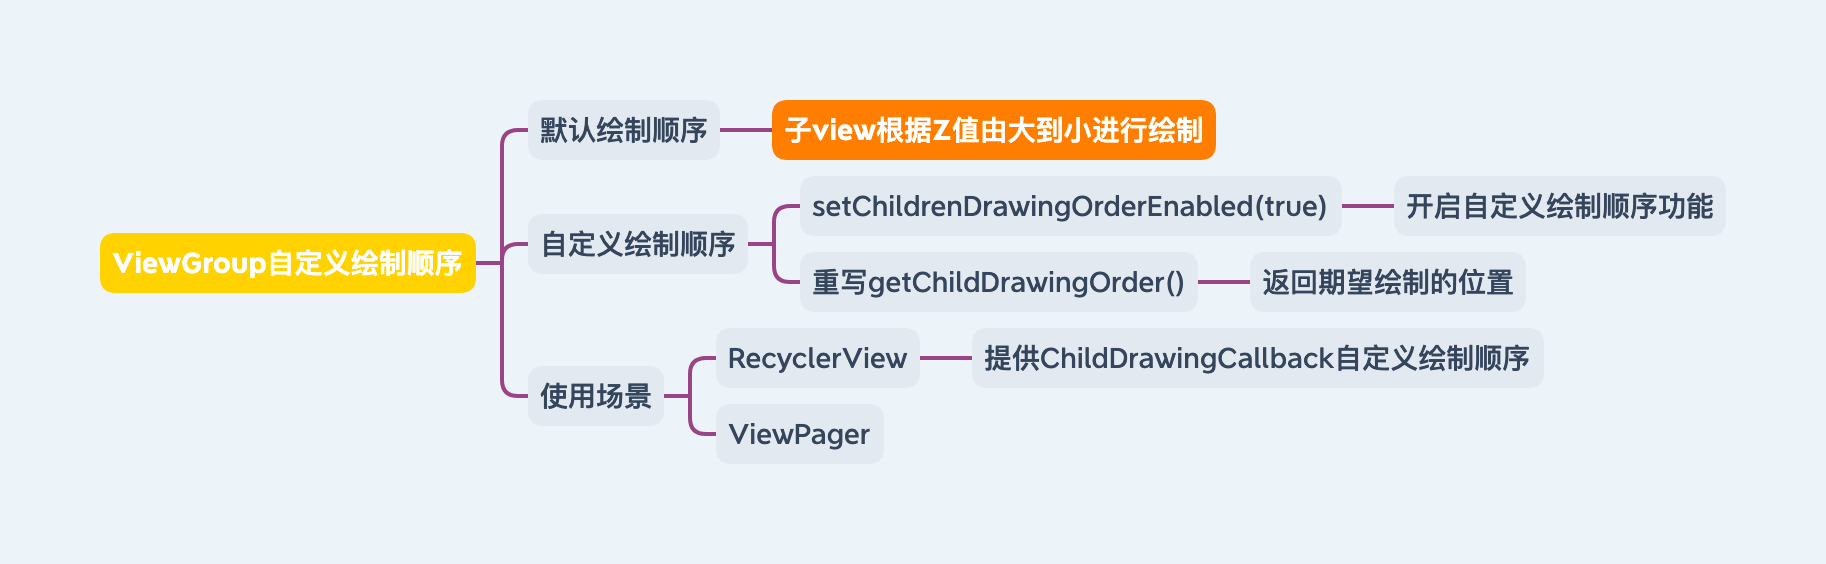
根据上述源码,默认的绘制按照z轴从大到小的顺序 进行绘制,如果需要修改绘制顺序的话,需要执行以下两步:
setChildrenDrawingOrderEnabled(true)打开自定义设置开关继承ViewGroup后,重写getChildDrawingOrder()方法,设置对应的绘制顺序
常用的RecyclerView、ViewPager都实现了该方法,其中RecyclerView通过设置ChildDrawingOrderCallback也可以实现这个功能。
如果在addView()的场景下,可通过setElevation()或setTranslationZ()或setZ()去修改Z轴的坐标值。
自定义View
自定义View需要了解View的层次、View的事件分发机制以及View的工作流程。
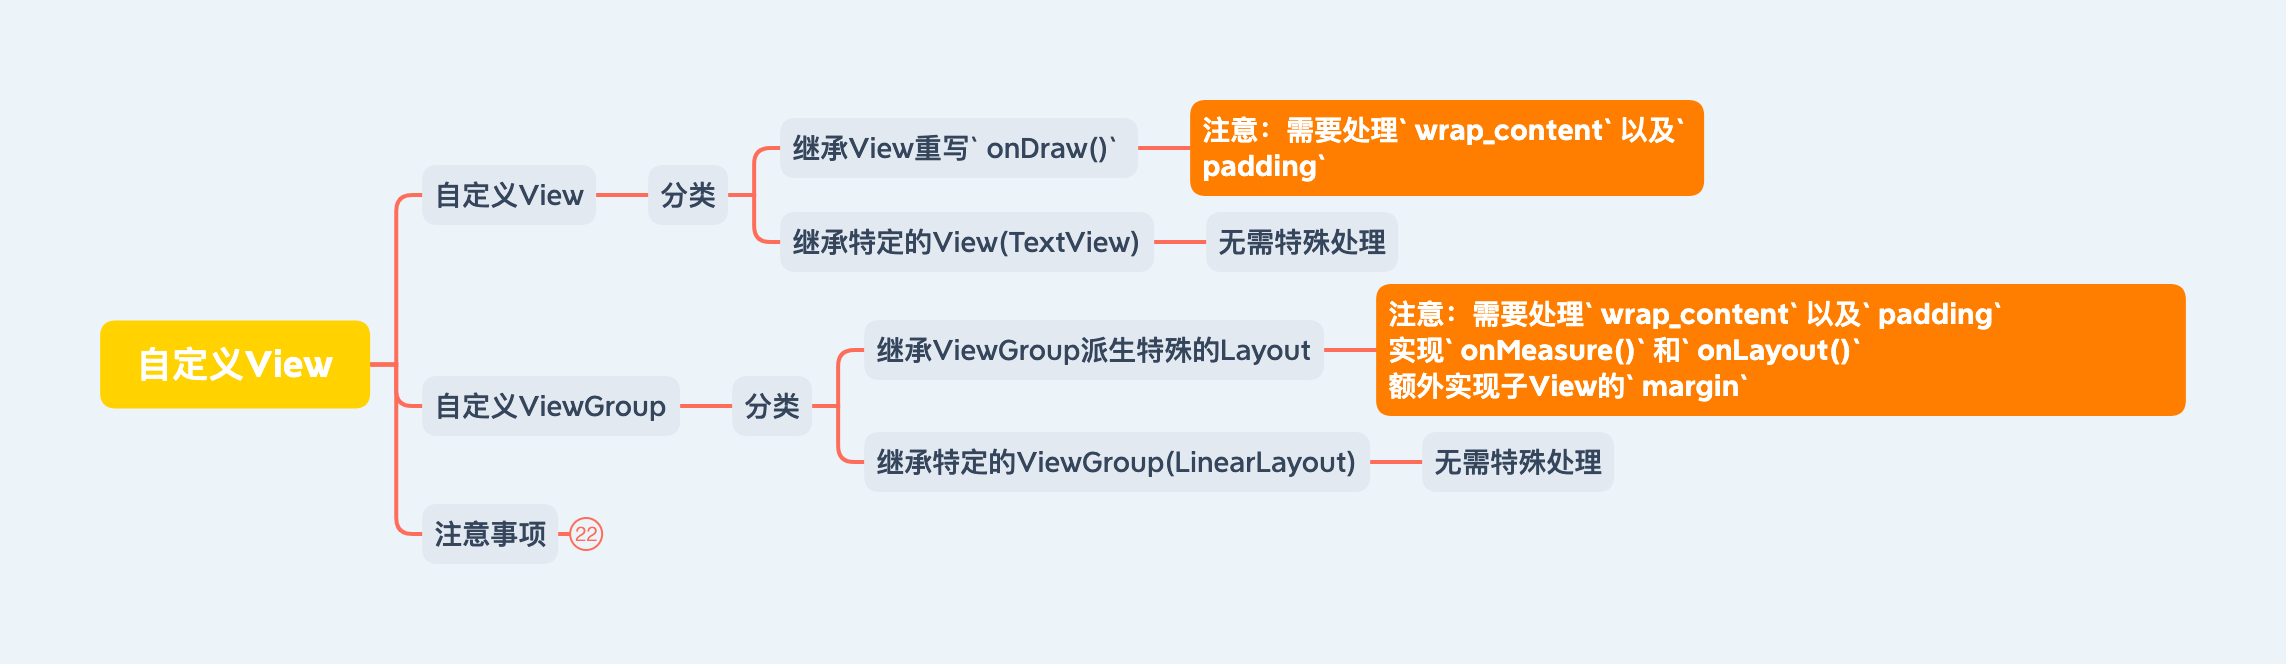
分类 1.继承View重写onDraw()
主要用于实现一些不规则的效果,不方便通过布局的组合方法可以直接实现,往往需要静态或者动态的显示一些不规则图形(圆形啥的)。
特殊形状的这种就需要重写onDraw()实现。一般需要额外支持wrap_content,并且也需要处理padding方法。
2.继承ViewGroup派生特殊的Layout
主要用于实现自定义的布局,除了常用的一些布局外。实现的是几种View的组合形式
实现稍微复杂,需要合适的处理ViewGroup的onMeasure(),onLayout()以及子View的onMeasure(),onLayout()
3.继承特定的View(例如TextView)
这种比较常见,一般用于拓展已有View的功能。
实现比较简单,无需自己处理wrap_content以及padding
4.继承特定的ViewGroup(例如LinearLayout)
比较常见,当某种效果看起来很像几种View组合在一起的时候
实现比较简单,无需自己处理测量以及布局过程
注意事项
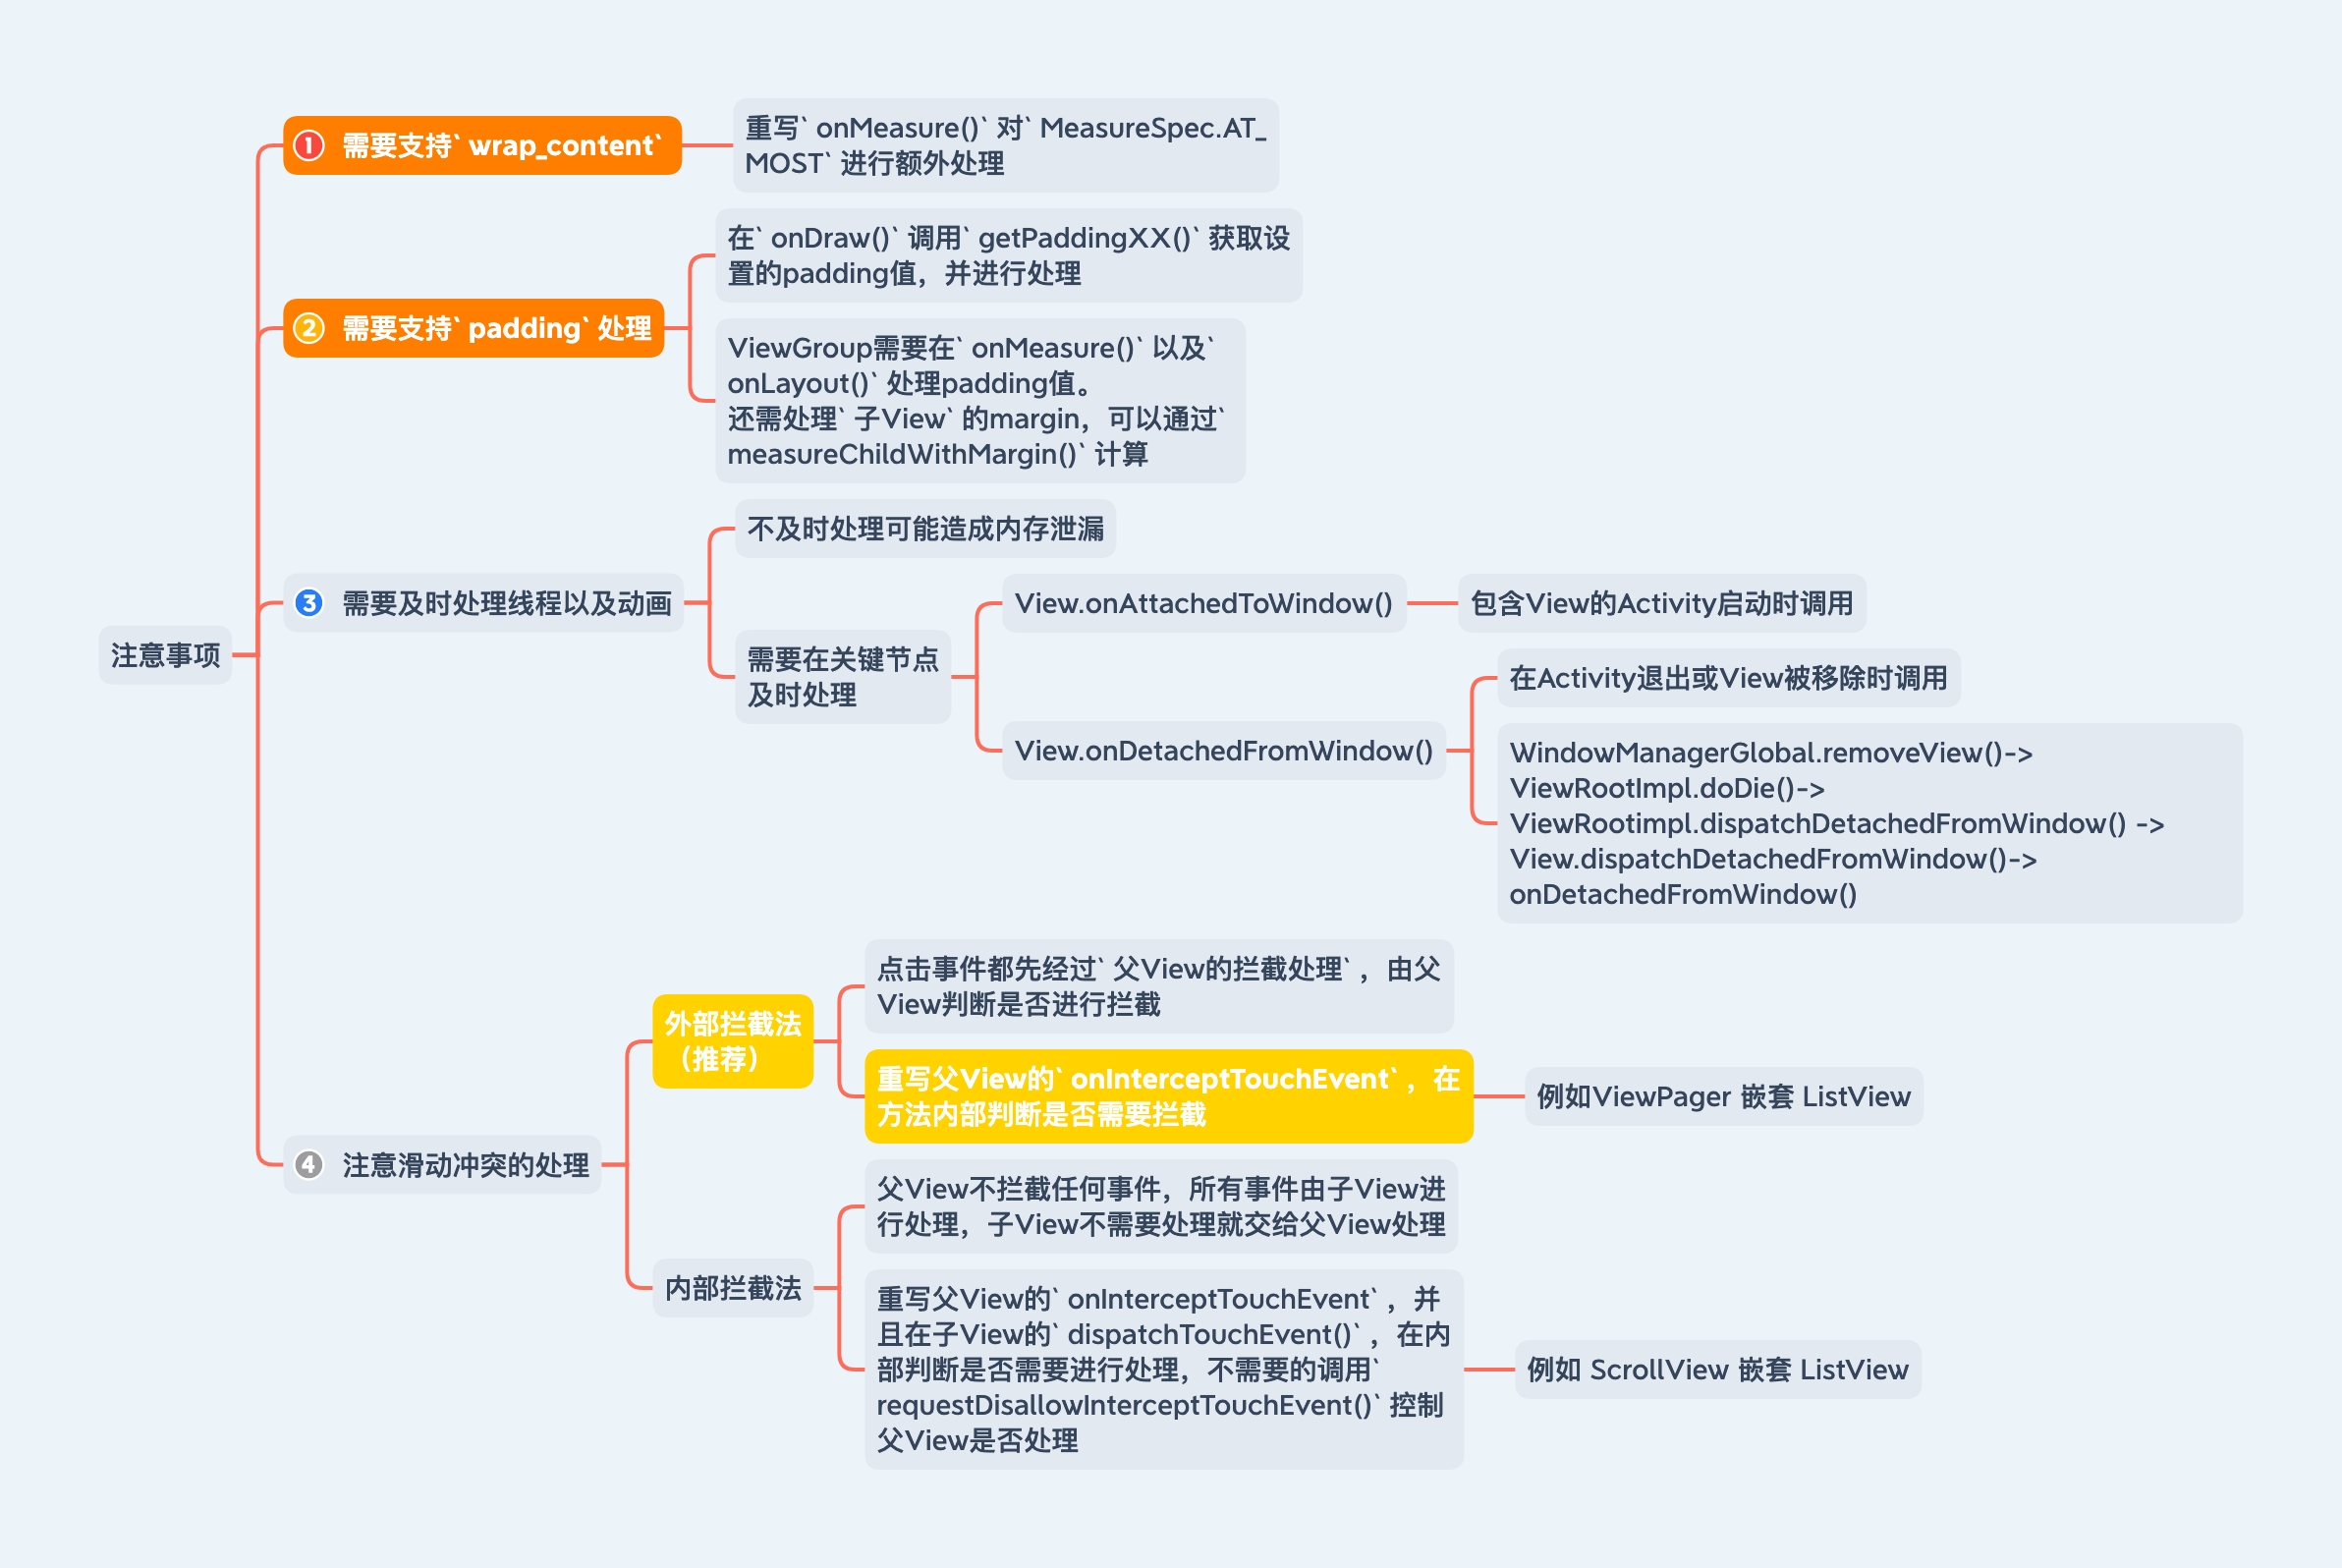
1.让View支持wrap_content
直接继承View或ViewGroup的控件,不重写onMeasure()并对AT_MOST进行处理,就无法达到需要的显示效果。
2.需要的话,让View支持padding
直接继承View的控件,需要在draw过程处理padding属性,不然padding属性无法起作用。
直接继承ViewGroup的控件,需要在onMeasure(),onLayout()处理自身的padding以及子View的marginmeasureChildWithMargin()
3.尽量不要在View中使用Handler
View内部提供了post方法,可以替代Handler使用
4.View中如果有线程或动画,需要及时停止
不处理有可能造成内存泄漏,View不可见时也需要停止线程和动画
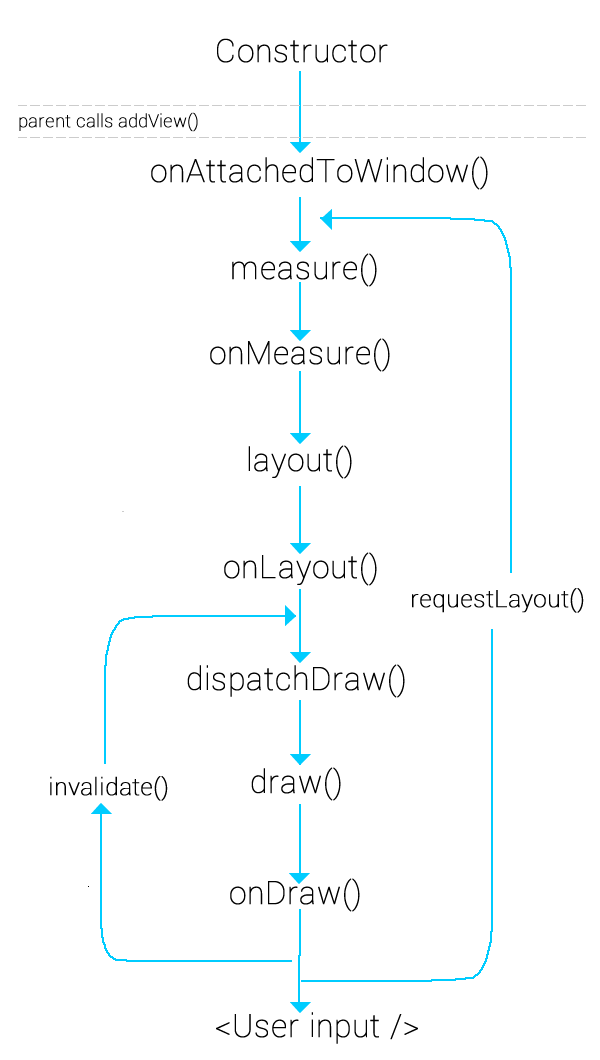
包含View的Activity启动时,View的onAttachedToWindow()会调用
包含View的Activity退出或当前View被移除时,调用View.onDetachedFromWindow()时关闭线程和动画
同时要注意:View树相关调用都在主线程,跨线程直接改View会在ViewRootImpl.checkThread()处抛异常。
5.View若有滑动冲突情况,需要处理
滑动冲突处理方法:
外部拦截法:点击事件都先经过父容器的拦截处理 ,如果父容器需要此事件就拦截,不需要就放行
重写父容器的onInterceptTouchEvent(),在方法内部拦截
内部拦截法:父容器不拦截任何事件,所有事件交由子容器进行处理,如果子容器需要就消耗事件,不需要就返给父容器处理。
重写父容器的onInterceptTouchEvent(),以及子容器的dispatchTouchEvent()。关键在于调用requestDisallowInterceptTouchEvent()控制父布局是否进行拦截。
一般推荐使用外部拦截法,符合事件分发流程。
实例 自定义View实践
自定义ViewGroup实践
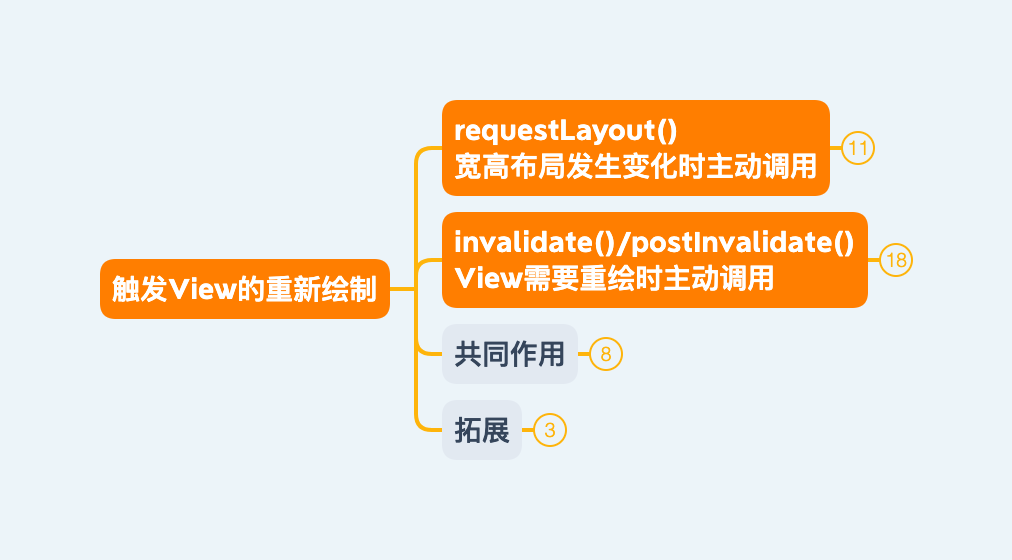
拓展 如何触发View的重新绘制? 通过调用invalidate()/postInvalidate()或requestLayout()实现。
requestLayout
在需要刷新View的布局时会调用该函数。不应该在布局的过程中调用这个函数。
这个请求可能会在以下场景执行:当前布局结束、当前帧绘制完成,下次布局发生时
1 2 3 4 5 6 7 8 9 10 11 12 13 14 15 16 17 18 19 20 21 22 23 24 25 26 27 28 29 30 31 public void requestLayout () {if (mMeasureCache != null ) mMeasureCache.clear();if (mAttachInfo != null && mAttachInfo.mViewRequestingLayout == null ) {ViewRootImpl viewRoot = getViewRootImpl();if (viewRoot != null && viewRoot.isInLayout()) {if (!viewRoot.requestLayoutDuringLayout(this )) {return ;this ;if (mParent != null && !mParent.isLayoutRequested()) {if (mAttachInfo != null && mAttachInfo.mViewRequestingLayout == this ) {null ;
mParent对应父节点,一层层向上递归调用父节点requestLayout()。直到调用ViewRootImpl.requestLayout()结束.
1 2 3 4 5 6 7 8 9 10 11 @Override public void requestLayout () {if (!mHandlingLayoutInLayoutRequest) {true ;
调用到scheduleTraversals()就是开始了View的绘制流程。
更准确地说,这里并不是“立刻执行绘制”,而是向ViewRootImpl提交一次遍历请求 :
当前线程把这次刷新标记为待处理。
scheduleTraversals()会把遍历任务挂到下一帧。同一帧内如果多次调用requestLayout(),通常会被合并,避免重复执行完整遍历。
1 2 3 4 5 6 7 8 9 10 11 12 13 14 15 16 17 18 19 20 21 22 23 24 25 26 27 28 29 30 31 32 33 private void performTraversals () {boolean layoutRequested = mLayoutRequested && (!mStopped || mReportNextDraw);if (!mStopped || mReportNextDraw) {if (focusChangedDueToTouchMode || mWidth != host.getMeasuredWidth()final boolean didLayout = layoutRequested && (!mStopped || mReportNextDraw);if (didLayout) {boolean cancelDraw = mAttachInfo.mTreeObserver.dispatchOnPreDraw() || !isViewVisible;if (!cancelDraw && !newSurface) {if (mPendingTransitions != null && mPendingTransitions.size() > 0 ) {for (int i = 0 ; i < mPendingTransitions.size(); ++i) {
一开始调用的performMeasure()
1 2 3 4 5 6 7 8 9 10 11 12 13 14 15 16 17 18 19 20 21 22 23 24 25 private void performMeasure (int childWidthMeasureSpec, int childHeightMeasureSpec) {try {finally {public final void measure (int widthMeasureSpec, int heightMeasureSpec) {final boolean forceLayout = (mPrivateFlags & PFLAG_FORCE_LAYOUT) == PFLAG_FORCE_LAYOUT;if (forceLayout || needsLayout) {
继续向下调用performLayout()
1 2 3 4 5 6 7 8 9 10 11 12 13 14 15 16 17 18 19 20 21 22 23 24 25 26 27 28 29 30 31 32 33 34 35 36 37 38 39 40 41 42 private void performLayout (WindowManager.LayoutParams lp, int desiredWindowWidth, int desiredWindowHeight) {true ;final View host = mView;int numViewsRequestingLayout = mLayoutRequesters.size();if (numViewsRequestingLayout > 0 ) {false );if (validLayoutRequesters != null ) {0 , 0 , host.getMeasuredWidth(), host.getMeasuredHeight()); true ); if (validLayoutRequesters != null ) {final ArrayList<View> finalRequesters = validLayoutRequesters;new Runnable () {@Override public void run () {int numValidRequests = finalRequesters.size();for (int i = 0 ; i < numValidRequests; ++i) {final View view = finalRequesters.get(i);"View" , "requestLayout() improperly called by " + view +" during second layout pass: posting in next frame" );
主要执行了三步:
执行DecorView的layout过程
执行调用过requestLayout()的View(包含PFLAG_FORCE_LAYOUT标志)的measure和layout
还没调用过requestLayout()的View加入到队列中,等待下一帧绘制时执行
1 2 3 4 5 6 7 8 9 10 11 12 13 14 15 16 17 18 19 20 21 22 23 24 25 26 27 28 public void layout (int l, int t, int r, int b) {boolean changed = isLayoutModeOptical(mParent) ?if (changed || (mPrivateFlags & PFLAG_LAYOUT_REQUIRED) == PFLAG_LAYOUT_REQUIRED) {protected boolean setFrame (int left, int top, int right, int bottom) {if (mLeft != left || mRight != right || mTop != top || mBottom != bottom) {boolean sizeChanged = (newWidth != oldWidth) || (newHeight != oldHeight);
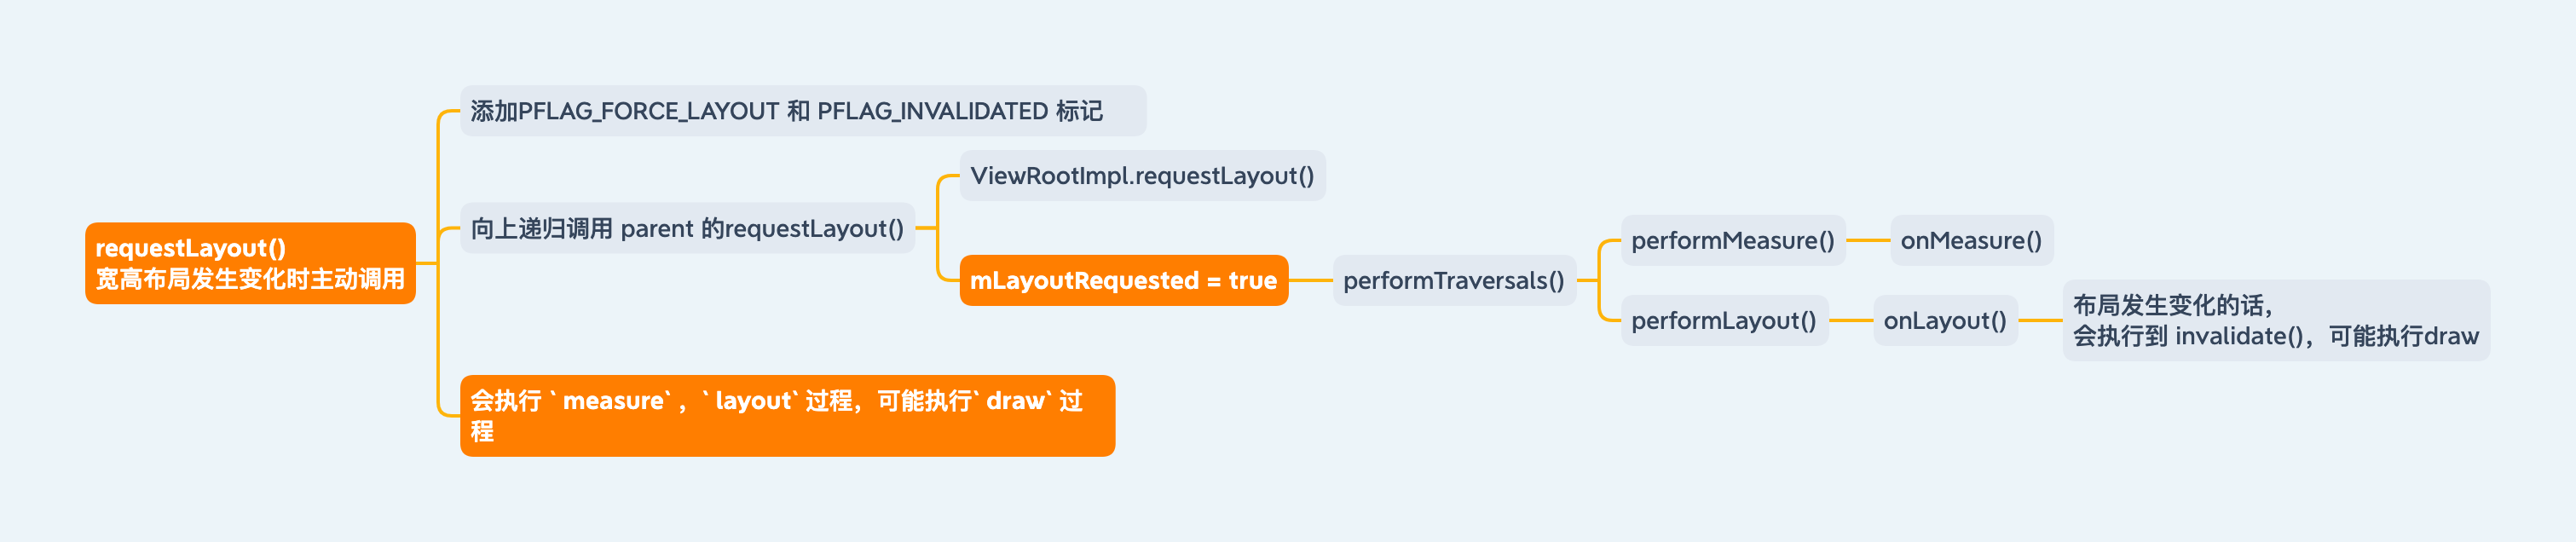
requestLayout()主要执行了以下几步:
添加PFLAG_FORCE_LAYOUT和PFLAG_INVALIDATED标记
measure执行需要判断PFLAG_FORCE_LAYOUT标记是否存在measure执行后,添加PFLAG_LAYOUT_REQUIRED标记,可以去执行onLayout()layout执行后,移除PFLAG_LAYOUT_REQUIRED和PFLAG_FORCE_LAYOUT标记在layout过程中,如果位置发生了变化,会执行到invalidate(),可能会执行draw过程;如果未发生变化,就不会执行draw过程
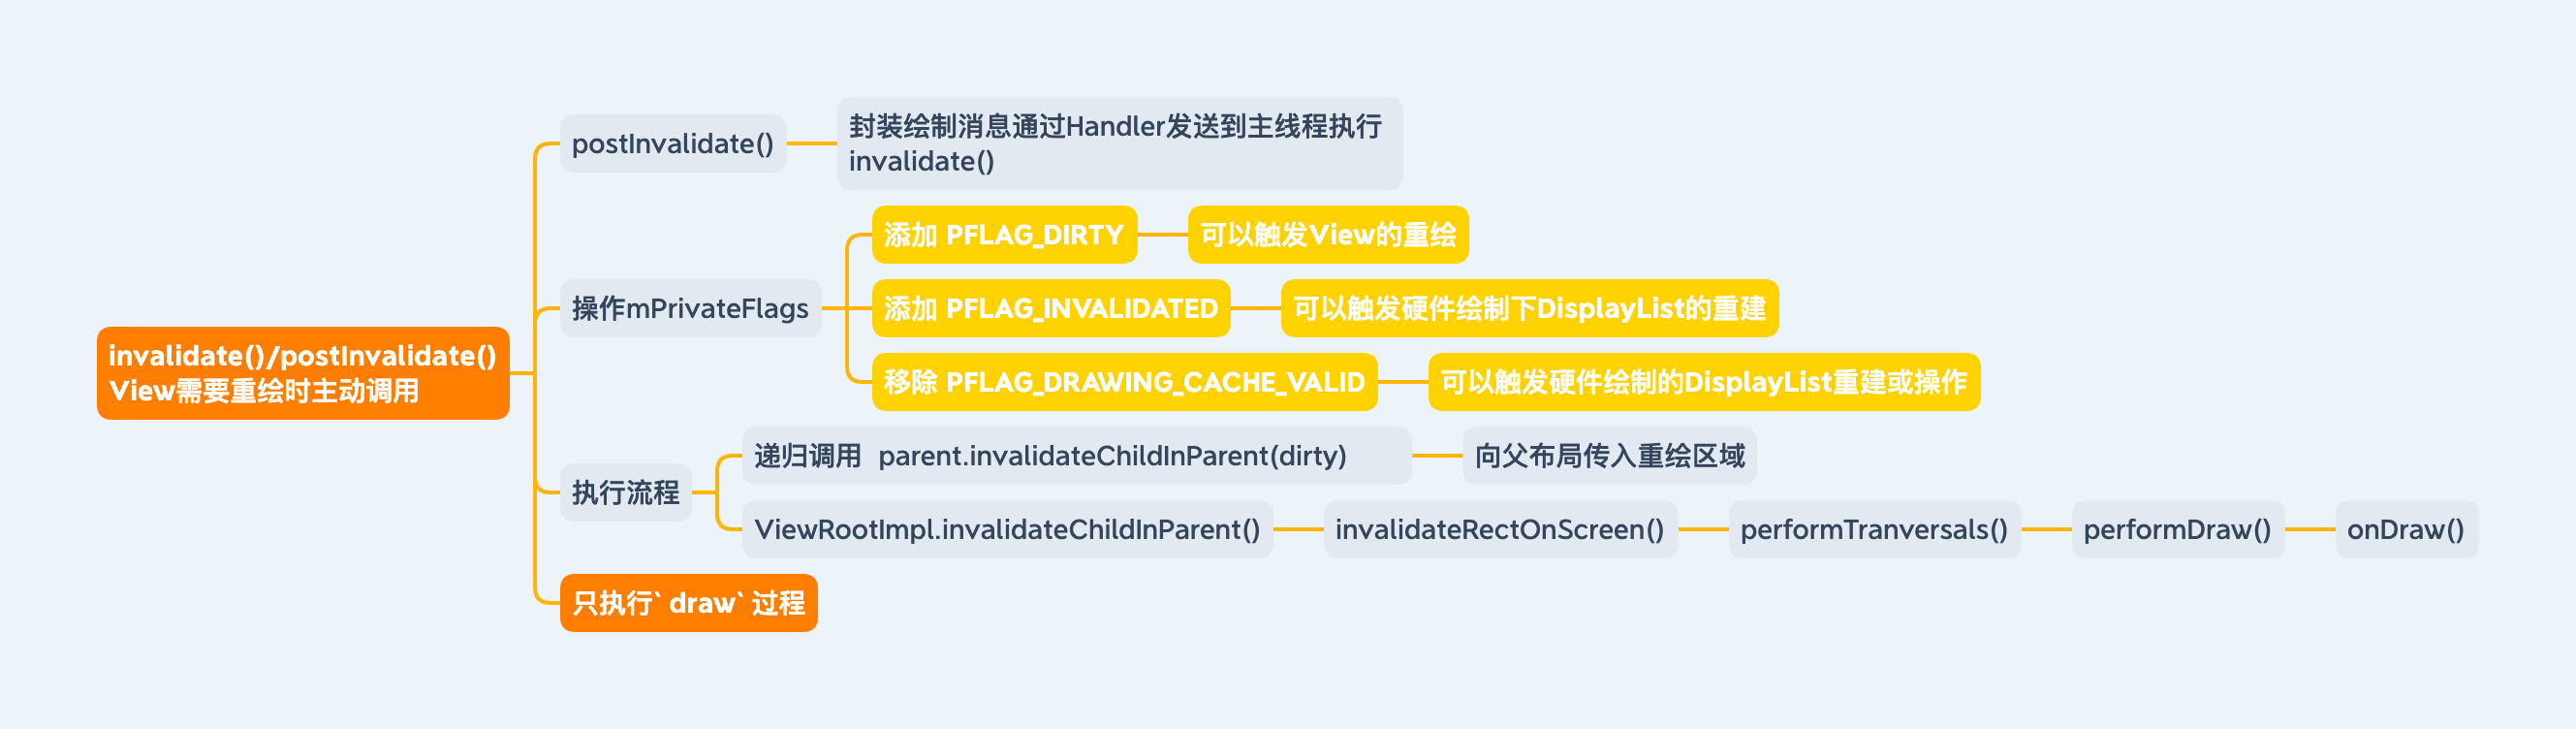
invalidate/postInvalidate
invalidate()必须在主线程调用。postInvalidate()可以在子线程调用(通过handler发送消息到主线程调用)
主要用于请求View的重绘,只会影响到View的draw过程
1 2 3 4 5 6 7 8 9 10 11 12 13 14 15 16 17 18 19 20 21 22 23 public void postInvalidate () {0 );public void dispatchInvalidateDelayed (View view, long delayMilliseconds) {Message msg = mHandler.obtainMessage(MSG_INVALIDATE, view);@Override public void handleMessage (Message msg) {switch (msg.what) {case MSG_INVALIDATE:break ;public void invalidate () {true );
最终执行到invalidateInternal()
1 2 3 4 5 6 7 8 9 10 11 12 13 14 15 16 17 18 19 20 21 22 23 24 25 26 27 28 29 30 31 32 33 34 35 36 37 38 39 void invalidateInternal (int l, int t, int r, int b, boolean invalidateCache, boolean fullInvalidate) {if (skipInvalidate()) {return ;if ((mPrivateFlags & (PFLAG_DRAWN | PFLAG_HAS_BOUNDS)) == (PFLAG_DRAWN | PFLAG_HAS_BOUNDS)if (fullInvalidate) {if (invalidateCache) {final AttachInfo ai = mAttachInfo;final ViewParent p = mParent;if (p != null && ai != null && l < r && t < b) {final Rect damage = ai.mTmpInvalRect;this , damage);
上述代码修改标记完成后,调用父类的invalidateChild()将需要重绘的区域(脏区域)传入。(ViewGroup以及ViewRootImpl都继承自ViewParent类)
脏区域:为了保证绘制的效率,控件树仅对需要绘制的区域进行重绘,需要重绘的区域成为脏区域 。
1 2 3 4 5 6 7 8 9 10 11 12 13 14 15 16 17 18 19 20 21 22 23 24 25 26 27 28 29 30 31 32 33 34 35 36 37 38 39 40 41 42 43 44 45 46 47 48 49 50 51 52 53 54 55 56 57 58 59 public final void invalidateChild (View child, final Rect dirty) {if (attachInfo != null && attachInfo.mHardwareAccelerated) {return ;final boolean isOpaque = child.isOpaque() && !drawAnimation &&null && childMatrix.isIdentity(); int opaqueFlag = isOpaque ? PFLAG_DIRTY_OPAQUE : PFLAG_DIRTY;do {View view = null ;if (parent instanceof View) {if (drawAnimation) {if (view != null ) {else if (parent instanceof ViewRootImpl) {true ;if (view != null ) {if ((view.mViewFlags & FADING_EDGE_MASK) != 0 &&0 ) {if ((view.mPrivateFlags & PFLAG_DIRTY_MASK) != PFLAG_DIRTY) {int ) Math.floor(boundingRect.left),int ) Math.floor(boundingRect.top),int ) Math.ceil(boundingRect.right),int ) Math.ceil(boundingRect.bottom)); while (parent != null );public ViewParent invalidateChildInParent (final int [] location, final Rect dirty) {if ((mPrivateFlags & (PFLAG_DRAWN | PFLAG_DRAWING_CACHE_VALID)) != 0 ) {
当parent==null时,表示已经到了最顶层ViewRootImpl
1 2 3 4 5 6 7 8 9 10 11 12 13 14 15 16 17 18 19 20 21 22 23 24 25 26 27 28 29 30 31 32 33 34 35 36 37 38 39 40 41 public ViewParent invalidateChildInParent (int [] location, Rect dirty) {if (DEBUG_DRAW) Log.v(mTag, "Invalidate child: " + dirty);if (dirty == null ) {return null ;else if (dirty.isEmpty() && !mIsAnimating) {return null ;return null ;private void invalidateRectOnScreen (Rect dirty) {final Rect localDirty = mDirty;if (!localDirty.isEmpty() && !localDirty.contains(dirty)) {true ;true ;final float appScale = mAttachInfo.mApplicationScale;final boolean intersected = localDirty.intersect(0 , 0 ,int ) (mWidth * appScale + 0.5f ), (int ) (mHeight * appScale + 0.5f ));if (!intersected) {if (!mWillDrawSoon && (intersected || mIsAnimating)) {
通过scheduleTraversals()执行绘制流程,由于未设置mLayoutRequested = true,所以无法进入performMeasure()和performLayout()只能执行到performDraw()。
1 2 3 4 5 6 7 8 9 10 11 12 13 14 15 16 17 18 19 20 21 22 private void performDraw () {boolean canUseAsync = draw(fullRedrawNeeded);private boolean draw (boolean fullRedrawNeeded) {if (!dirty.isEmpty() || mIsAnimating || accessibilityFocusDirty) {if (mAttachInfo.mThreadedRenderer != null && mAttachInfo.mThreadedRenderer.isEnabled()) {this , callback); else {if (!drawSoftware(surface, mAttachInfo, xOffset, yOffset,return false ;
向下调用到View.draw()
1 2 3 4 5 6 7 8 9 10 11 public void draw (Canvas canvas) {final boolean dirtyOpaque = (privateFlags & PFLAG_DIRTY_MASK) == PFLAG_DIRTY_OPAQUE &&null || !mAttachInfo.mIgnoreDirtyState);if (!dirtyOpaque) {if (!dirtyOpaque) onDraw(canvas);
关键在于是否持有PFLAG_DIRTY_OPAQUE标志,这个标志主要是在invalidate()打上的。
invalidate()会设置当前脏区与相关标记,然后执行invalidateChild(),通过层层向上调用parent.invalidateChildInParent()把需要重新绘制的区域传递上去,直到达到ViewRootImpl。最后调用invalidateRectOnScreen()传入最终脏区,开始执行绘制流程。
核心是把重绘请求上传到ViewRootImpl并触发下一帧draw,是否走onDraw()还受透明度、背景与具体脏区状态影响。
两者区别 requestLayout()和invalidate()都可以触发整个绘制流程,但是触发measure、layout、draw各条件都不同
measure过程触发:mPrivateFlags包含PFLAG_FORCE_LAYOUTlayout过程触发:mPrivateFlags包含PFLAG_LAYOUT_REQUIRED(measure执行后添加)或者位置发生变化draw过程触发:存在脏区(dirty)或动画等需要重绘的条件
requestLayout()主要用来设置PFLAG_FORCE_LAYOUT标志以及设置mLayoutRequested=true,会执行到measure、layout过程,如果位置发生变化则可能执行draw过程。
invalidate()主要用于标记脏区并上报到ViewRootImpl,在下一次performTraversal()中进入performDraw()完成绘制。
两者虽然入口不同,但最终都不会立刻把像素画到屏幕上,而是等待ViewRootImpl在后续一帧统一执行遍历与绘制;区别主要在于是否需要重新走measure/layout链路。
使用建议:
内容变化但尺寸不变:优先invalidate()。
尺寸或位置可能变化:使用requestLayout()(必要时再配合invalidate())。
子线程触发重绘:用postInvalidate()或切回主线程调用。
排查建议:调用invalidate/requestLayout后若界面无变化,先检查主线程约束、脏区是否有效、父容器是否拦截刷新链路。
同时调用
在某些情况下,需要requestLayout和invalidate配合使用,得到最终的结果。
拿TextView举例:
当TextView执行setText()后,TextView可能布局发生改变,也可能需要进行重绘。需要区分不同情况实现对应功能。
1 2 3 4 5 6 7 8 9 10 11 12 13 14 15 16 17 18 19 20 21 22 23 24 25 26 27 28 29 30 31 32 33 34 35 36 37 38 39 40 41 42 43 44 45 46 47 48 49 50 51 52 53 54 55 56 57 58 59 60 61 62 63 64 65 private void setText (CharSequence text, //文本 BufferType type, //缓存类型 NORMAL 默认样式 SPANNABLE 自定义样式 EDITABLE 可以追加字符 boolean notifyBefore, //是否通知之前 int oldlen //旧文本长度 ) {if (mLayout != null ) {private void checkForRelayout () {if ((mLayoutParams.width != LayoutParams.WRAP_CONTENTnull || mHintLayout != null )0 )) {int oldht = mLayout.getHeight();int want = mLayout.getWidth();int hintWant = mHintLayout == null ? 0 : mHintLayout.getWidth();false );if (mEllipsize != TextUtils.TruncateAt.MARQUEE) {if (mLayoutParams.height != LayoutParams.WRAP_CONTENT return ;if (mLayout.getHeight() == oldhtnull || mHintLayout.getHeight() == oldht)) {return ;else {
根据上述源码分析:
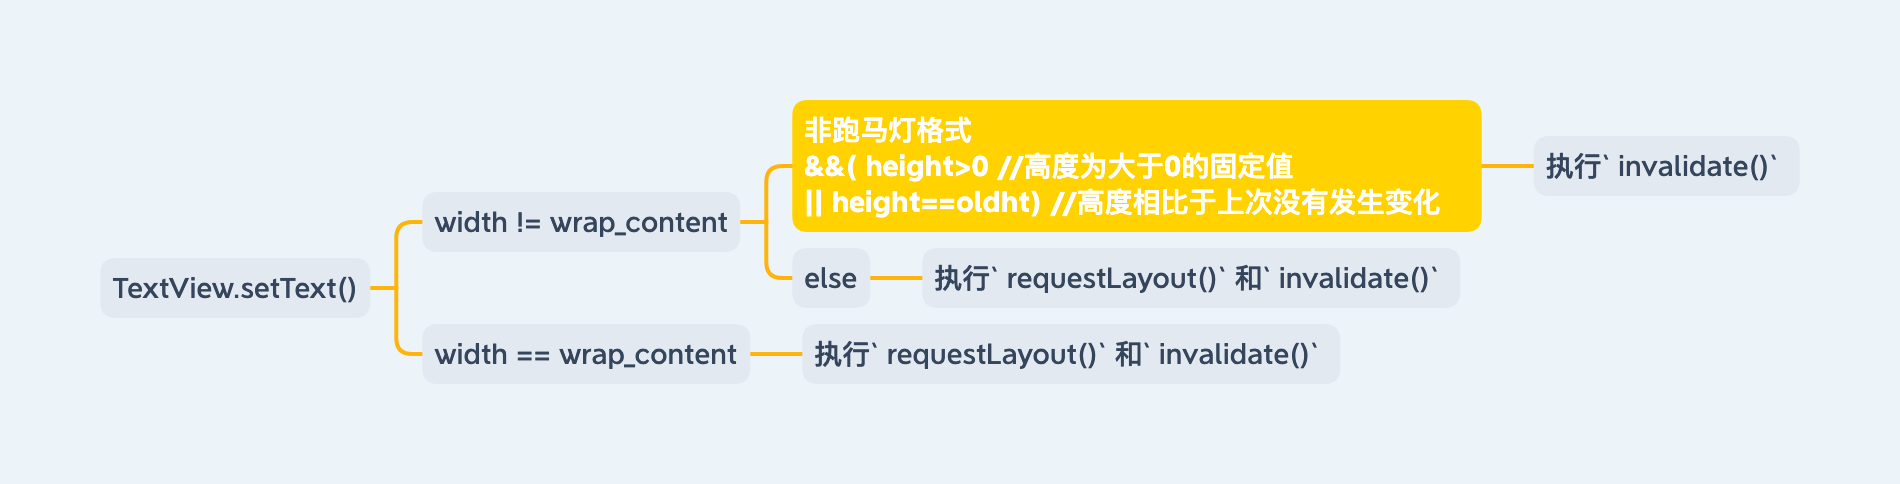
TextView.setText()根据不同的情况会执行不同的重绘方法:
width!=wrap_content
非跑马灯格式(mEllipsize!=MARQUEE) && (height > 0 || height == oldht/*高度没有变化*/):执行invalidate()
others:执行requestLayout()和invalidate()
width=wrap_content:需要执行requestLayout()和invalidate()
拓展 forceLayout()
标记当前View需要重新执行测量-布局-绘制流程。一般父ViewGroup调用requestLayout(),子View不会触发整套流程。
调用后,子View也可以执行整套流程。
1 2 3 4 5 6 7 public void forceLayout () {if (mMeasureCache != null ) mMeasureCache.clear();
forceLayout若要生效,需要直系父View调用requestLayout。
include、merge、ViewStub作用以及实现 include、merge及ViewStub相关
View的层级计算 1 2 3 4 5 6 7 8 9 10 11 12 13 14 15 16 17 18 19 20 21 private int maxViewDeep (View view) {if (!(view instanceof ViewGroup)) {return 0 ;ViewGroup vp = (ViewGroup) view;if (vp.getChildCount() == 0 ) {return 0 ;int max = 0 ;int count = vp.getChildCount();for (int i = 0 ; i < count; i++) {int deep = maxViewDeep(vp.getChildAt(i)) + 1 ;if (deep > max) {return max;
AsyncLayoutInflater异步加载 AsyncLayoutInflater
inflate()时,root与attachToRoot的结果源码 1 2 3 4 5 6 7 8 9 10 11 12 13 14 15 16 17 18 19 20 21 22 23 24 25 26 27 28 29 public View inflate (XmlPullParser parser, @Nullable ViewGroup root, boolean attachToRoot) {View result = root;if (root != null ) {if (!attachToRoot) {if (root != null && attachToRoot) {if (root == null || !attachToRoot) {return result;
根据源码分析到,root与attachToRoot会对inflate()结果产生影响,且实现代码会有差异。
root与attachToRoot参数表现
inflate()返回结果
root == null && attachToRoot == false/true直接显示source加载的结果,而且设置的宽高属性也会失效
source加载后的View实例
root != null && attachToRoot == false直接显示source加载的结果,且设置的宽高属性保持
source加载后的View实例
root != null && attachToRoot == true直接显示root并且source已被add进去且设置的宽高属性保持
root
root不为null,无论attachToRoot,都会保持需要加载布局的宽高属性。root为null,无论attachToRoot,都不会持有原有的宽高属性。
实战建议:
RecyclerView.Adapter中通常使用inflate(layout, parent, false),既拿到正确LayoutParams又不立即attach。页面根布局初始化时不要随意传root = null,否则容易丢失父容器相关布局参数语义。
MeasureSpec.UNSPECIFIED使用场景
UNSPECIFIED就是未指定的意思,在这个模式下 父控件不会干涉子控件的尺寸。
一般用于支持滚动的布局中,例如ScrollView、RecyclerView中。
在可滚动的ViewGroup中,不应该限制子View的尺寸。有可能子View会超出父布局的尺寸,在AT_MOST/EXACTLY都会对子View的尺寸进行限制。
拿ScrollView举例
1 2 3 4 5 6 7 8 9 10 11 12 13 14 15 16 17 18 protected void measureChild (View child, int parentWidthMeasureSpec, int parentHeightMeasureSpec) {LayoutParams lp = child.getLayoutParams();int childWidthMeasureSpec;int childHeightMeasureSpec;final int verticalPadding = mPaddingTop + mPaddingBottom;0 , MeasureSpec.getSize(parentHeightMeasureSpec) - verticalPadding),


与 getWidth()区别.png)