下列源码分析是基于 Android 8.0源码
Activity的启动过程分为两种:
根Activity的启动过程 - 指代根Activity的启动过程,也可以认为是应用程序的启动过程普通Activity的启动过程 - 除启动应用程序启动的第一个Activity之外Activity的启动过程
术语与范围约定(补充)
根Activity:Manifest 中声明了MAIN + LAUNCHER的入口 Activity。
普通Activity:应用进程已经存在时,由当前前台组件触发的后续 Activity 启动。
冷启动:目标进程不存在,需要从 Zygote fork 新进程并完成 Application 绑定。
温启动:目标进程存在,但目标 Activity 需要重新创建。
热启动:目标 Activity 已在任务栈中,主要是前后台切换后的恢复展示。
Task:系统中用于组织 Activity 的任务单元,对应一条回退历史。
Back Stack:Task 内部的 Activity 入栈顺序,决定返回键的回退路径。
ActivityRecord:System Server 侧对一个待启动/已启动 Activity 的记录对象,用来保存生命周期与任务栈状态。
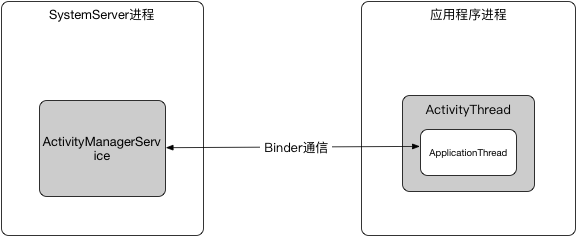
ApplicationThread:应用进程暴露给 System Server 的 Binder 通道,AMS 通过它把启动与生命周期事务派发回应用侧。
本文主体源码仍以 Android 8.0 为主,文末会补充新版本中类职责迁移与关键差异。这里讨论的“启动完成”主要是指页面已经完成创建并进入前台可见阶段,而“首帧真正绘制完成”会比生命周期回调再靠后一步。
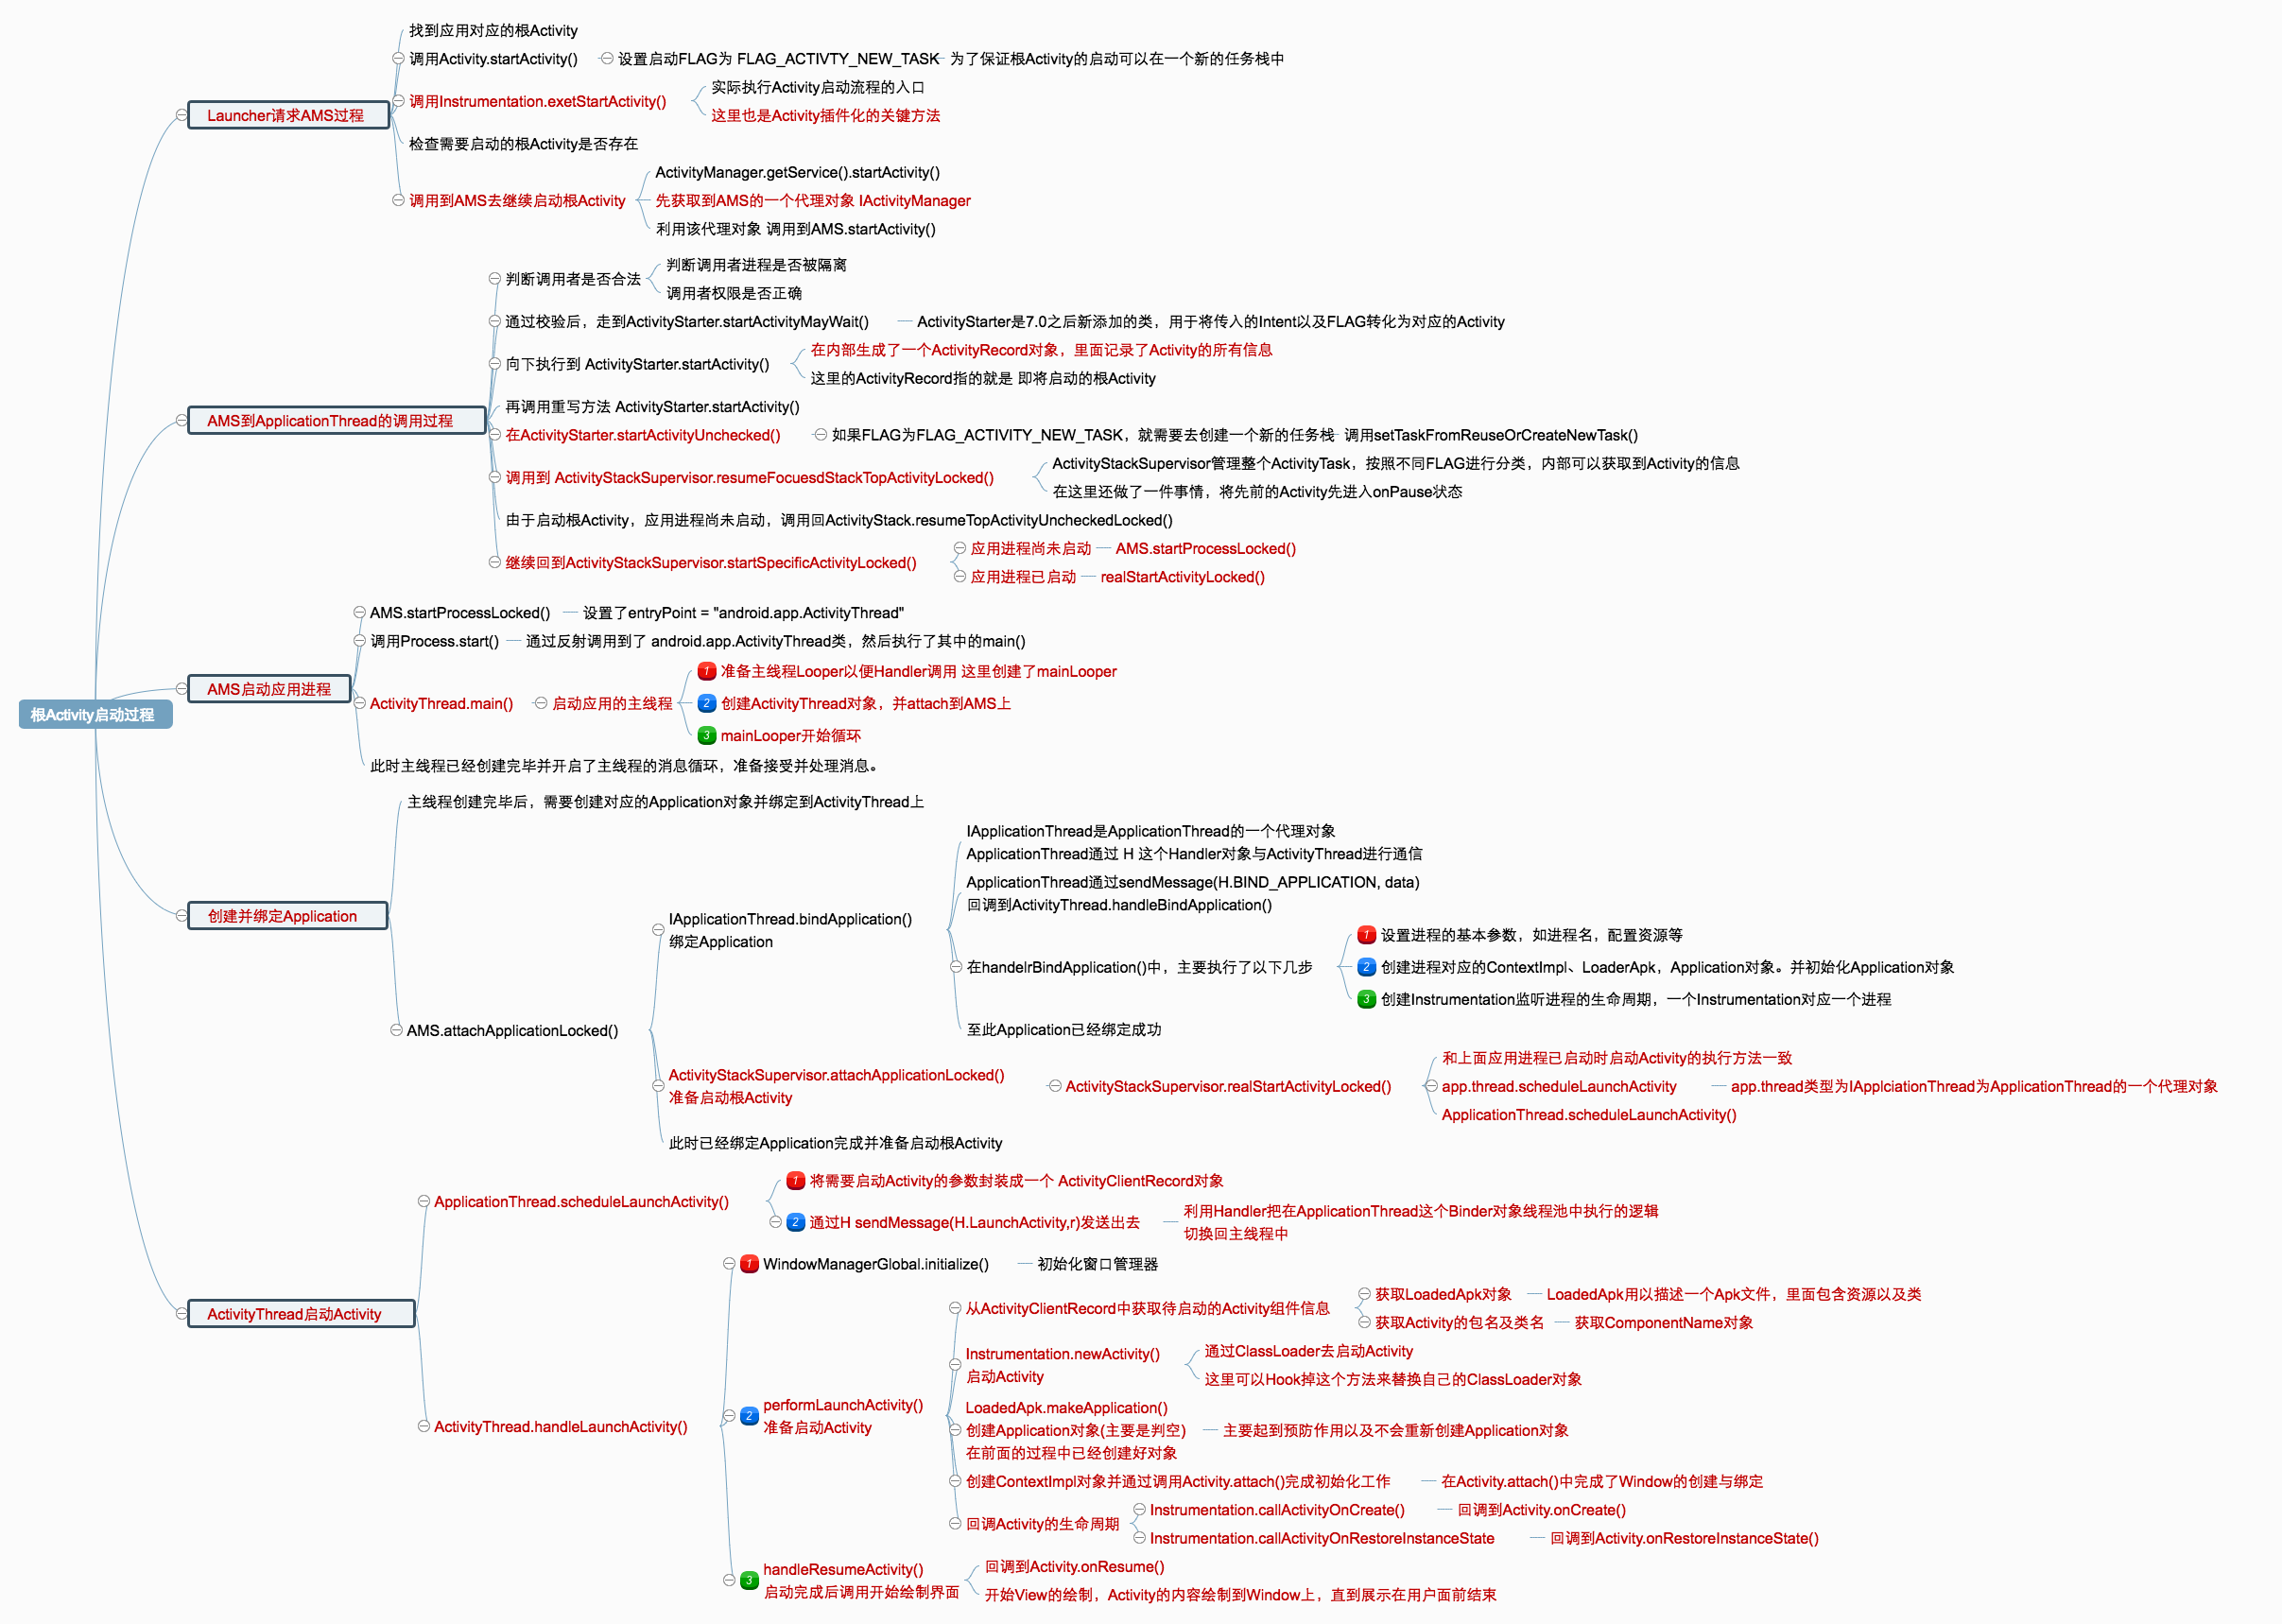
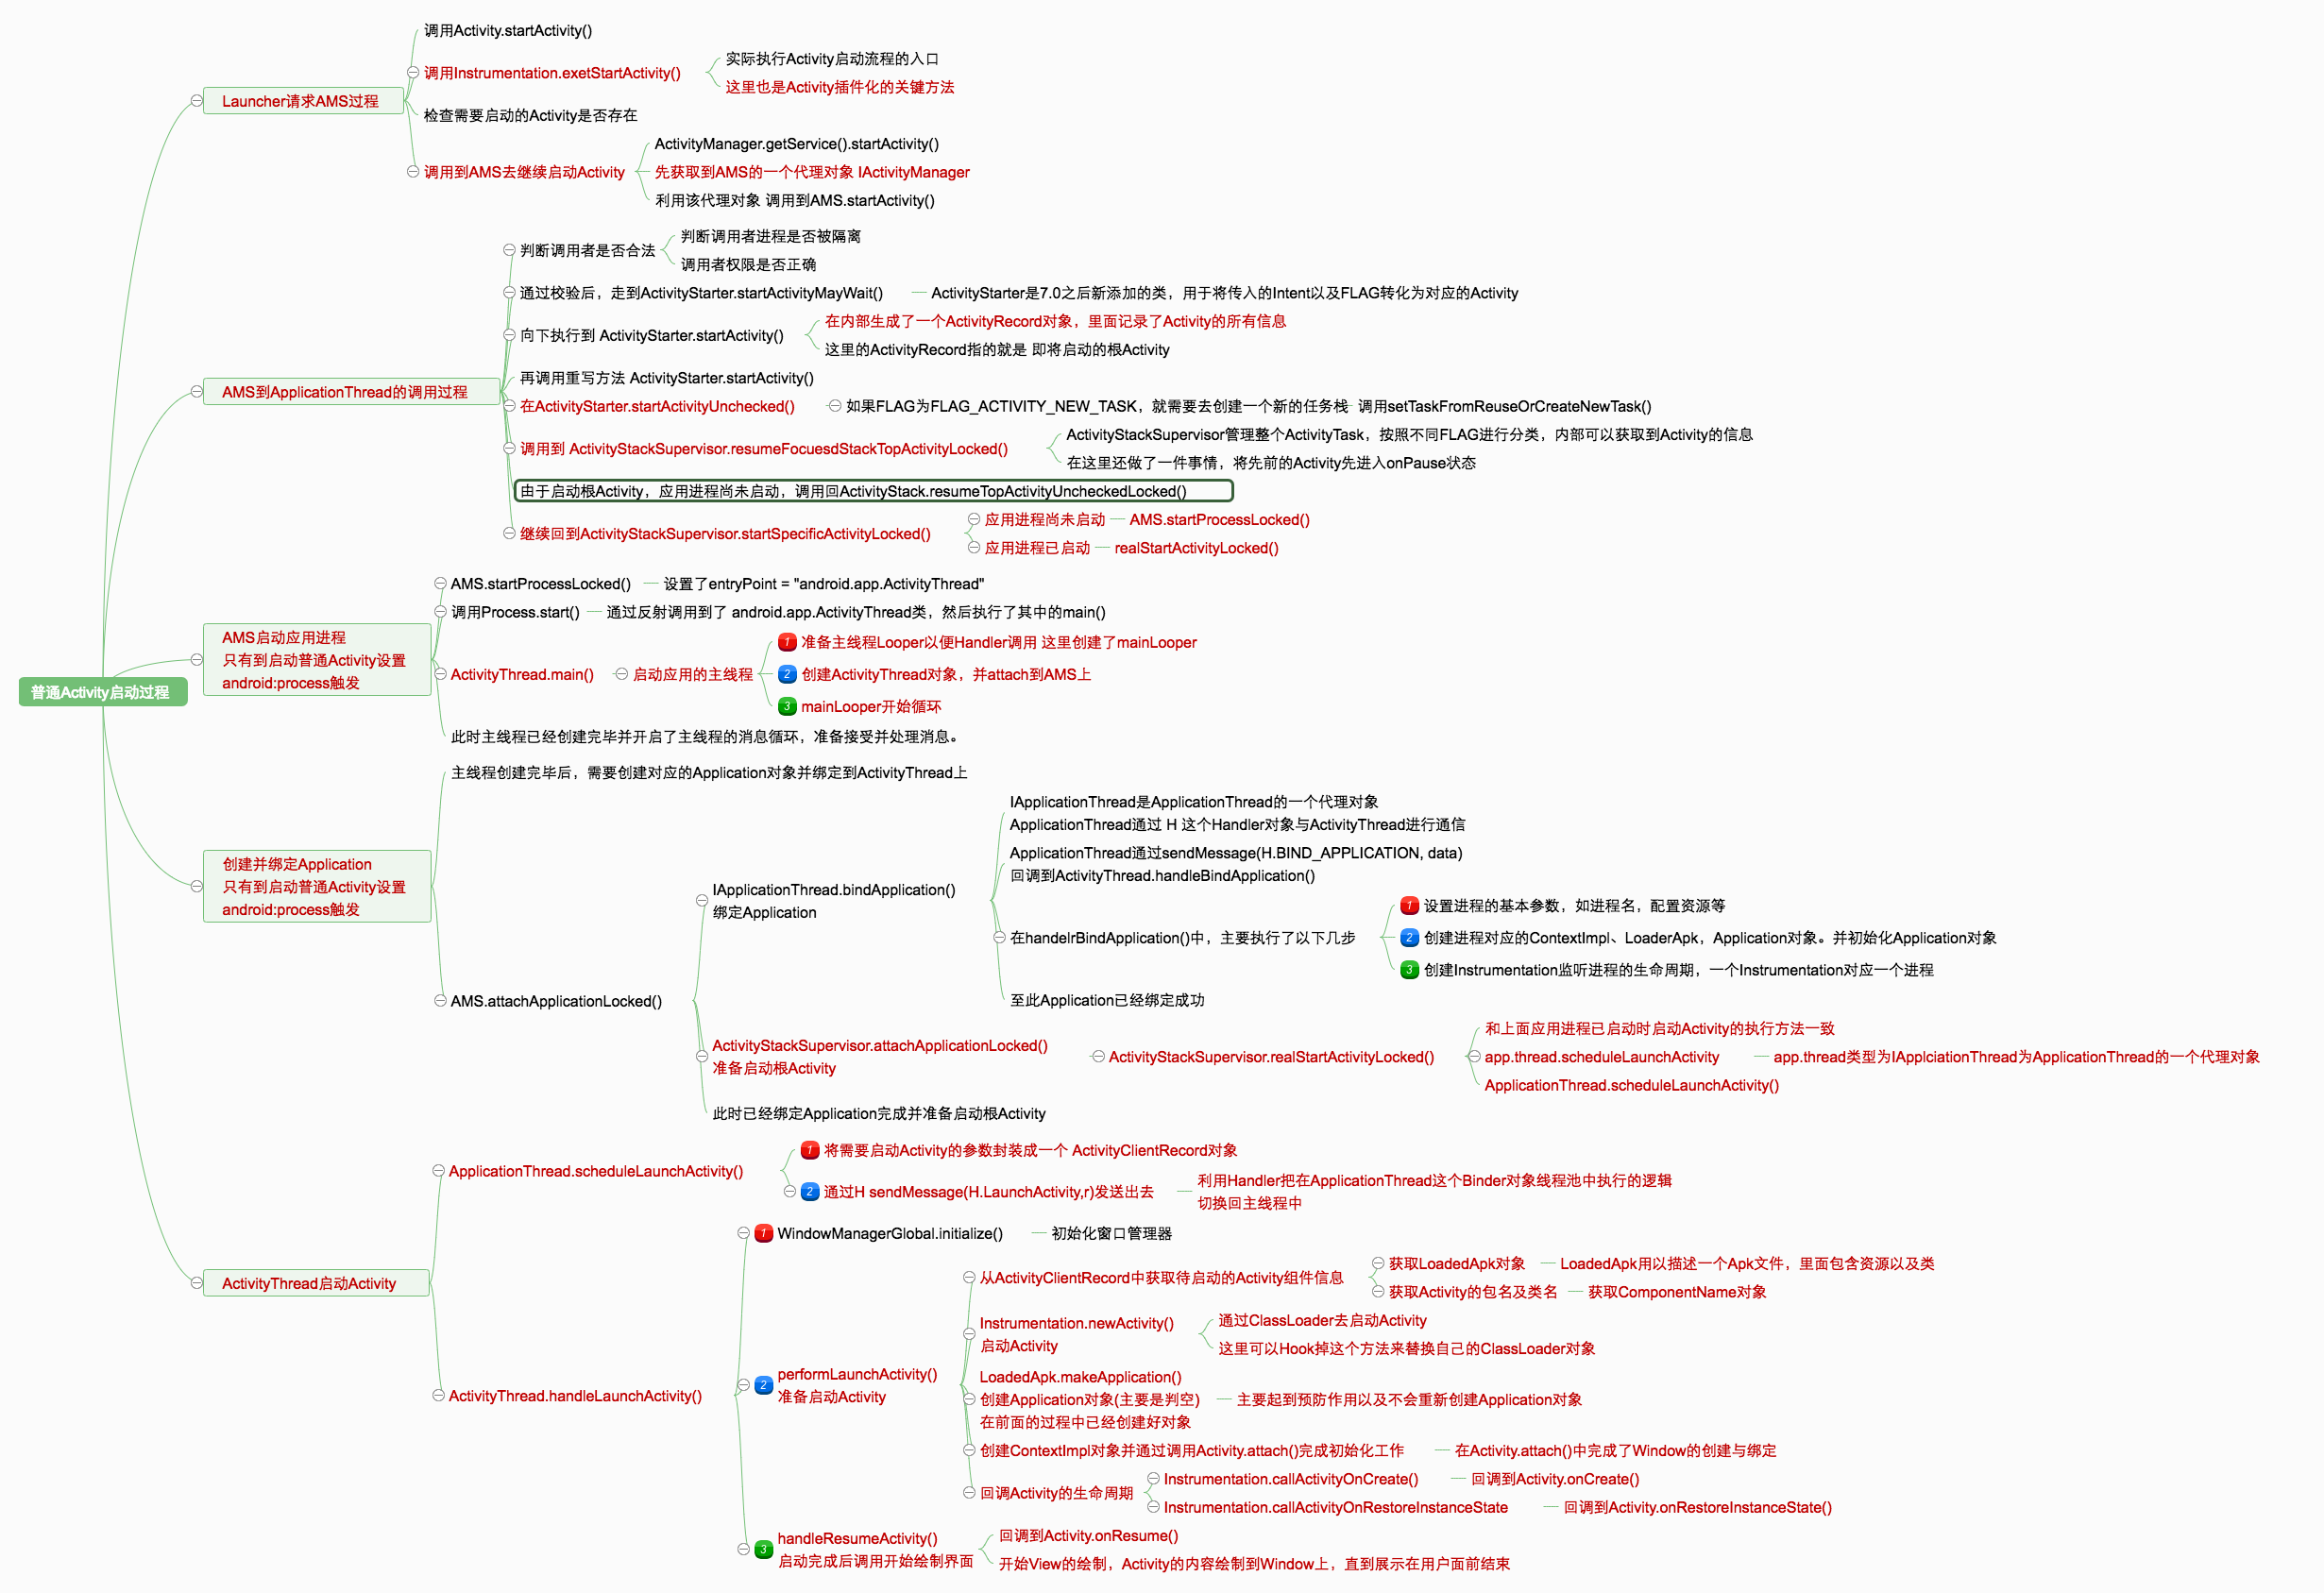
根Activity启动过程 根Activity启动主链路总览(补充) 根Activity的启动可以抽象为 6 个阶段:
Launcher通过startActivity发起启动请求。请求经Instrumentation -> IActivityManager跨进程进入AMS。
AMS/ActivityStarter完成权限校验、任务栈决策、目标进程决策。若目标进程不存在,AMS通过Zygote创建应用进程并进入ActivityThread.main()。
新进程回调attachApplication,AMS通过ApplicationThread触发bindApplication。
ActivityThread收到LAUNCH_ACTIVITY后执行performLaunchActivity + handleResumeActivity,最终完成可见。
点击桌面的应用程序图标就是启动根Activity的入口,当我们点击某个应用程序图标时,就会通过Launcher请求AMS来启动该应用程序。
其中涉及了三个进程间的通信:Launcher组件,AMS,Activity组件。
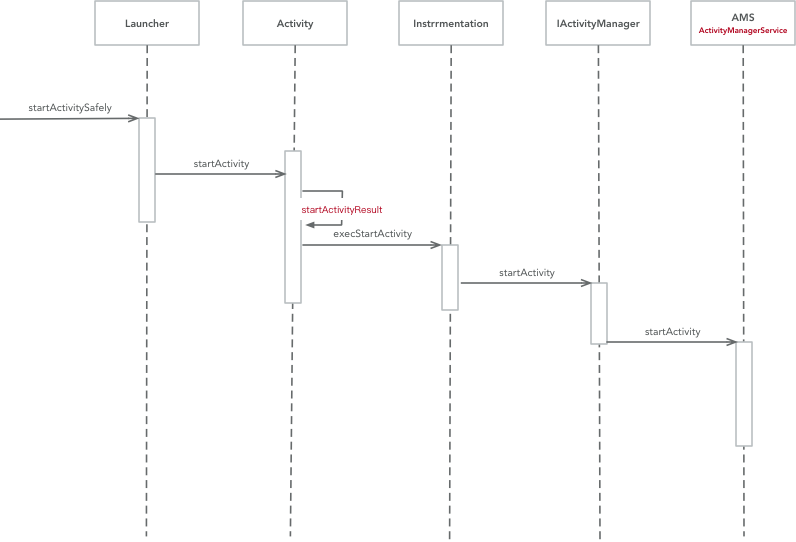
Launcher请求AMS过程 当我们在应用程序启动器Launcher上点击一个应用的图标时,Launcher组件就会调用startActivitySafely()启动该App的根Activity。
配置根Activity,需要在AndroidManifest.xml中配置 相关属性
1 2 3 4 5 6 7 8 9 10 <activity android:name =".MainActivity" android:label ="@string/app_name" android:theme ="@style/AppTheme.NoActionBar" > <intent-filter > <action android:name ="android.intent.action.MAIN" /> <category android:name ="android.intent.category.LAUNCHER" /> </intent-filter > </activity >
Launcher组件中startActivitySafely()相关操作
1 2 3 4 5 6 7 8 9 10 11 12 13 14 15 16 17 18 19 20 21 22 23 24 public boolean startActivitySafely (View v,Intent intent,ItemInfo item) {try {if (Utilities.ATLEAST_MARSHMELLOWinstanceof ShortcutInfo)else if (user ==null || user.equals(Process.myUserHandle())){else {this ).startActivityForProfile(intent.getComponent(),return true ;catch (ActivityNotFoundException|SecurityException e){return false ;
设置启动Activity为FLAG_ACTIVITY_NEW_TASK,保证根Activity在一个新任务栈中启动。Launcher.java继承了Activity,接下来就到了Activity.startActivity()中。
1 2 3 4 5 6 7 8 9 @Override public void startActivity (Intent intent, @Nullable Bundle options) {if (options != null ) {1 , options);else {1 );
接下来会走到startActivityForResult(),第二个参数设为-1,表明Launcher不需要知道返回结果 。
1 2 3 4 5 6 7 8 9 10 11 12 13 14 15 16 17 18 19 20 public void startActivityForResult (@RequiresPermission Intent intent, int requestCode, @Nullable Bundle options) {if (mParent == null ) {ActivityResult ar = this , this ,else {
mParent代表当前Activity的父类,由于根Activity还未创建出来,所以mParent==null成立。后续向下走就会调用到Instrumentation.execStartActivity()去继续启动Activity组件。
Instrumentation用于监控应用程序和系统间的交互。
1 2 3 4 5 6 7 8 9 10 11 12 13 14 15 16 17 18 19 20 public ActivityResult execStartActivity ( Context who, IBinder contextThread, IBinder token, Activity target, Intent intent, int requestCode, Bundle options) {try {int result = ActivityManager.getService()null ? target.mEmbeddedID : null ,0 , null , options);catch (RemoteException e) {throw new RuntimeException ("Failure from system" , e);return null ;
ActivityManager.getService()用于获取AMS的代理对象。实质上是把启动过程转移到了AMS上去执行
1 2 3 4 5 6 7 8 9 10 11 12 13 14 15 16 17 18 19 20 21 22 23 24 25 26 27 28 29 30 31 public static IActivityManager getService () {return IActivityManagerSingleton.get();private static final Singleton<IActivityManager> IActivityManagerSingleton =new Singleton <IActivityManager>() {@Override protected IActivityManager create () {final IBinder b = ServiceManager.getService(Context.ACTIVITY_SERVICE);final IActivityManager am = IActivityManager.Stub.asInterface(b);return am;public abstract class Singleton <T> {private T mInstance;protected abstract T create () ;public final T get () {synchronized (this ) {if (mInstance == null ) {return mInstance;
第一次调用到getService()时,就会调用到IActivityManagerSingleton.get(),由源码可知,该类是一个单例类。
在其中先去获取名为activity的一个代理对象(IBinder),后续实现利用了AIDL,根据asInterface()可以获得IActivityManager对象,他是AMS在本地的代理对象。然后就可以直接调用到AMS的startActivity()。
总结:
用户点击桌面图标触发startActivitySafely()开始调用打开根Activity流程。
Launcher组件会调用到Activity.startActivity()后调用到Activity.startActivityForResult()由于从Launcher启动,根Activity尚未建立,就会走到Instrumentation.execStartActivity()中
在Instrumentation.execStartActivity()中,实际调用的是ActivityManager.getService()去继续启动Activity
跟踪到ActivityManager.getService()实际返回的是一个AMS的本地代理对象IActivityManager,由前面学到的Binder机制中,这个代理对象是可以直接调用到AMS中的方法,所以execStartActivity()最终指向的是AMS.startActivity()
startActivity请求参数语义(补充)从Instrumentation.execStartActivity()到AMS.startActivity()这一步,核心参数有以下作用:
caller/whoThread:调用方进程在系统侧的 Binder 身份(即调用者是谁)。token:调用方 Activity 的窗口令牌,用于建立结果回传与生命周期关联。requestCode:用于startActivityForResult回传链路,根Activity启动时常为-1。options:承载动画、启动窗口、跨任务切换等附加参数。FLAG_ACTIVITY_NEW_TASK:根Activity通常要求在新的任务栈语义下启动。
这些参数不会直接创建 Activity 对象,而是作为ActivityStarter后续任务栈决策与调度的输入。
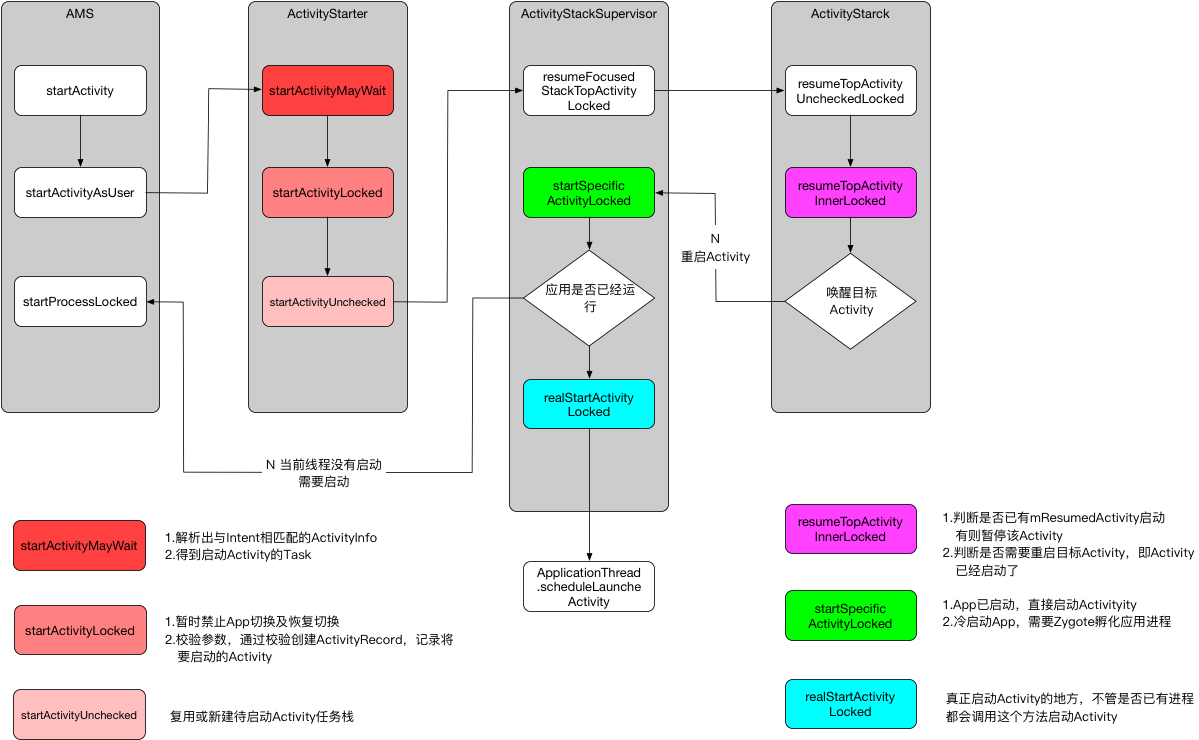
AMS到ApplicationThread的调用过程 Launcher请求到AMS后,后续逻辑由AMS继续执行。继续执行的是AMS.startActivity()
1 2 3 4 5 6 7 8 9 10 11 12 13 14 15 16 17 18 19 20 21 22 23 24 25 26 27 28 29 30 31 public final int startActivity (IApplicationThread caller, String callingPackage, Intent intent, String resolvedType, IBinder resultTo, String resultWho, int requestCode, int startFlags, ProfilerInfo profilerInfo, Bundle bOptions) {return startActivityAsUser(caller, callingPackage, intent, resolvedType, resultTo,@Override public final int startActivityAsUser (IApplicationThread caller, String callingPackage, Intent intent, String resolvedType, IBinder resultTo, String resultWho, int requestCode, int startFlags, ProfilerInfo profilerInfo, Bundle bOptions, int userId) {"startActivity" );false , ALLOW_FULL_ONLY, "startActivity" , null );return mActivityStarter.startActivityMayWait(caller, -1 , callingPackage, intent,null , null , resultTo, resultWho, requestCode, startFlags,null , null , bOptions, false , userId, null , null ,"startActivityAsUser" );void enforceNotIsolatedCaller (String caller) {if (UserHandle.isIsolated(Binder.getCallingUid())) {throw new SecurityException ("Isolated process not allowed to call " + caller);
进入到AMS.startActivity()中,会调用到startActivityAsUser(),在这个方法中需要去判断调用是否合法。需要先检测调用者进程是否被隔离以及调用者权限是否正确。
前面都通过的话,就会调用到ActivityStarter.startActivityMayWait()。没有通过校验的话就会抛出SecurityException异常。
1 2 3 4 5 6 7 8 9 10 11 12 13 14 15 16 17 18 19 20 21 22 23 24 25 26 27 28 29 30 31 32 33 34 35 36 37 38 39 40 41 42 43 44 45 46 47 48 49 50 final int startActivityMayWait (IApplicationThread caller, int callingUid, String callingPackage, Intent intent, String resolvedType, IVoiceInteractionSession voiceSession, IVoiceInteractor voiceInteractor, IBinder resultTo, String resultWho, int requestCode, int startFlags, ProfilerInfo profilerInfo, WaitResult outResult, Configuration globalConfig, Bundle bOptions, boolean ignoreTargetSecurity, int userId, IActivityContainer iContainer, TaskRecord inTask, String reason) {int res = startActivityLocked(caller, intent, ephemeralIntent, resolvedType,int startActivityLocked (IApplicationThread caller, Intent intent, Intent ephemeralIntent, String resolvedType, ActivityInfo aInfo, ResolveInfo rInfo, IVoiceInteractionSession voiceSession, IVoiceInteractor voiceInteractor, IBinder resultTo, String resultWho, int requestCode, int callingPid, int callingUid, String callingPackage, int realCallingPid, int realCallingUid, int startFlags, ActivityOptions options, boolean ignoreTargetSecurity, boolean componentSpecified, ActivityRecord[] outActivity, ActivityStackSupervisor.ActivityContainer container, TaskRecord inTask, String reason) {if (TextUtils.isEmpty(reason)) {throw new IllegalArgumentException ("Need to specify a reason." );0 ] = null ;if (outActivity != null ) {0 ] = mLastStartActivityRecord[0 ];return mLastStartActivityResult;
ActivityStarter是Android7.0新加入的类,他是加载Activity的控制类,会收集所有的逻辑来决定如何将Intent和Flags转换为Activity,并将Activity和Task以及Stark相关联。
调用startActivityLocked()之后继续走向ActivityStarter.startActivity()过程
1 2 3 4 5 6 7 8 9 10 11 12 13 14 15 16 17 18 19 20 21 22 23 24 25 26 27 28 29 30 31 32 33 34 35 36 37 38 39 40 41 private int startActivity (IApplicationThread caller, Intent intent, Intent ephemeralIntent, String resolvedType, ActivityInfo aInfo, ResolveInfo rInfo, IVoiceInteractionSession voiceSession, IVoiceInteractor voiceInteractor, IBinder resultTo, String resultWho, int requestCode, int callingPid, int callingUid, String callingPackage, int realCallingPid, int realCallingUid, int startFlags, ActivityOptions options, boolean ignoreTargetSecurity, boolean componentSpecified, ActivityRecord[] outActivity, ActivityStackSupervisor.ActivityContainer container, TaskRecord inTask) {int err = ActivityManager.START_SUCCESS;final Bundle verificationBundle = options != null ? options.popAppVerificationBundle() : null ;ProcessRecord callerApp = null ;if (caller != null ) {if (callerApp != null ) {else {"Unable to find app for caller " + caller" (pid=" + callingPid + ") when starting: " ActivityRecord r = new ActivityRecord (mService, callerApp, callingPid, callingUid,null ,if (outActivity != null ) {0 ] = r;false );return startActivity(r, sourceRecord, voiceSession, voiceInteractor, startFlags, true ,
第16行代码 caller!=null 这个caller对象是从Launcher启动时就一直传递下来的,指向的是Launcher所在的应用程序进程的ApplicationThread对象。
第17行代码 mService.getRecordForAppLocked(caller) 得到的就是一个ProgreeRecord对象(用于描述一个应用程序进程)。该对象指的就是 Launcher组件所运行的应用程序进程 。
第30行代码 new ActivityRecord() ActivityRecord用来记录一个Activity的所有信息。在这里ActivityRecord指的就是将要启动的Activity即根Activity。
第39行代码 继续调用startActivity()并传递当前记录的Activity信息。
1
2
3
4
5
6
7
8
9
10
11
12
13
14
15
16
17
18
19
20
21
22
23
24
25
26
27
28
29
30
31
32
33
34
35
36
37
38
39
40
41
42
43
44
45
46
47
48
49
50
51
52
53
54
55
56
57
58
59
60
61
62
63
64
65
66
67
68
69
private int startActivity (final ActivityRecord r, ActivityRecord sourceRecord, IVoiceInteractionSession voiceSession, IVoiceInteractor voiceInteractor, int startFlags, boolean doResume, ActivityOptions options, TaskRecord inTask, ActivityRecord[] outActivity) {int result = START_CANCELED;try {finally {if (!ActivityManager.isStartResultSuccessful(result)null ) {return result;private int startActivityUnchecked (final ActivityRecord r, ActivityRecord sourceRecord, IVoiceInteractionSession voiceSession, IVoiceInteractor voiceInteractor, int startFlags, boolean doResume, ActivityOptions options, TaskRecord inTask, ActivityRecord[] outActivity) {if (mStartActivity.resultTo == null && mInTask == null && !mAddingToTask0 ) {true ;else if (mSourceRecord != null ) {else if (mInTask != null ) {else {if (result != START_SUCCESS) {return result;if (mDoResume) {final ActivityRecord topTaskActivity = if (!mTargetStack.isFocusable()null && topTaskActivity.mTaskOverlaynull , 0 , !PRESERVE_WINDOWS);else {if (mTargetStack.isFocusable() && !mSupervisor.isFocusedStack(mTargetStack)) {"startActivityUnchecked" );else {
第30行代码 由于我们从Launcher启动根Activity时,设置启动标志为FLAG_ACTIVITY_NEW_TASK,所以就会走到setTaskFromReuseOrCreateNewTask(),这个方法主要是管理任务栈,如果没有就会创建一个新的任务栈。
第62代码 最终调用ActivityStackSupervisor.resumeDocusedStackTopActivityLocked()继续启动Activity的流程。
1 2 3 4 5 6 7 8 9 10 11 12 13 14 15 16 17 18 19 boolean resumeFocusedStackTopActivityLocked ( ActivityStack targetStack, ActivityRecord target, ActivityOptions targetOptions) {if (targetStack != null && isFocusedStack(targetStack)) {return targetStack.resumeTopActivityUncheckedLocked(target, targetOptions);final ActivityRecord r = mFocusedStack.topRunningActivityLocked();if (r == null || r.state != RESUMED) {null , null );else if (r.state == RESUMED) {return false ;
由于要启动的Activity尚未启动,所以会继续调用ActivityStack.resumeTopActivityUncheckedLocked()
1 2 3 4 5 6 7 8 9 10 11 12 13 14 15 16 17 18 19 20 21 22 23 24 25 26 27 boolean resumeTopActivityUncheckedLocked (ActivityRecord prev, ActivityOptions options) {if (mStackSupervisor.inResumeTopActivity) {return false ;boolean result = false ;try {true ;finally {false ;return result;private boolean resumeTopActivityInnerLocked (ActivityRecord prev, ActivityOptions options) {true , true );return true ;
1 2 3 4 5 6 7 8 9 10 11 12 13 14 15 16 17 18 19 20 21 22 23 24 25 26 27 28 29 30 31 32 void startSpecificActivityLocked (ActivityRecord r, boolean andResume, boolean checkConfig) {ProcessRecord app = mService.getProcessRecordLocked(r.processName,true );if (app != null && app.thread != null ) {try {if ((r.info.flags&ActivityInfo.FLAG_MULTIPROCESS) == 0 "android" .equals(r.info.packageName)) {return ;catch (RemoteException e) {"Exception when starting activity " true , 0 ,"activity" , r.intent.getComponent(), false , false , true );
这一节主要是从ActivityManagerService经过层层调用到达ApplicationThread的Activity启动方法。
从职责上看,这一段可以分成两层:
AMS更像总调度入口,负责权限校验、跨用户校验、进程状态管理以及与其他系统服务协同。ActivityStarter更像启动策略执行器,负责把“启动哪个 Activity”细化为“放入哪个任务栈、复用哪个实例、是否需要拉起进程”。
所以startActivity()进入 System Server 之后,重点并不是立刻去“new 一个 Activity”,而是先把启动请求转换成一组合法的任务栈与进程调度决策。
ActivityStack:Activity的任务栈,从中获取需要进行操作的ActivityRecord进行操作。在启动过程中,它的作用是检测当前栈顶Activity是否为要启动的Activity,不是就启动新Activity,是的话就重启,在这之前需要标记一下前Activity处于Pause状态。
ActivityStackSupervisor:管理整个手机任务栈,管理着所有的ActivityStack。在启动过程中,它负责检查是否已有对应的应用进程在运行,如果有就直接启动Activity,没有的话则需新建一个应用进程。
总结:
调用AMS.startActivity()实质调用其内部的startActivityAsUser()并在方法内部进行验证,判定调用者进程是否隔离以及调用者权限是否正确
通过验证后,就到了ActivityStarter.startActivityMayWait(),并设置启动理由为startActivityAsUser
向下调用到了startActivityLocked(),方法内部会去判定reason是否为空
不为空则走到startActivity(),该方法中主要caller(指向Launcher组件所运行进程的ApplicationThread对象) 、callerApp(指向Launcher组件所运行的应用程序进程) ,基于callerApp生成对应的ActivityRecord(记录即将要启动的Activity)并存入ActivityRecord[]中备用。
对应参数传入startActivity()的重载函数中,向下继续调用startActivityUnchecked()
startActivityUnchecked()主要是 创建新的TaskRecord(记录任务栈信息)向下切换到ActivityStackSupervisor.resumeFocusedStackTopActivityLocked(),这个方法主要实现的是寻找需要恢复的栈顶Activity。
内部实现由ActivityStack.resumeTopActivityUncheckedLocked()完成,这里又继续调用到resumeTopActivityInnerLocked()。
后续又切换回到ActivityStackSupervisor.startSpecificActivityLocked(),在该方法中获取即将启动的Activity所在应用程序进程,已启动的话调用realStartActivityLocked(),未启动的话就调用startProcessLocked()去启动进程
ActivityStarter关键决策点(补充)ActivityStarter在调度阶段主要做三类决策:
任务栈决策:是否复用现有TaskRecord,以及是否需要清理栈顶 Activity。
目标实例决策:是否复用现有ActivityRecord,还是创建新的记录对象。
进程决策:目标进程是否已存在,已存在走realStartActivityLocked,否则走startProcessLocked。
换句话说,startActivity在 AMS 阶段的核心不是“立刻创建 Activity”,而是“先完成调度与状态机合法性”。
补充:启动模式与任务栈行为可以拆成两层判断:
先判断任务栈归属(是否受FLAG_ACTIVITY_NEW_TASK/taskAffinity影响)。
再判断目标实例复用(standard/singleTop/singleTask)。
singleTop只在目标实例位于栈顶时复用,否则仍会创建新实例。singleTask命中已存在实例时,会复用该实例并清理其上的Activity。
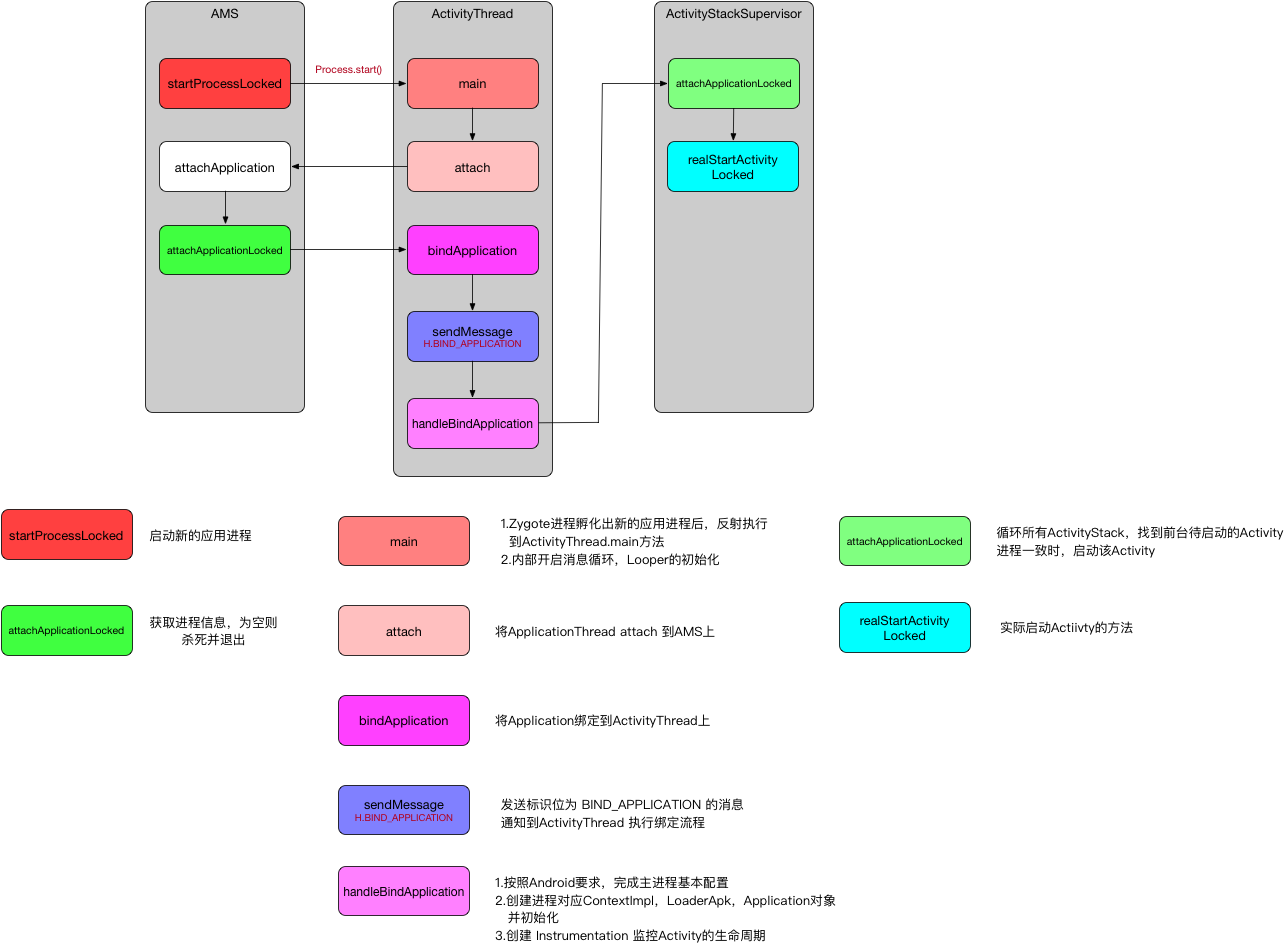
AMS启动应用进程 由于启动是根Activity,这时应用进程尚未启动,需要通过AMS.startProcessLocked()创建一个应用程序进程
1 2 3 4 5 6 7 8 9 10 11 12 13 14 15 16 17 18 19 20 21 22 23 24 25 26 27 28 29 30 31 32 33 34 35 36 37 38 39 40 41 42 43 44 45 46 47 final ProcessRecord startProcessLocked (String processName, ApplicationInfo info, boolean knownToBeDead, int intentFlags, String hostingType, ComponentName hostingName, boolean allowWhileBooting, boolean isolated, boolean keepIfLarge) {return startProcessLocked(processName, info, knownToBeDead, intentFlags, hostingType,0 , keepIfLarge,null , null , null ,null );final ProcessRecord startProcessLocked (String processName, ApplicationInfo info, boolean knownToBeDead, int intentFlags, String hostingType, ComponentName hostingName, boolean allowWhileBooting, boolean isolated, int isolatedUid, boolean keepIfLarge, String abiOverride, String entryPoint, String[] entryPointArgs, Runnable crashHandler) {long startTime = SystemClock.elapsedRealtime();private final void startProcessLocked (ProcessRecord app, String hostingType, String hostingNameStr, String abiOverride, String entryPoint, String[] entryPointArgs) {boolean isActivityProcess = (entryPoint == null );if (entryPoint == null ) entryPoint = "android.app.ActivityThread" ;"Start proc: " +"startProcess: asking zygote to start proc" );if (hostingType.equals("webview_service" )) {null , entryPointArgs);else {
调用到Process的静态成员函数start()启动一个新的应用进程,指定了该进程的入口函数为ActivityThread.main();因此创建应用进程结束时,逻辑就转移到了ActivityThread.main()上。
如果把这一段再压缩成一条主线,就是:
AMS.startProcessLocked() -> Process.start() -> Zygote fork 新进程 -> 反射进入 ActivityThread.main() -> 准备主线程 Looper -> attach 到 AMS
这条链路解释了“为什么 System Server 能启动一个全新的应用进程”:AMS 负责发起与管理,真正把进程孵化出来的是Zygote,而新进程启动后的 Java 世界入口则是ActivityThread.main()。
startProcessLocked关键参数与进程属性(补充)startProcessLocked除了“拉起进程”本身,还同时确定了进程运行环境:
processName:目标进程名(可与包名一致,也可通过android:process声明子进程)。uid/gid:Linux 进程身份,决定文件权限与沙箱边界。targetSdkVersion:影响运行时兼容行为分支。abi/instructionSet:决定使用的指令集与 native 代码运行环境。entryPoint:普通应用进程默认是android.app.ActivityThread。
因此这一步不仅是“创建进程”,也是“确定进程运行画像”的关键阶段。
1
2
3
4
5
6
7
8
9
10
11
12
13
14
15
16
17
18
19
20
21
22
23
24
25
26
27
28
29
30
31
32
33
34
35
36
37
38
39
40
41
42
43
44
45
46
47
48
49
50
51
52
53
54
55
56
57
58
59
60
61
62
63
64
65
66
67
68
69
70
71
72
73
74
75
76
77
78
79
80
81
82
83
84
85
86
87
88
89
90
91
92
93
94
95
96
97
98
99
100
Process.start() => ZygoteProcess.start() == LocalSocket连接 => ZygoteServer.runSelectLoop() => ZygoteConnection.processOneCommand() => processOneCommand (ZygoteServer zygoteServer) {try {if (pid == 0 ) {null ;return handleChildProc(parsedArgs, descriptors, childPipeFd,else {null ;return null ;finally {private Runnable handleChildProc (Arguments parsedArgs, FileDescriptor[] descriptors, FileDescriptor pipeFd, boolean isZygote) {if (!isZygote) {return ZygoteInit.zygoteInit(parsedArgs.targetSdkVersion, parsedArgs.remainingArgs,null );else {return ZygoteInit.childZygoteInit(parsedArgs.targetSdkVersion,null );public static final Runnable zygoteInit (int targetSdkVersion, String[] argv, ClassLoader classLoader) {if (RuntimeInit.DEBUG) {"RuntimeInit: Starting application from zygote" );"ZygoteInit" );return RuntimeInit.applicationInit(targetSdkVersion, argv, classLoader);protected static Runnable applicationInit (int targetSdkVersion, String[] argv, ClassLoader classLoader) {return findStaticMain(args.startClass, args.startArgs, classLoader);protected static Runnable findStaticMain (String className, String[] argv, ClassLoader classLoader) {try {true , classLoader);catch (ClassNotFoundException ex) {throw new RuntimeException ("Missing class when invoking static main " + className,try {"main" , new Class [] { String[].class });catch (NoSuchMethodException ex) {throw new RuntimeException ("Missing static main on " + className, ex);catch (SecurityException ex) {throw new RuntimeException ("Problem getting static main on " + className, ex);
拓展:为什么不用Binder而是采用Socket进行 ZygoteProcess与AMS间的通信。
父进程binder线程有锁,然后子进程的主线程一直在等其子线程(从父进程拷贝过来的子进程)的资源,但是其实父进程的子进程并没有被拷贝过来,造成死锁,所以fork不允许存在多线程 。而非常巧的是Binder通讯偏偏就是多线程,所以干脆父进程(Zgote)这个时候就不使用binder线程
fork()不支持多线程,可能导致binder调用的时候,多个service发起fork请求,导致部分service创建失败
Zygote进程孵化出新的应用进程后,通过反射执行ActivityThread.main(),在该方法中会事先准备好Looper以及MessageQueue,继续调用attach()用进程绑定到AMS,然后开始消息循环,不断读取队列消息,并分发消息。
1 2 3 4 5 6 7 8 9 10 11 12 13 14 15 16 17 18 19 20 21 22 23 24 25 26 27 28 29 30 31 32 33 34 35 36 public static void main (String[] args) {ActivityThread thread = new ActivityThread ();false );if (sMainThreadHandler == null ) {final ApplicationThread mAppThread = new ApplicationThread ();private void attach (boolean system) {if (!system) {final IActivityManager mgr = ActivityManager.getService();try {catch (RemoteException ex) {throw ex.rethrowFromSystemServer();else {
AMSattach的是ActivityThread的代理对象ApplicationThread,然后AMS就可以通过代理对象对主线程进行操作。
至此,应用进程创建完毕,并且已建立主线程完毕并开启了消息循环。
创建并绑定Application 这时应用进程以及主线程已经创造完毕,接下来就是要创建Application
1 2 3 4 5 6 7 8 9 10 11 12 13 14 15 16 17 18 19 20 21 22 23 24 25 26 27 28 29 30 31 32 33 34 35 36 37 38 39 40 41 42 43 44 45 46 47 48 49 50 51 52 53 54 55 56 57 58 59 60 61 62 63 64 65 66 67 68 69 70 71 72 73 74 75 76 77 78 79 80 81 82 83 84 85 86 87 88 89 90 91 92 93 94 95 96 97 98 99 100 101 102 103 104 105 106 107 108 109 @Override public final void attachApplication (IApplicationThread thread) {synchronized (this ) {int callingPid = Binder.getCallingPid();final long origId = Binder.clearCallingIdentity();private final boolean attachApplicationLocked (IApplicationThread thread, int pid) {long startTime = SystemClock.uptimeMillis();if (pid != MY_PID && pid >= 0 ) {synchronized (mPidsSelfLocked) {else {null ;if (app == null ) {if (pid > 0 && pid != MY_PID) {else {try {catch (Exception e) {return false ;try {AppDeathRecipient adr = new AppDeathRecipient (0 );catch (RemoteException e) {"link fail" , processName);return false ;try {if (app.instr != null ) {new Configuration (getGlobalConfiguration()), app.compat,else {null , profilerInfo,null , null , null , testMode,new Configuration (getGlobalConfiguration()), app.compat,catch (Exception e){"bind fail" , processName);return false ;try {if (mStackSupervisor.attachApplicationLocked(app)) {true ;catch (Exception e) {"Exception thrown launching activities in " + app, e);true ;if (badApp) {"error during init" , true );false , true );return false ;if (!didSomething) {return true ;
在AMS.attachApplicationLocked()主要做了两步:
attachApplicationLocked职责拆分(补充)这一阶段可以拆成 3 个职责块:
进程身份确认:根据pid找到ProcessRecord并建立死亡回调linkToDeath。
运行时绑定:通过thread.bindApplication()把应用运行时参数发送到ActivityThread主线程。
组件继续调度:在应用侧完成绑定后,再继续触发根Activity/Service/Broadcast等组件启动。
其中第 2 步与第 3 步是“先绑定运行时,再启动组件”的顺序关系。
thread.bindApplication():绑定Application到ActivityThread上1 2 3 4 5 6 7 8 9 10 11 12 13 14 15 16 17 18 19 20 21 22 23 24 25 26 27 28 29 30 31 32 33 34 35 36 37 38 39 40 public final void bindApplication (String processName, ApplicationInfo appInfo, List<ProviderInfo> providers, ComponentName instrumentationName, ProfilerInfo profilerInfo, Bundle instrumentationArgs, IInstrumentationWatcher instrumentationWatcher, IUiAutomationConnection instrumentationUiConnection, int debugMode, boolean enableBinderTracking, boolean trackAllocation, boolean isRestrictedBackupMode, boolean persistent, Configuration config, CompatibilityInfo compatInfo, Map services, Bundle coreSettings, String buildSerial) {if (services != null ) {AppBindData data = new AppBindData ();private class H extends Handler {public static final int BIND_APPLICATION = 110 ;public void handleMessage (Message msg) {if (DEBUG_MESSAGES) Slog.v(TAG, ">>> handling: " + codeToString(msg.what));switch (msg.what) {case BIND_APPLICATION:"bindApplication" );AppBindData data = (AppBindData)msg.obj;break ;
H相当于ApplcationThread与ActivityThread的中间人,其中AMS与ActivityThread通信靠 ApplicationThread,ActivityThread与ApplicationThread通信靠Handler。
这里涉及的就是**Android的主线程消息循环模型**。
在ApplicationThread发送BIND_APPLICATION标识的消息时,H接收到消息,调用handleBindApplication()
1 2 3 4 5 6 7 8 9 10 11 12 13 14 15 16 17 18 19 20 21 22 23 24 25 26 27 28 29 30 31 32 33 34 35 36 37 38 39 40 41 42 43 44 45 46 47 Instrumentation mInstrumentation;private void handleBindApplication (AppBindData data) {final ContextImpl appContext = ContextImpl.createAppContext(this , data.info);final InstrumentationInfo ii;if (ii != null ) {else {new Instrumentation ();try {Application app = data.info.makeApplication(data.restrictedBackupMode, null );try {catch (Exception e) {throw new RuntimeException ("Exception thrown in onCreate() of " ": " + e.toString(), e);try {catch (Exception e) {if (!mInstrumentation.onException(app, e)) {throw new RuntimeException ("Unable to create application " + app.getClass().getName()": " + e.toString(), e);finally {
handleBindApplicaiton()主要是为了让一个Java的进程可以加入到Android中 。
主要执行步骤有以下几步:
设置进程的基本参数,例如进程名,时区等,配置资源以及兼容性设计。
创建进程对应的ContextImpl、LoadedApk以及Application对象,并初始化ContentProvide以及Application。
创建Instrumentation监听Activity的生命周期。(一个进程对应一个Instrumentation实例 )
handleBindApplication执行顺序补全(补充)这里有一个关键顺序容易被忽略:
创建ContextImpl/LoadedApk/Application。
安装ContentProvider(installContentProviders)。
回调Application.onCreate()。
进程完成 attach 后,System Server 才会继续派发根Activity启动事务。
也就是说,ContentProvider初始化通常先于Application.onCreate(),这也是很多库在 Provider 中做自动初始化的基础。
因此从启动先后关系上看,根Activity冷启动时通常是:
ContentProvider初始化 → Application.onCreate() → Activity.onCreate()/onStart()/onResume()
这也是为什么很多“启动阶段初始化”问题,不能只盯着Activity生命周期本身,还要往前看到 Provider 和 Application 这两层。
mStackSupervisor.attachApplicationLocked():启动根Activity在该方法中Application已经绑定到进程上,接下来就是启动根Activity
1 2 3 4 5 6 7 8 9 10 11 12 13 14 15 16 17 18 19 20 21 22 23 24 25 26 27 28 29 30 31 32 33 34 boolean attachApplicationLocked (ProcessRecord app) throws RemoteException {final String processName = app.processName;boolean didSomething = false ;for (int displayNdx = mActivityDisplays.size() - 1 ; displayNdx >= 0 ; --displayNdx) {for (int stackNdx = stacks.size() - 1 ; stackNdx >= 0 ; --stackNdx) {final ActivityStack stack = stacks.get(stackNdx);if (!isFocusedStack(stack)) {continue ;ActivityRecord hr = stack.topRunningActivityLocked();if (hr != null ) {if (hr.app == null && app.uid == hr.info.applicationInfo.uidtry {if (realStartActivityLocked(hr, app, true , true )) {true ;catch (RemoteException e) {throw e;if (!didSomething) {null , 0 , !PRESERVE_WINDOWS);return didSomething;
需要启动的Activity所在进程已经启动时,开始准备启动根Activity realStartActivityLocked()
补充:这里也是“是否需要拉起进程”的关键分叉点:
进程不存在:startProcessLocked() -> attachApplicationLocked() -> realStartActivityLocked()。
进程已存在:可直接进入realStartActivityLocked(),省去进程创建成本。
因此同一启动请求在冷、热两种进程状态下,链路长度和耗时会明显不同。
1
2
3
4
5
6
7
8
9
10
11
12
13
14
final boolean realStartActivityLocked (ActivityRecord r, ProcessRecord app, boolean andResume, boolean checkConfig) throws RemoteException { new Intent (r.intent), r.appToken,
这里的app.thread的类型为IApplicationThread,它的实现是ActivityThread的内部类ApplicationThread。app指代的是要启动的Acttvity所在的应用进程。因此这段代码指的就是要在目标应用程序进程中启动Activity。
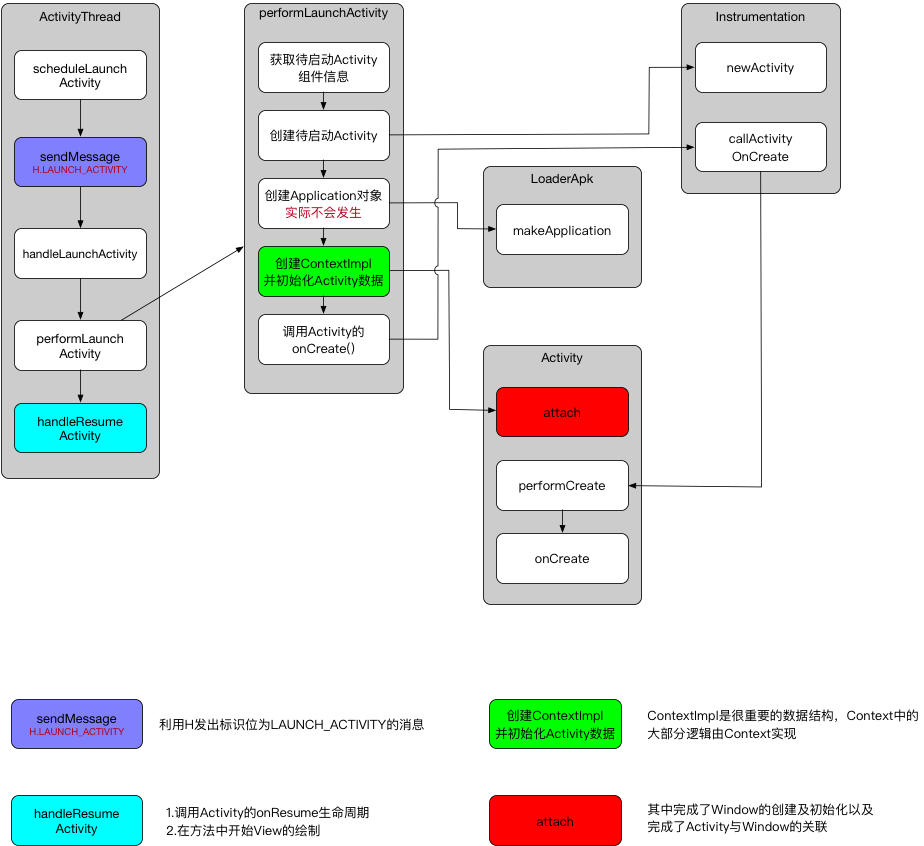
ActivityThread启动Activity过程 这时Activity的启动过程从AMS切换到了ApplicationThread中,最后是调用到了ApplicationThread.scheduleLaunchActivity()
1 2 3 4 5 6 7 8 9 10 11 12 13 14 15 16 17 18 19 20 21 22 23 24 25 26 27 28 29 30 31 32 33 34 35 36 @Override public final void scheduleLaunchActivity (Intent intent, IBinder token, int ident, ActivityInfo info, Configuration curConfig, Configuration overrideConfig, CompatibilityInfo compatInfo, String referrer, IVoiceInteractor voiceInteractor, int procState, Bundle state, PersistableBundle persistentState, List<ResultInfo> pendingResults, List<ReferrerIntent> pendingNewIntents, boolean notResumed, boolean isForward, ProfilerInfo profilerInfo) {false );ActivityClientRecord r = new ActivityClientRecord ();
将需要启动Activity的参数封装成ActivityClientRecord,在调用sendMessage()设置类型为LAUNCH_ACTIVITY,并将ActivityClientRecord传递过去。
1
2
3
4
5
6
7
8
9
10
11
12
13
14
15
final H mh = new H ();private void sendMessage (int what, Object obj, int arg1, int arg2, boolean async) {if (DEBUG_MESSAGES) Slog.v("SCHEDULE " + what + " " + mH.codeToString(what)": " + arg1 + " / " + obj);Message msg = Message.obtain();if (async) {true );
这里的mh指的就是H,这个H是ActivityThread的内部类并继承自Handler,是主线程的消息管理类。因为ApplicationThread是一个Binder,它的调用逻辑是在Binder线程池中。所以这里就要把执行逻辑切换到主线程中,就使用了Handler。
1
2
3
4
5
6
7
8
9
10
11
12
13
14
15
16
17
18
19
20
private class H extends Handler {public static final int LAUNCH_ACTIVITY = 100 ;public void handleMessage (Message msg) {if (DEBUG_MESSAGES) Slog.v(TAG, ">>> handling: " + codeToString(msg.what));switch (msg.what) {case LAUNCH_ACTIVITY: {"activityStart" );final ActivityClientRecord r = (ActivityClientRecord) msg.obj;null , "LAUNCH_ACTIVITY" );break ;
每一个Android程序都是打包在一个Apk文件中的,一个Apk文件包含了一个Android程序中的所有资源。应用程序进程在启动一个Activity组件时,需要将它所属的Apk文件加载进来,以便访问内部资源。ActivityThread内部使用LoaderApk描述一个已加载的Apk文件。
继续向下调用到handleLauncheActivity()
1
2
3
4
5
6
7
8
9
10
11
12
13
14
15
16
17
18
19
20
21
22
23
24
25
26
27
28
29
30
31
32
private void handleLaunchActivity (ActivityClientRecord r, Intent customIntent, String reason) {Activity a = performLaunchActivity(r, customIntent);if (a != null ) {new Configuration (mConfiguration);Bundle oldState = r.state;false , r.isForward,if (!r.activity.mFinished && r.startsNotResumed) {if (r.isPreHoneycomb()) {else {try {null ,catch (RemoteException ex) {throw ex.rethrowFromSystemServer();
首先调用performLaunchActivity()开始准备启动Activity,内部会调用Activity的Oncreate(),onStart(),onRestoreInstaceState()
performResumeActivity()对应生命周期的onResume(),之后开始调用View的绘制,Activity的内容开始渲染到Window上面,直到我们看见绘制结果。
生命周期与首帧绘制关系(补充) onResume()不等于“首帧已经显示”。
onResume()表示 Activity 进入前台交互阶段。首帧可见发生在后续Window提交绘制、ViewRootImpl完成首轮performTraversals并被系统合成之后。
Choreographer会在 VSYNC 节拍下驱动 UI 线程执行测量、布局与绘制,再把结果交给渲染链路。只有当首帧被提交并经过系统合成后,用户才真正“看到页面”。
因此在启动分析中要区分“生命周期完成点”和“首帧可见点”两个时刻。
从观察角度说,onResume()更适合描述“组件生命周期已经走到前台”,而首帧绘制完成更适合描述“页面真正展示出来”。如果把两者混在一起,就很容易在启动耗时分析里高估或低估某一阶段的耗时。
1
2
3
private Activity performLaunchActivity (ActivityClientRecord r, Intent customIntent) {
performLaunchActivity()主要完成了如下几件事:
从ActivityClientRecord中获取待启动的Activity的组件信息
1
2
3
4
5
6
7
8
9
10
11
12
13
14
15
16
17
18
ActivityInfo aInfo = r.activityInfo;if (r.packageInfo == null ) {ComponentName component = r.intent.getComponent();if (component == null ) {if (r.activityInfo.targetActivity != null ) {new ComponentName (r.activityInfo.packageName,
ComponentName包含了Activity组件的包名及类名。
通过Instrumentation.newActivity()使用类加载器创建Activity对象
1
2
3
4
5
6
7
8
9
10
11
12
13
14
15
Activity activity = null ;try {ClassLoader cl = appContext.getClassLoader();if (r.state != null ) {catch (Exception e) {
1 2 3 4 5 6 7 public Activity newActivity (ClassLoader cl, String className, Intent intent) throws InstantiationException, IllegalAccessException,return (Activity)cl.loadClass(className).newInstance();
通过LoadedApk.makeApplication()创建Application对象(实际是判空 )
1
2
3
4
5
6
7
8
9
10
11
12
13
14
15
16
17
18
19
20
21
22
23
24
25
26
27
28
29
30
31
32
33
Application app = r.packageInfo.makeApplication(false , mInstrumentation);public Application makeApplication (boolean forceDefaultAppClass, Instrumentation instrumentation) {if (mApplication != null ) {return mApplication;try {ClassLoader cl = getClassLoader();if (!mPackageName.equals("android" )) {"initializeJavaContextClassLoader" );ContextImpl appContext = ContextImpl.createAppContext(mActivityThread, this );catch (Exception e) {if (!mActivityThread.mInstrumentation.onException(app, e)) {throw new RuntimeException ("Unable to instantiate application " + appClass": " + e.toString(), e);
由于在前面创建并绑定Application过程中的bindApplication()就已经创建好了Application,所以这一步只是起到了预防作用,并且不会重复创建。
创建ContextImpl对象,并通过Activity.attach()完成一些重要数据的初始化
1
2
3
4
5
6
7
ContextImpl appContext = createBaseContextForActivity(r);this , getInstrumentation(), r.token,
ContextImpl是一个很重要的数据结构,它是Context的具体实现,Context中大部分逻辑都是由ContextImpl完成的。ContextImpl是通过Activity.attach()与Activity进行关联的。除此之外,在attach()中,Activity还会完成Window的创建并建立关联 ,这样当Window接收到外部输入事件以后就可以将事件传递给Activity。
调用Activity.oncreate()加载用户界面
1
2
3
4
5
6
7
8
9
10
11
12
13
14
15
16
17
18
19
20
21
22
mInstrumentation.callActivityOnCreate(activity, r.state);public void callActivityOnCreate (Activity activity, Bundle icicle) {final void performCreate (Bundle icicle) {
最终调用到Activity.performCreate(),后续调用到Activity.onCreate(),这时根Activity就启动了,完成了整个启动流程。onCreate()不等于页面已经可见,首帧展示还要等待后续恢复与绘制合成完成。
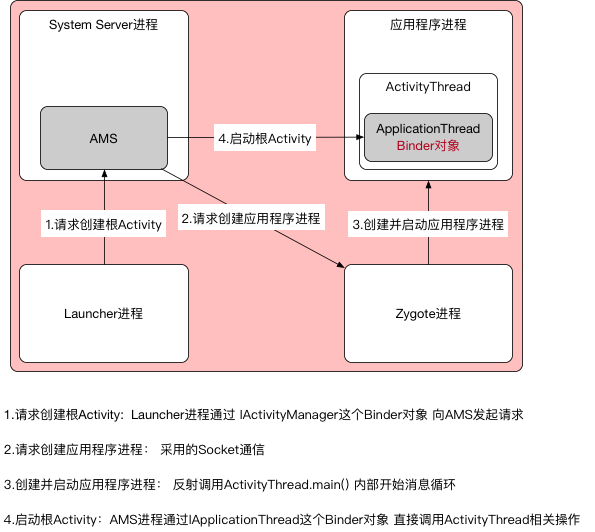
根Activity启动过程中涉及的进程 根Activity启动过程中涉及四个进程:Zygote进程、Launcher进程、AMS所在进程(System Server进程),应用程序进程。
首先Launcher进程会向AMS发起创建根Activity请求,AMS会判断根Activity所需的应用程序进程是否存在并处于启动状态
未启动:请求Zygote进程创建应用程序进程已启动:AMS直接启动Activity
根Activity关键数据结构(补充) 启动链路里最常见的几个结构体职责如下:
数据结构
所在侧
作用
ProcessRecordSystem Server
描述应用进程状态(pid、uid、组件状态、adj等)
ActivityRecordSystem Server
描述单个 Activity 的生命周期与调度状态
TaskRecordSystem Server
描述任务栈(Task)及其栈内关系
ActivityClientRecordApp 进程
应用侧启动参数快照,供ActivityThread创建 Activity
把这四个对象串起来,就能更容易理解“系统侧调度”与“应用侧创建”的分工。
总结 经过上述章节的描述,可以基本厘清根Activity的启动过程
当我们按下桌面上的应用程序快捷启动方式时,Launcher会调用Activity.startActivity()并设置启动FLAG为FLAG_ACTIVITY_NEW_TASK给根Activity设置任务栈,实质上是调用Instrumentation.execStartActivity()尝试启动Activity,这是一个跨进程的过程,利用IActivityManager与AMS进行通信。
AMS就会记录下要启动的Activity信息,并且跨进程通知Launcher进入pause状态,Launcher进入pause状态后,跨进程通知AMS自己已被pause。AMS会回调用自身的startActivty()去继续启动根Activity,这一步需要校验(调用者是否有权限调用),检验通过后,发现此时应用进程尚未启动,AMS就会启动新的进程,并且在新进程中创建ActivityThread对象并执行main()进程初始化。
应用进程启动完毕后,AMS通知主线程绑定Application并启动根Activity。这时AMS会通过ApplicationThread回调到我们的进程,这一步也是一个跨进程的过程,利用ApplicationThread这个Binder对象。由于回调逻辑是在Binder线程池中进行的,所以需要通过Handler H将其切回主线程,发出的消息是LAUNCH_ACTIVITY,对应调用handleLaunchActivity,在这个方法中完成了根Activity的创建以及启动。接着在handleResumeActivity()中开始Activity的内容绘制,直到绘制完成被我们看见。
启动耗时观察点(补充)
进程创建阶段:是否触发startProcessLocked,是否等待Zygote拉起。
主线程阶段:bindApplication、handleLaunchActivity中是否有阻塞初始化。
渲染阶段:onResume到首帧可见之间是否出现绘制/合成延迟。
普通Activity启动过程
普通Activity启动过程相比于根Activity启动过程,只保留了两步:AMS到Application的调用过程,ActivityThread启动Activity过程。
涉及的进程也只剩:AMS所在进程(System Server进程),应用程序进程。
普通Activity与根Activity差异矩阵(补充)
对比项
根Activity启动
普通Activity启动(同进程)
是否需要新建进程
可能需要(冷启动场景)
一般不需要
是否执行bindApplication
冷启动会执行
通常不执行
是否经过 Zygote
冷启动会经过
不经过
核心跨进程链路
Launcher -> AMS -> App
App -> AMS -> App
应用侧创建入口
LAUNCH_ACTIVITYLAUNCH_ACTIVITY
可以看出两者后半段(应用侧创建 Activity)高度一致,差异主要集中在前半段的“进程准备与运行时绑定”。
相同进程的启动过程
例如LoadingActivity -> MainActivity
LoadingActivity组件会向AMS发送一个启动MainActivity的请求,其实就是内部通过Instrumentation尝试启动Activity(execStartActivity),这是一个跨进程过程,会调用AMS的startActivity()
AMS会保存下来MainActivity的组件信息,然后向LoadingActivity发送一个进入中止状态的进程间通信请求。这也就是为什么老Activity的onPause()会执行在新Activity的启动之前的原因。 LoadingActivity进入中止状态后会通知到AMS继续向下执行MainActivity的启动,由于发现应用进程已经存在,所以AMS直接通过ApplicationThread回调到应用进程,这也是一个跨进程过程。由于ApplicationThread是一个Binder对象,回调逻辑在Binder线程池中完成,需要通过Handler H切回到主线程,并发出LAUNCH_ACTIVITY消息,对应调用handleLaunchActivity。
继续向下完成MainActivity的创建和启动,然后在handleResumeActivity()中完成View的绘制,直到绘制完成展示在用户面前结束。
新进程的启动过程
例如LoadingActivity -> MainActivity设置了android:process=":remote"
类似根Activity的启动过程,不过起始点是从LoadingActivity开始
LoadingActivity组件会向AMS发送一个启动MainActivity的请求,其实就是内部通过Instrumentation尝试启动Activity(execStartActivity),这是一个跨进程过程,会调用AMS的startActivity()
AMS会保存下来MainActivity的组件信息,然后向LoadingActivity发送一个进入中止状态的进程间通信请求。这也就是为什么老Activity的onPause()会执行在新Activity的启动之前的原因。 LoadingActivity进入中止状态后会通知到AMS继续向下执行MainActivity的启动,此时发现用来运行的:remote进程不存在,就会调用AMS去启动新的应用进程,并且在新进程中创建ActrivityThread(*主进程*)并执行main()进行初始化。应用进程启动完毕之后,向AMS发送一个启动完成的请求,AMS就会通知主线程ActivityThread去创建并绑定Application,绑定完成后,通知AMS绑定完成。AMS直接通过ApplicationThread回调到应用进程,这也是一个跨进程过程。
由于ApplicationThread是一个Binder对象,回调逻辑在Binder线程池中完成,需要通过Handler H切回到主线程,并发出LAUNCH_ACTIVITY消息,对应调用handleLaunchActivity。
版本差异映射(Android 10+)(补充) 本文主线是 Android 8.0,后续版本中类职责有迁移,阅读源码时可按以下映射理解:
AMS中的 Activity/Task 调度职责逐步拆分到ATMS(ActivityTaskManagerService)。任务栈与窗口管理的协作更紧密,更多逻辑由 WindowManager 侧结构承接。
启动窗口与系统过渡动画机制在新版本中不断加强,冷启动视觉链路与 8.0 有明显差异。
建议阅读新版本源码时,先按“职责迁移”定位类,再回到具体方法链。
启动链路观察点(补充) 为了验证启动时序,建议固定观察以下关键点:
系统侧:ActivityTaskManager/ActivityManager相关日志中的startActivity/attachApplication。
应用侧:ActivityThread的BIND_APPLICATION与LAUNCH_ACTIVITY消息时序。
生命周期:Application.onCreate -> Activity.onCreate/onStart/onResume的先后。
首帧:onResume之后到首帧可见之间的渲染耗时区间。
用同一套观察点反复验证,能更稳定地定位“慢在调度侧还是慢在应用侧”。
临时记录:
Andorid 9.0 源码添加了Sleeping状态,功能类似Stop
handleSleeping() 可能导致 onSaveInstanceState()存储异常