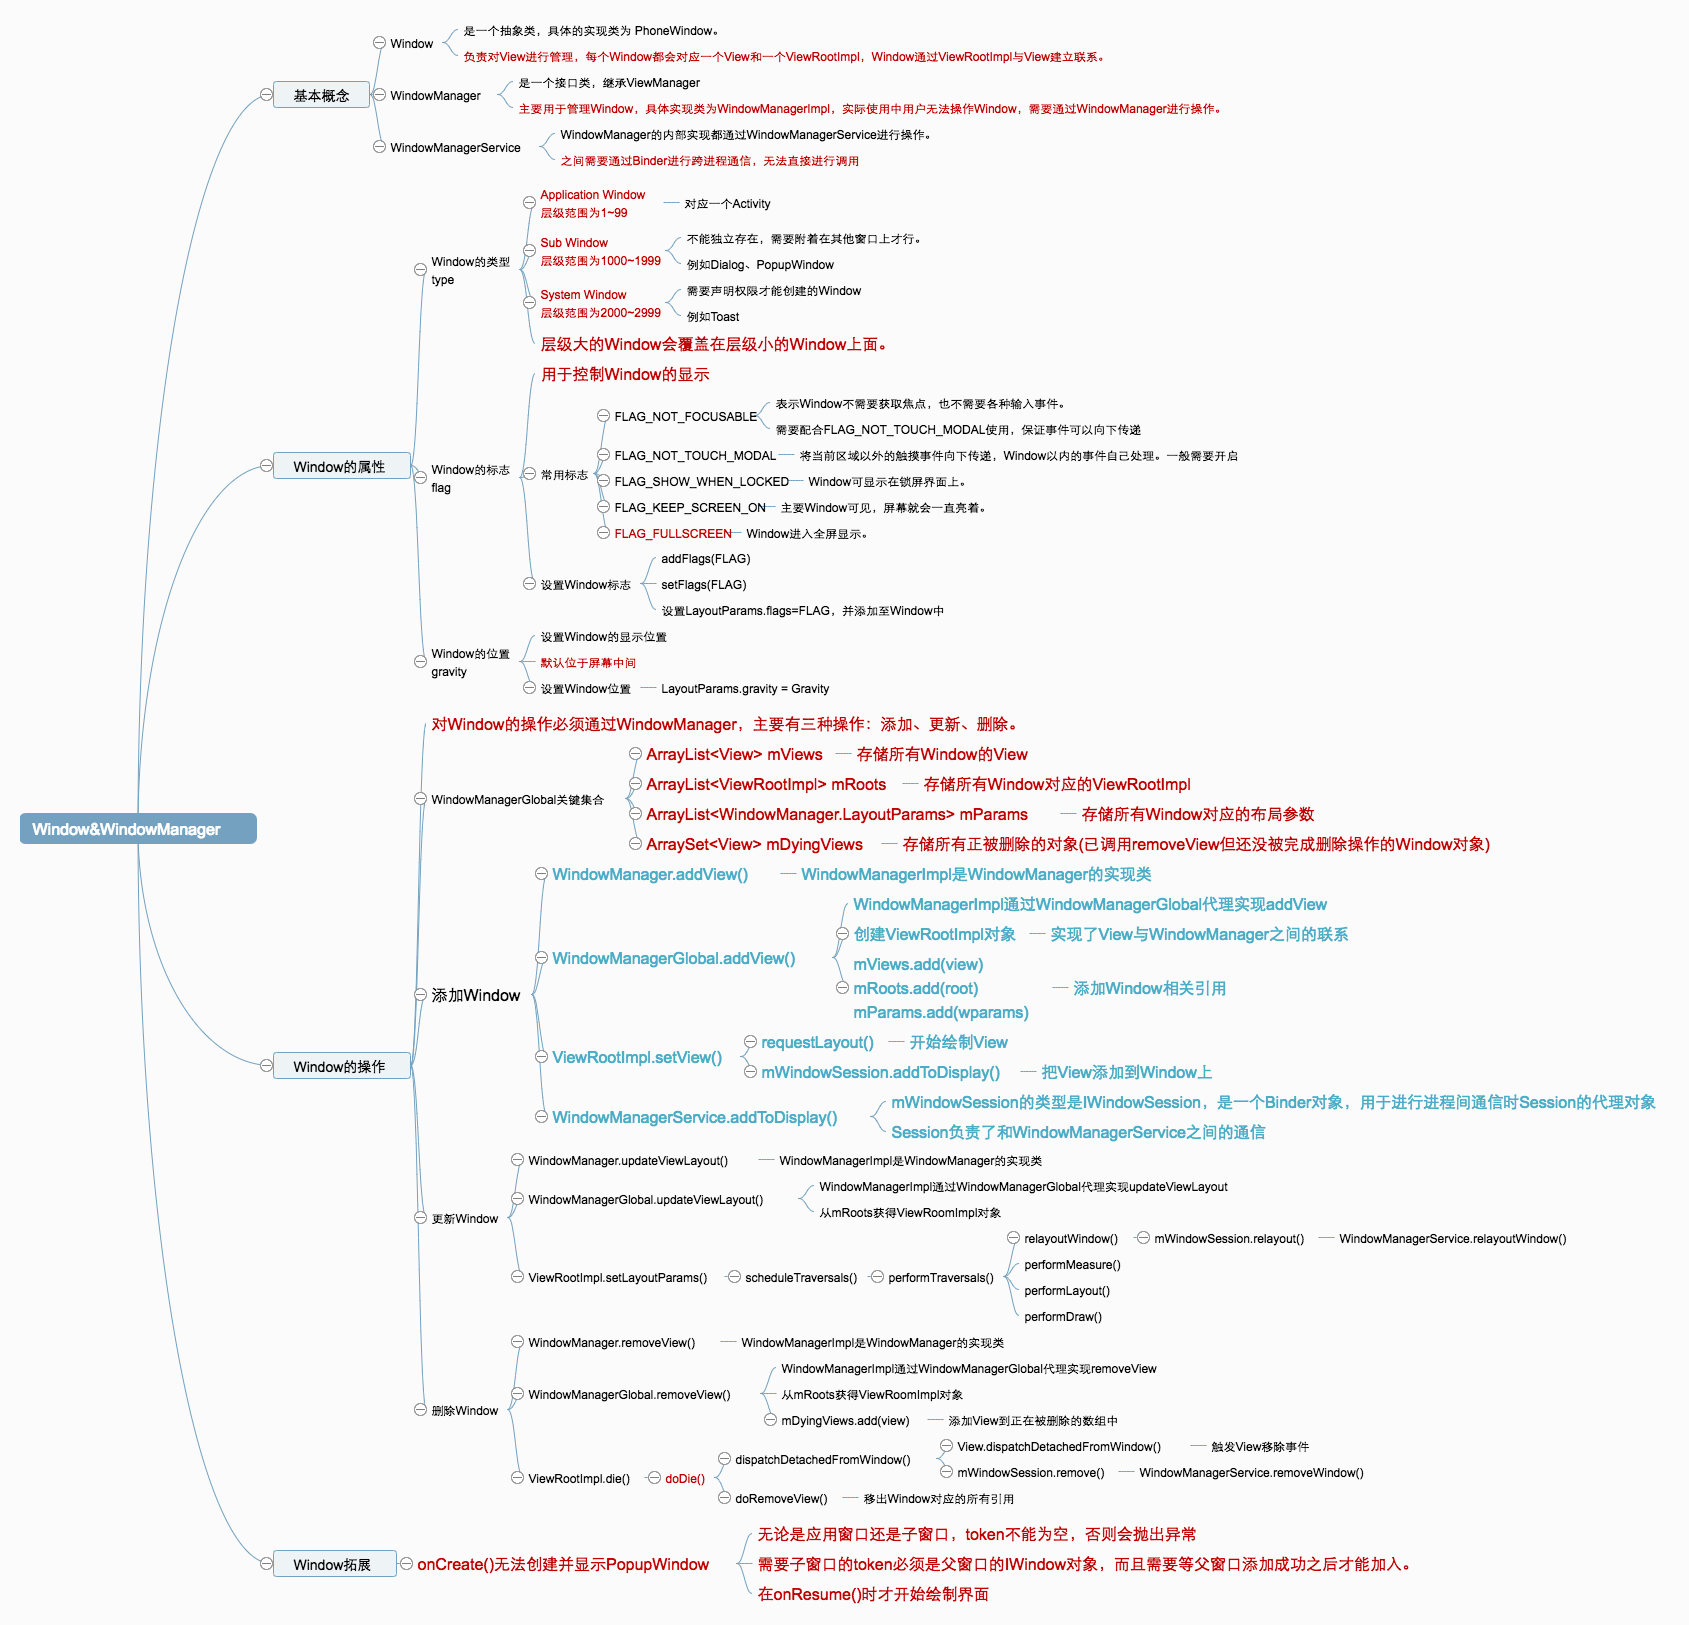
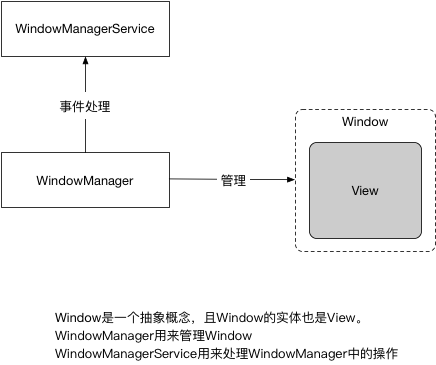
1.基本概念 Window:他是一个抽象类,具体的实现类为PhoneWindow,它对View进行管理。每个Window都会对应一个View和一个ViewRootImpl,Window通过ViewRootImpl与View建立联系。
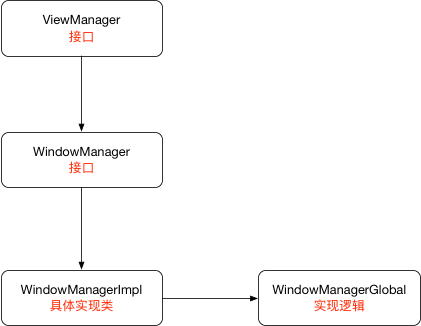
WindowManager:是一个接口类,继承ViewManager,主要用于管理Window,具体实现类为WindowManagerImpl。实际使用中无法直接访问Window,需要通过WindowManager进行操作。
WindowManagerService:WindowManager的具体工作都会通过WindowManagerService进行处理,他们之间通过Binder进行跨进程通信,WindowManager无法直接调用WMS中的API。
2.Window的属性 Window的类型(Type ) Window有三种类型:
Application Window(应用窗口) :对应一个Activity 层级范围为1~99
Sub Window(子窗口) :不能独立存在,需要附着在其他窗口上才行,例如Dialog,PopupWindow 层级范围为1000~1999
System Window(系统窗口) :需要声明权限才能创建的Window,例如Toast 层级范围为2000~2999
Window是分层的,层级大的Window会覆盖在层级小的Window上面,上面描述的层级范围对应的是WindowManager.LayoutParams的type参数。
通过layoutParams.type = LayoutParams.TYPE_XXX可以设置层级。**同时需要声明<user-permission android:name="android:permission.SYSTEM_ALERT_WINDOW">**就可以设置系统窗口的type。
Window的标志(Flag ) Window的标志用于控制Window的显示,同时被定义在WindowManager.LayoutParams中,以下列举比较常用的:
FLAG
描述
FLAG_NOT_FOCUSABLE
表示Window不需要获取焦点,也不需要接收各种输入事件,同时会设置FLAG_NOT_TOUCH_MODAL标记,最终事件会传递到下层具有焦点的Window
FLAG_NOT_TOUCH_MODAL
系统会将当前区域以外的触摸事件向下传递,Window以内的事件自己处理。一般需要开启,否则其他Window无法接受时间。
FLAG_SHOW_WHEN_LOCKED
表示Window可显示在锁屏界面。(例如XX助手 )
FLAG_KEEP_SCREEN_ON
只要窗口可见,屏幕就会一直亮着
FLAG_FULLSCREEN
隐藏所有的屏幕装饰窗口,进入全屏显示
设置Windwo的Flag有三种方法:
通过Window的addFlags()
1
2
Window mWindow = getWindow();
通过Window的setFlags()
1
2
Window mWindow = getWindow();
addFlags()内部实现调用的还是setFlags(),两者区别不大。
设置LayoutParams.flags=XX,并通过addView()添加进Window
1 2 3 4 5 WindowManager.LayoutParams mLayoutParams = new WindowManager .LayoutParams();WindowManager mWindowManager = (WindowManager)getSystemService(Context.WINDOW_SERVICE);TextView tv = new TextView (this );
Window的位置(Gravity ) 默认位于屏幕中间
1
2
3
mLayoutParams.gravity = Gravity.LEFT | Gravity.TOP;100 ;300 ;
设置的x、y是相对于gravity的位置
Window软键盘相关模式 窗口之间的叠加是常见的场景,如果弹出窗口为软键盘的话,可能会有显示问题,默认弹出软键盘会覆盖用户的输入框。WindowManager.LayoutParams中定义了相关的软键盘弹出模式,下面列举常用的几个:
SoftInputMode
描述
SOFT_INPUT_STATE_UNSPECIFIED
没有指定状态,系统会自动选择一个
SOFT_INPUT_STATE_UNCHANGED
不会改变软键盘状态
SOFT_INPUT_STATE_HIDDEN
用户进入窗口,软键盘默认隐藏
SOFT_INPUT_STATE_ALWAYS_HIDDEN
窗口获取焦点时,软键盘总是隐藏
SOFT_INPUT_ADJUST_RESIZE
软键盘弹出时,窗口会调整大小
SOFT_INPUT_ADJUST_PAN
软键盘弹出时,窗口不需要调整大小,确保输入焦点是可见
1 getWindow().setSoftInputMode(WindowManager.LayoutParams.SOFT_INPUT_ADJUST_PAN)
或者设置在AndroidManifest.xml中
1 2 3 <activity android:windowSoftInputMode ="SOFT_INPUT_ADJUST_PAN" />
3.Window的操作 对Window的访问必须通过WindowManager,主要有三大操作:添加、更新、删除 。这三个方法主要定义在ViewManger中
1
2
3
4
5
6
public interface ViewManager public void addView (View view, ViewGroup.LayoutParams params) ;public void updateViewLayout (View view, ViewGroup.LayoutParams params) ;public void removeView (View view) ;
WindowManager也是一个接口继承自ViewManager
1 public interface WindowManager extends ViewManager
WindowManagerImpl就是WindowManager的具体实现类
1
2
3
4
5
6
7
8
9
10
11
12
13
14
15
16
17
18
19
20
public final class WindowManagerImpl implements WindowManager {@Override public void addView (@NonNull View view, @NonNull ViewGroup.LayoutParams params) {@Override public void updateViewLayout (@NonNull View view, @NonNull ViewGroup.LayoutParams params) {@Override public void removeView (View view) {false );
最终WindowManagerImpl对View的操作交由WindowManagerGlobal去实现。
WindowManagerGlobal通过ViewRootImpl操作Window,ViewRootImpl通过IWindowSession这个Binder对象与WindowManagerService进程间通信去操作Window。
WindowManagerService简析
Window添加
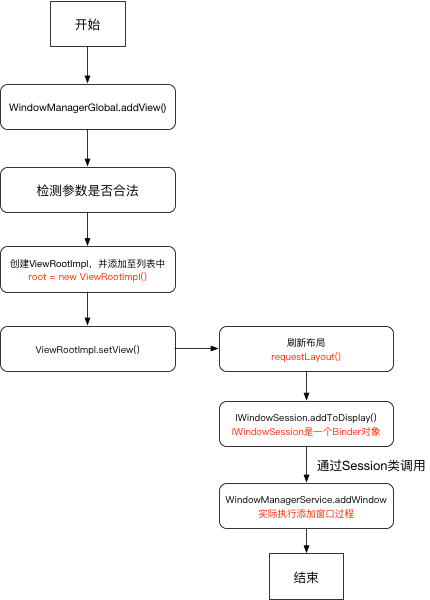
添加过程需要通过WindowManager.addView()来实现,它的真正实现需要通过WindowManagerGlobal
1 2 3 4 5 6 7 8 9 10 11 12 13 14 15 16 17 18 19 20 21 22 23 24 25 26 27 28 29 30 31 32 33 34 35 36 37 38 39 40 41 42 43 44 45 46 47 48 49 50 51 52 53 54 55 56 57 private final ArrayList<View> mViews = new ArrayList <View>();private final ArrayList<ViewRootImpl> mRoots = new ArrayList <ViewRootImpl>();private final ArrayList<WindowManager.LayoutParams> mParams =new ArrayList <WindowManager.LayoutParams>();private final ArraySet<View> mDyingViews = new ArraySet <View>(); public void addView (View view, ViewGroup.LayoutParams params, Display display, Window parentWindow) {if (view == null ) {throw new IllegalArgumentException ("view must not be null" );if (display == null ) {throw new IllegalArgumentException ("display must not be null" );if (!(params instanceof WindowManager.LayoutParams)) {throw new IllegalArgumentException ("Params must be WindowManager.LayoutParams" );final WindowManager.LayoutParams wparams = (WindowManager.LayoutParams) params;if (parentWindow != null ) {else {final Context context = view.getContext();if (context != null 0 ) {new ViewRootImpl (view.getContext(), display);try {catch (RuntimeException e) {if (index >= 0 ) {true );throw e;
在WindowManagerGlobal.addView()主要完成了以下三步:
检查参数是否合法,如果是子Window,还需要调整参数
创建ViewRootImpl,然后保存当前界面参数
调用ViewRootImpl.setView()继续完成Window的添加过程
1 2 3 4 5 6 7 8 9 10 11 12 13 14 15 16 17 18 19 20 21 22 23 24 25 26 27 28 29 30 31 32 public void setView (View view, WindowManager.LayoutParams attrs, View panelParentView) {synchronized (this ) {try {true ;catch (RemoteException e) {false ;null ;null ;null ;null );null , null );throw new RuntimeException ("Adding window failed" , e);finally {if (restore) {
mWindowSession的类型是IWindowSession是一个Binder对象,用于进行进程间通信,它是Session代理对象。
添加完成后,需要通过返回值res来判断是否添加成功。若是WindowManagerGlobal.ADD_PKAY说明添加成功。
1 2 3 4 5 6 7 8 9 final WindowManagerService mService;@Override public int addToDisplay (IWindow window, int seq, WindowManager.LayoutParams attrs, int viewVisibility, int displayId, Rect outContentInsets, Rect outStableInsets, Rect outOutsets, InputChannel outInputChannel) {return mService.addWindow(this , window, seq, attrs, viewVisibility, displayId,
addToDisplay()最终调用到WindowManagerService.addWindow()实现Window添加过程。
Window更新
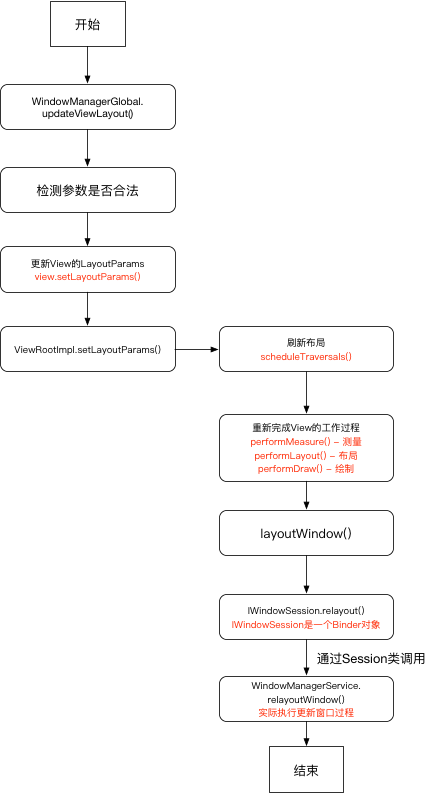
更新过程需要通过WindowManager.updateViewLayout(),它的真正实现需要通过WindowManagerGlobal
1 2 3 4 5 6 7 8 9 10 11 12 13 14 15 16 17 18 19 20 21 public void updateViewLayout (View view, ViewGroup.LayoutParams params) {if (view == null ) {throw new IllegalArgumentException ("view must not be null" );if (!(params instanceof WindowManager.LayoutParams)) {throw new IllegalArgumentException ("Params must be WindowManager.LayoutParams" );final WindowManager.LayoutParams wparams = (WindowManager.LayoutParams)params;synchronized (mLock) {int index = findViewLocked(view, true );ViewRootImpl root = mRoots.get(index);false );
更新View的LayoutParams之后,还需要更新ViewRootImpl.setLayoutParams()
1 2 3 4 5 6 7 8 9 10 11 12 13 14 15 16 17 18 19 20 21 void setLayoutParams (WindowManager.LayoutParams attrs, boolean newView) {synchronized (this ){if (newView) {if ((attrs.softInputMode & WindowManager.LayoutParams.SOFT_INPUT_MASK_ADJUST)true ;
在scheduleTraversals()调用到performTraversals()继续执行更新过程
1
2
3
4
5
6
7
8
9
10
11
12
13
14
15
16
17
18
19
20
21
22
23
24
25
26
27
28
29
30
31
private void performTraversals () {if (!mStopped){int childWidthMeasureSpec = getRootMeasureSpec(mWidth, lp.width);int childHeightMeasureSpec = getRootMeasureSpec(mHeight, lp.height); final boolean didLayout = layoutRequested && (!mStopped || mReportNextDraw);if (didLayout){if (!cancelDraw && !newSurface) {if (mPendingTransitions != null && mPendingTransitions.size() > 0 ) {for (int i = 0 ; i < mPendingTransitions.size(); ++i) {
performTraversals()内部实现了Window更新以及View的整个工作过程(测量-布局-绘制 )。
1
2
3
4
5
6
7
8
9
10
11
12
13
private int relayoutWindow (WindowManager.LayoutParams params, int viewVisibility, boolean insetsPending) throws RemoteException {int relayoutResult = mWindowSession.relayout(int ) (mView.getMeasuredWidth() * appScale + 0.5f ),int ) (mView.getMeasuredHeight() * appScale + 0.5f ),0 ,
mWindowSession的类型是IWindowSession是一个Binder对象,用于进行进程间通信,它是Session代理对象。
mWindow即W extends IWindow.Stub发送给WindowManagerService,用来接受WMS信息。
1 2 3 4 5 6 7 8 9 10 11 12 13 14 15 16 final WindowManagerService mService;public int relayout (IWindow window, int seq, WindowManager.LayoutParams attrs, int requestedWidth, int requestedHeight, int viewFlags, int flags, Rect outFrame, Rect outOverscanInsets, Rect outContentInsets, Rect outVisibleInsets, Rect outStableInsets, Rect outsets, Rect outBackdropFrame, MergedConfiguration mergedConfiguration, Surface outSurface) {int res = mService.relayoutWindow(this , window, seq, attrs,return res;
relayout()最终调用到WindowManagerService.relayoutWindow()实现Window更新过程。
Window删除
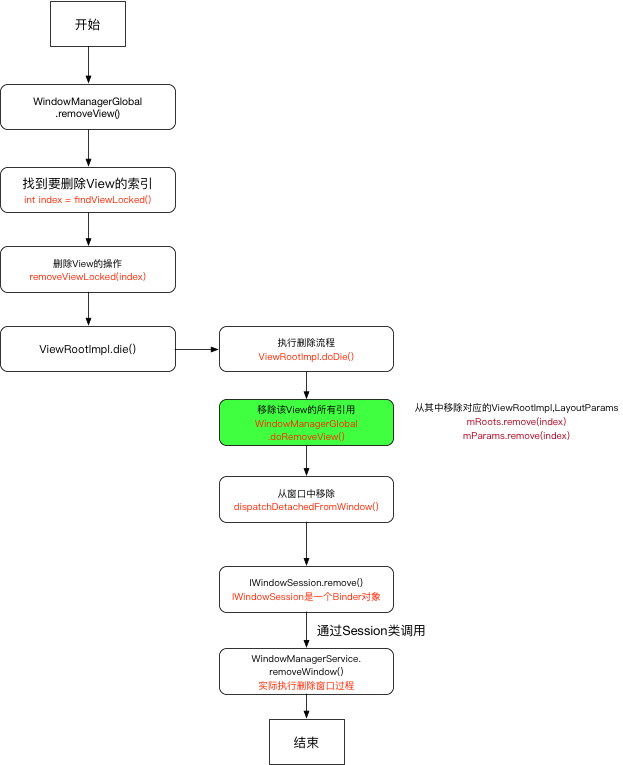
删除过程需要通过WindowManager.removeView()来实现,它的真正实现需要通过WindowManagerGlobal
文件位置../android/view/WindowManagerGlobal.java 1 2 3 4 5 6 7 8 9 10 11 12 13 14 15 16 17 18 19 public void removeView (View view, boolean immediate) {if (view == null ) {throw new IllegalArgumentException ("view must not be null" );synchronized (mLock) {int index = findViewLocked(view, true );View curView = mRoots.get(index).getView();if (curView == view) {return ;throw new IllegalStateException ("Calling with view " + view" but the ViewAncestor is attached to " + curView);
实际调用removeViewLocked()执行删除Window操作,内部实现还是依赖了ViewRootImpl
../android/view/WindowManagerGlobal.java 1 2 3 4 5 6 7 8 9 10 11 12 13 14 15 16 17 18 19 20 21 private void removeViewLocked (int index, boolean immediate) {ViewRootImpl root = mRoots.get(index);View view = root.getView();if (view != null ) {InputMethodManager imm = InputMethodManager.getInstance();if (imm != null ) {boolean deferred = root.die(immediate);if (view != null ) {null );if (deferred) {
../android/view/ViewRootImpl.java 1 2 3 4 5 6 7 8 9 10 11 12 13 14 15 16 17 18 boolean die (boolean immediate) {if (immediate && !mIsInTraversal) {return false ;if (!mIsDrawing) {else {"Attempting to destroy the window while drawing!\n" +" window=" + this + ", title=" + mWindowAttributes.getTitle());return true ;
die()中分为两种移除Window方式:同步执行、异步执行(通过Handler) 。最终都会执行到doDie()
../android/view/ViewRootImpl.java 1 2 3 4 5 6 7 8 9 10 11 12 13 14 15 16 17 void doDie () {synchronized (this ) {if (mRemoved) {return ;true ;if (mAdded) {false ;this );
doDie()主要实现了两个功能:
dispatchDetachedFromWindow():移除WindowdoRemoveView():移除Window所对应的引用
../android/view/ViewRootImpl.java 1 2 3 4 5 6 7 8 9 10 11 12 13 14 15 void dispatchDetachedFromWindow () {if (mView != null && mView.mAttachInfo != null ) {false );try {catch (RemoteException e) {
mWindowSession的类型是IWindowSession是一个Binder对象,用于进行进程间通信,它是Session代理对象。
../core/java/com/android/server/wm/Session.java 1 2 3 public void remove (IWindow window) {this , window);
remove()最终通过WindowManagerService.removeView()实现Window删除逻辑。
总结
上述Window的三大操作(添加、更新和删除 )都会通过一个IPC过程调用WindowManagerService去实现具体逻辑。
三大操作过程也都需要通过ViewRootImpl来关联起Window和View,ViewRootImpl可以控制内部VIew的测量、布局与绘制 。
在上述三大操作中,虽然说是由WindowManagerGlobal去实现,但内部是依靠的ViewRootImpl,实际执行的是WindowManagerService。 WindowManagerService简析
