Bitmap简介
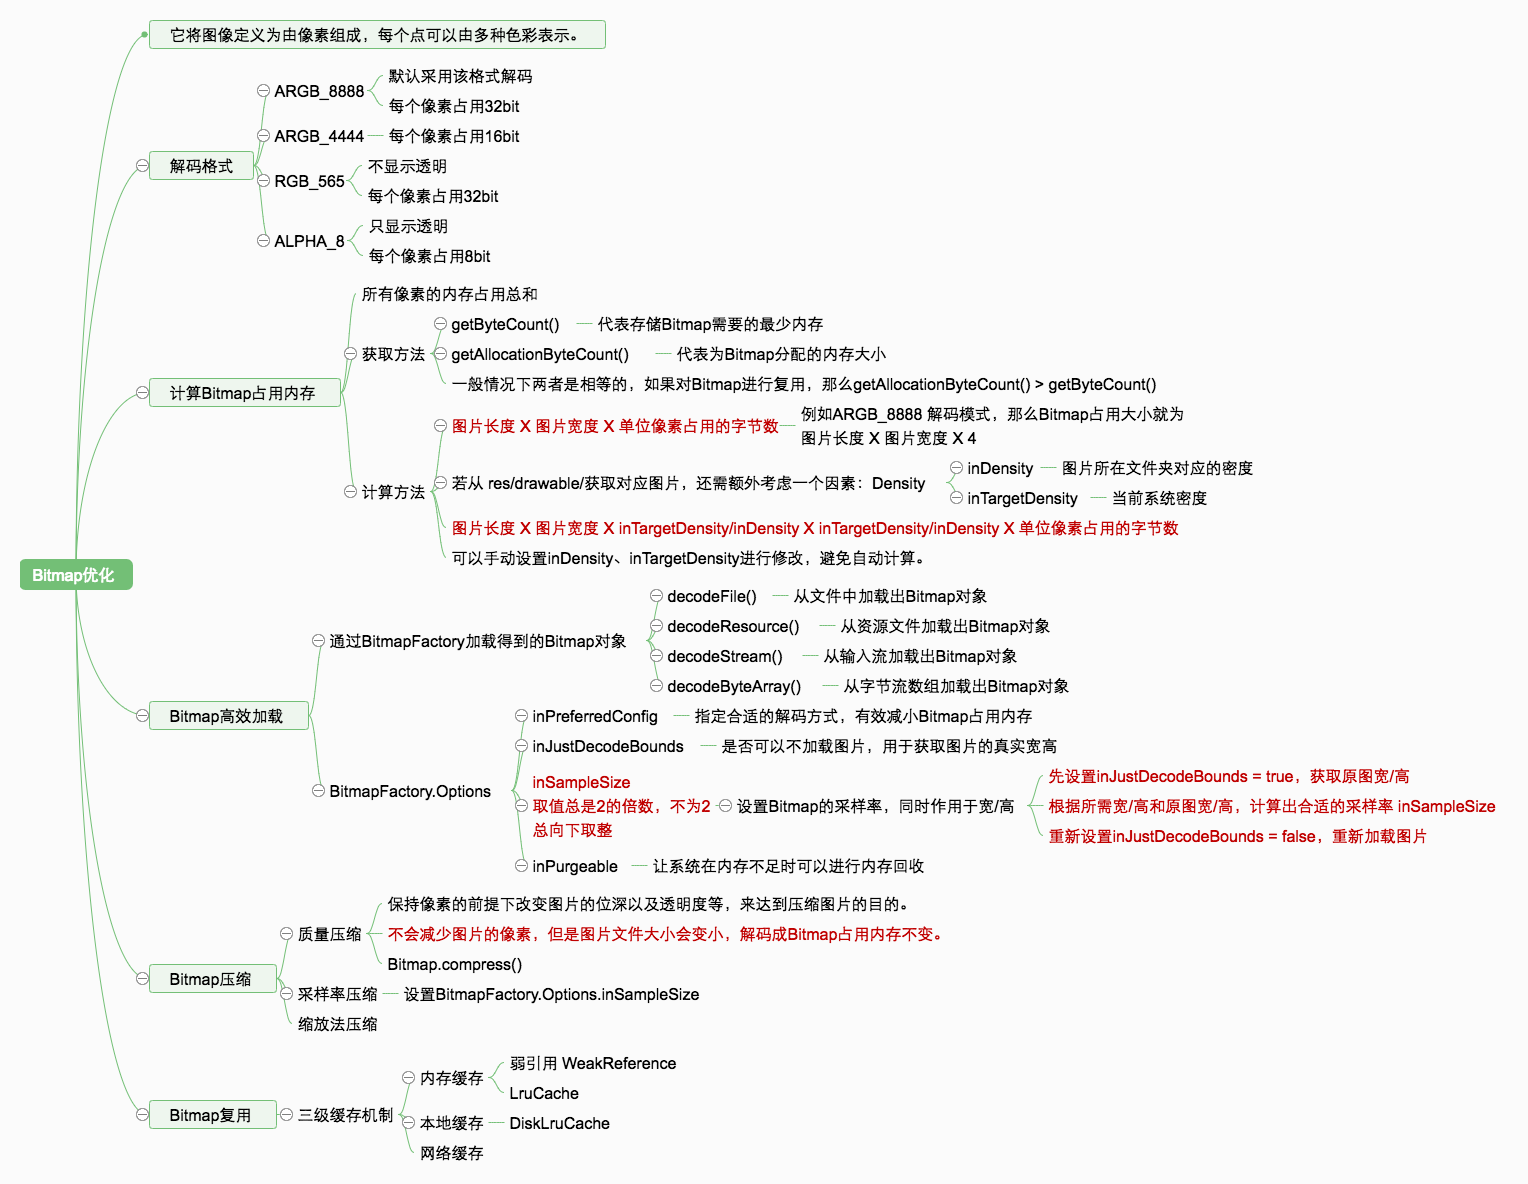
位图文件(Bitmap),扩展名可以是.bmp或.dlb。它将图像定义为由像素组成,每个点可以由多种色彩表示,包括2、4、8、16、24和32位色彩。
在安卓系统中bitmap图片一般是以ARGB_8888来进行存储的。
| 颜色格式 |
每个像素占用内存(byte) |
每个像素占用内存(bit) |
ARGB_8888(默认) |
4 |
32 |
| ALPHA_8 |
1 |
8 |
| ARGB_4444 |
2 |
16 |
| RGB_565 |
2 |
16 |
ARGB_8888:分别代表透明度,红色,绿色,蓝色,每个值分别用8bit记录
ALPHA_8:该像素只保存透明度
ARGB_4444:每个值分别用4bit记录
RGB_565:不存在透明度
实际应用中建议使用ARGB_8888和RGB_565(不需要存储透明度时使用)。
Bitmap占用内存
bitmap占用内存:所有像素的内存占用总和。
Android系统提供了两个方法获取占用内存:getByteCount()和getAllocationByteCount()。
getByteCount():在API12中加入的,代表存储Bitmap需要的最少内存。
getAllocationByteCount():在API19中加入的,代表在内存中为Bitmap分配的内存大小
1
2
3
4
5
6
| public final int getAllocationByteCount(){
if(mBuffer == null){
return getByteCount();
}
return mBuffer.length;
}
|
两者的区别:
- 一般情况下两者是相等的
- 如果通过Bitmap的复用去解码图片,那么被复用的Bitmap的内存比待分配内存的Bitmap大,即
getByteCount()<getAllocationByteCount()。getByteCount()表示新解码图片占用内存的大小(并非实际占用内存大小),getAllocationByteCount()表示被复用的Bitmap占用的内存大小。
一般情况下Bitmap占用的内存大小都为:图片长度 x 图片宽度 x 单位像素占用的字节数。
单位像素占用字节数:指代的是上面描述的编码方式,常用的是ARGB_8888即用这个方式编码的Bitmap占用大小就为图片长度 x 图片宽度 x 4。
非一般情况下,例如从资源文件夹(res/drawable/)获取图片时,还需要额外考虑一个因素:Density。
Density:可以理解为相对屏幕密度,一个DIP在160dpi的屏幕上大约为1px,以160dpi为基准线,density的值即为相对于160dpi的相对屏幕密度。
1
2
3
4
5
6
7
8
9
10
11
12
13
14
15
16
17
18
19
20
21
22
23
|
public static Bitmap decodeResourceStream(@Nullable Resources res, @Nullable TypedValue value,
@Nullable InputStream is, @Nullable Rect pad, @Nullable Options opts) {
validate(opts);
if (opts == null) {
opts = new Options();
}
if (opts.inDensity == 0 && value != null) {
final int density = value.density;
if (density == TypedValue.DENSITY_DEFAULT) {
opts.inDensity = DisplayMetrics.DENSITY_DEFAULT;
} else if (density != TypedValue.DENSITY_NONE) {
opts.inDensity = density;
}
}
if (opts.inTargetDensity == 0 && res != null) {
opts.inTargetDensity = res.getDisplayMetrics().densityDpi;
}
return decodeStream(is, pad, opts);
}
|
从源码中可以看出:加载一张本地资源图片,那么它占用的内存 = 图片长度 x 图片宽度 x inTargetDensity/inDensity x inTargetDensity/inDensity x 单位像素占用字节数。
其中 inDensity代表图片所在文件夹对应的密度;inTargetDensity代表了当前的系统密度。
*可以通过设置 Options对inTargetDensity 、inDensity进行修改,避免自动计算。 *
Bitmap复用
利用LruCache和DiskLruCache做内存和磁盘缓存
LruCache原理
使用Bitmap复用 -多个Bitmap复用同一块内存
1
2
3
4
5
6
7
8
9
10
11
12
13
14
15
16
17
| BitmapFactory.Options options = new BitmapFactory.Options();
options.inMutable = true;
options.inDensity = 320;
options.inTargetDensity = 320;
Bitmap bitmap = BitmapFactory.decodeResource(getResources(), R.drawable.resbitmap, options);
options.inBitmap = bitmap;
options.inDensity = 320;
options.inTargetDensity = 160;
options.inMutable = true;
Bitmap bitmapReuse = BitmapFactory.decodeResource(getResources(), R.drawable.resbitmap_reuse, options);
|
使用inBitmap参数实现Bitmap的复用,但复用存在一些限制:在Android4.4之前只能重用相同大小的Bitmap的内存,4.4之后的只要后来的Bitmap比之前的小即可。
Bitmap高效加载
核心思想:采用BitmapFactory.Options来加载所需尺寸的图片,使其按照一定的采样率将图片缩小后再进行加载。
防止直接加载大容量的高清Bitmap导致OOM的出现。
BitmapFactory
提供方法生成Bitmap对象。
decodeFile():从文件中加载出一个Bitmap对象decodeResource():从资源文件夹中加载出一个Bitmap对象decodeStream():从输入流中加载出一个Bitmap对象decodeByteArray():从字节数组中加载出一个Bitmap对象
decodeFile()和decodeResource()间接调用到了decodeStream(),最终都是在Native层实现的。
BitmapFactory.Options
里面配置的参数可以实现高效的加载Bitmap。
1
2
3
4
5
6
7
8
9
10
11
12
13
14
15
16
17
18
19
| public static class Options {
public Options() {
inDither = false;
inScaled = true;
inPremultiplied = true;
}
...
public Bitmap inBitmap;
public int inSampleSize;
public boolean inJustDecodeBounds;
public boolean inPremultiplied;
public boolean inDither;
public int inDensity;
public int inTargetDensity;
public boolean inScaled;
public int outWidth;
public int outHeight;
...
}
|
inPreferredConfig
根据需求选择合适的解码方式,可以有效减小占用内存
inPreferredConfig指的就是上面描述到的ARGB_8888、ARGB_4444、RGB_565、ALPHA_8,默认用的是ARGB_8888。
inScaled
表示是否支持缩放。默认为true
缩放系数的计算方法:inDensity / inTargetDensity计算得出。
1
2
3
4
5
| BitmapFactory.Options options = new BitmapFactory.Options();
options.inDensity = 160;
options.inTargetDensity = 320;
Bitmap bitmap = BitmapFactory.decodeResource(getResources(), R.drawable.size, options);
int size = bitmap.getByteCount();
|
可以手动的设置inDensity,inTargetDensity控制缩放系数。
inJustDecodeBounds
是否去加载图片
当此参数设置为true:BitmapFactory只会加载图片的原始宽高信息,而不会真正的加载图片到内存。
设置为false:BitmapFactory加载图片至内存。
BitmapFactory获取的图片宽高信息会和图片的位置以及程序运行的设备有关,会导致获取到不同结果。
inSampleSize
采样率,同时作用于宽/高。
当inSampleSize == 1,采样后的图片和原来大小一样;为2时,采样后的图片宽高均变为原来的1/2,占用内存大小也就变成了1/4。
inSampleSize的取值应该总是2的指数(2、4、8、16 …),如果传递的inSampleSize不为2的指数,那么系统会向下取整并选择一个最接近于2的指数来代替。传进来3,则对应为2。
注意:需要根据图片的宽高 实际大小和需要大小,去计算出需要的缩放比并尽可能取小,避免缩小的过多导致无法铺满控件被拉伸。
获取采样率
- 设置
BitmapFactory.Options.inJustDecodeBounds = true并加载图片
- 从
BitmapFactory.Options获取图片的原始宽高信息,outWidth和outHeight
- 根据原始宽高并结合目标View的大小得到合适的采样率
inSampleSize
- 重新设置
BitmapFactory.Options.inJustDecodeBounds = false并重新加载图片
1
2
3
4
5
6
7
8
9
10
11
12
13
14
15
16
17
18
19
20
21
22
23
24
25
26
27
28
| public static Bitmap decodeSampledBitmapTromResource(Resource res,int rresId,int reqWidth,int reqHeight){
final BitmapFactory.Options options = new BitmapFactory.Options();
options.inJustDecodeBounds = true;
BitmapFacory.decodeResource(res,resId,options);
options.inSampleSize = calculateInSampleSize(options,reqWidth,reqHeight);
options.inJustDecodeBounds = false;
return BitmapFactory.decodeResource(res,resId,options);
}
public static int calculateInSampleSize(BitmapFactory.Options options,int reqWidth,int reqHeight){
final int height = options.outHeight;
final int width = options.outWidth;
int inSampleSize = 1;
if(height > reqHeight || width > reqWidth){
final int halfWidth = width /2;
final int halfHeight = height/2;
while((halfHeight / inSampleSize) >= reqHeight
&& (halfWidth / inSampleSize) >= reqWidth){
inSampleSize = inSampleSize << 1;
}
}
return inSampleSize;
}
iv.setImageBitmap(decodeSampledBitmapTromResource(getResources(),R.drawable.bitmap,100,100))
|
Bitmap压缩
质量压缩
保持像素的前提下改变图片的位深以及透明度等,来达到压缩图片的目的,不会减少图片的像素,经过质量压缩的图片文件大小会变小,但是解码成Bitmap占用内存不变。
1
2
3
4
5
6
7
8
9
10
11
12
13
14
15
16
17
18
19
20
21
22
23
24
25
26
27
28
| public static Bitmap compressImage(Bitmap image , long maxSize) {
ByteArrayOutputStream baos = new ByteArrayOutputStream();
Bitmap bitmap = null;
image.compress(Bitmap.CompressFormat.JPEG, 100, baos);
int options = 90;
while (baos.toByteArray().length > maxSize) {
baos.reset();
image.compress(Bitmap.CompressFormat.JPEG, options, baos);
if(options == 1){
break;
}else if (options <= 10) {
options -= 1;
} else {
options -= 10;
}
}
byte[] bytes = baos.toByteArray();
if (bytes.length != 0) {
bitmap = BitmapFactory.decodeByteArray(bytes, 0, bytes.length);
}
return bitmap;
}
|
对于Png而言,设置quality无效
采样率压缩
采样率
缩放法压缩
Android使用Matrix对图像进行缩放(减少图片的像素)、旋转、平移、斜切等变换。Mairix是一个3*3的矩阵
| scaleX(控制缩放) |
skewX(控制斜切) |
translateX(控制位移) |
| skewY |
scaleY |
translateY |
| 0 |
0 |
scale |
执行顺序是 : preXXX() -> setXXX() ->postXXX()
1
2
3
4
5
6
7
8
9
10
11
12
| private static Bitmap scale(final Bitmap src, final float scaleWidth, final float scaleHeight, final boolean recycle) {
if (src == null || src.getWidth() == 0 || src.getHeight() == 0) {
return null;
}
Matrix matrix = new Matrix();
matrix.setScale(scaleWidth, scaleHeight);
Bitmap ret = Bitmap.createBitmap(src, 0, 0, src.getWidth(), src.getHeight(), matrix, true);
if (recycle && !src.isRecycled()) {
src.recycle();
}
return ret;
}
|
Bitmap加载高清大图
在开发过程中如果需要加载超大图或长图,就无法使用上述方案去进行加载,可能会导致图片细节大量丢失,无法查看。
BitmapRegionDecoder
需要通过BitmapReginDecoder去进行加载,该类支持加载图片的部分区域,可以有效的显示具体细节
1
2
3
4
5
6
7
8
9
10
11
12
13
14
15
16
17
18
19
20
| BitmapRegionDecoder bitmapRegionDecoder = null;
try {
bitmapRegionDecoder = BitmapRegionDecoder.newInstance(getAssets().open("world.jpg"),
true);
} catch (IOException e) {
e.printStackTrace();
}
int screenWidth = getResources().getDisplayMetrics().widthPixels;
int screenHeight = getResources().getDisplayMetrics().heightPixels;
Rect rect = new Rect(0,0,screenWidth,screenHeight);
BitmapFactory.Options options = new BitmapFactory.Options();
options.inPreferredConfig = Bitmap.Config.RGB_565;
Bitmap bitmap = bitmapRegionDecoder.decodeRegion(rect,options);
imageView.setImageBitmap(bitmap);
|
subsampling-scale-image-view
Bitmap内存回收
在Android2.3.3之前,Bitmap的像素数据存放在Native内存,Bitmap对象本身位于Dalvik Heap中。
Android3.0之后,Bitmap的像素数据也被放进了Dalvik Heap中。
Bitmap.recycle():释放与此位图关联的本地对象,并清除对像素数据的引用。这不会同步释放像素数据,只是允许它被垃圾收集,如果没有其他的情况。这个时候如果进行调用会抛出异常。
Android3.0之后就不需要手动调用recycle()进行释放,由系统进行控制。
内容引用
Bitmap优化详谈
Android性能优化(五)之细说Bitmap
