Kotlin-协程

协程本质上是轻量级的线程

协程的概念

协程是一种非抢占式或协作式的计算机程序并发调度的实现,程序可以主动挂起或者恢复执行。避免在异步编程中使用大量的回调,同时相比于传统的多线程技术,更容易提升系统的高并发处理能力。

线程和协程属于一对多关系,一个线程上允许存在多个协程。

线程大多数的实现是映射到内核的线程,当线程中的代码逻辑在线程抢到CPU的时间片才可以执行,否则只能等待。而协程之所以轻量级,协程并不会映射到内核线程,调度可以在用户态搞定,任务之间调度并非抢占式。

协程的使用

1
2
3
4
dependencies {
//引入协程库
implementation 'org.jetbrains.kotlinx:kotlinx-coroutines-android:1.3.9'
}
1
2
3
4
5
6
7
8
9
GlobalScope.launch(Dispatchers.Main + ,start = CoroutineStart.DEFAULT){
// TODO
}

public fun CoroutineScope.launch(
context: CoroutineContext = EmptyCoroutineContext,//协程作用域
start: CoroutineStart = CoroutineStart.DEFAULT,//协程启动方式
block: suspend CoroutineScope.() -> Unit //协程内需要执行的操作
)
: Job {...}

协程作用域(CoroutineScope)

在Android环境中,通常每个界面(Activity、Fragment)启动的协程(Coroutine)只在该界面有效,当退出界面时,协程执行的任务也没有意义。所以在设计Coroutine时会要求在Scope中执行,当CoroutineScope取消时,对应的Coroutine也需要自动取消。

阻塞协程作用域(runBlocking)

调用runBlocking的线程会被阻塞直到内部协程任务执行完毕

1
2
3
4
5
6
7
8
9
10
11
12
runBlocking {
launch {
println("Hello ${System.currentTimeMillis()}")
delay(1000)
}
}
println("world ${System.currentTimeMillis()}")

输出结果:
Hello 1597924663541
world 1597924664551
结果相差接近1s

多用于单元测试代码中,不会用于实际的业务开发。就因为会堵塞当前线程

全局协程作用域(GlobalScope)

作用于整个应用的生命周期中,并且无法被取消,在界面中使用,例如Activity中使用,就会导致内存泄露

1
2
3
4
5
6
7
8
9
10
GlobalScope.launch(Dispatchers.Unconfined) {
println("Hello ${System.currentTimeMillis()}")
delay(1000)
}
println("world ${System.currentTimeMillis()}")

输出结果:
Hello 1597924937030
world 1597924937038
结果接近

通过GlobalScope创建的协程将不会有父协程,也被称为根协程

1
2
3
4
5
6
7
public object GlobalScope : CoroutineScope {
/**
* Returns [EmptyCoroutineContext].
*/

override val coroutineContext: CoroutineContext
get() = EmptyCoroutineContext //返回一个上下文但并没有进行上下文关联,导致无法被取消
}

自定义协程作用域(: CoroutineScope)

自定义协程的作用域,就不会造成作用域过大导致的内存泄漏

1
2
3
4
5
6
7
8
9
10
11
12
val coroutineContext : CoroutineContext = Dispatchers.Main + Job()//协程上下文
val coroutineScope = CoroutineScope(coroutineContext)//自定义作用域

fun main(args:Array<String>){
coroutineScope.launch{
println("Hello ${System.currentTimeMillis()}")
delay(1000)
}
println("world ${System.currentTimeMillis()}")
//主动控制作用域的取消
coroutineScope.cancel()
}

自定义协程作用域最关键的就是定义CoroutineContext属性

自定义CoroutineContext主要由两部分构成:dispatcherjob

dispatcher:用于指定协程默认使用的调度器(后续会介绍)

job:可在任意时刻取消协程(后续会介绍)

1
val coroutineContext : CoroutineContext = Dispatchers.Main + Job()

+连接多个上下文,其中如果出现多个同类型的上下文,后面新添加的会成为使用的上下文,例如

1
2
3
4
5
val coroutineContext : CoroutineContext = Dispatchers.Unconfined + Job() + Dispatchers.IO
print(coroutineContext.toString())

输出结果:
[JobImpl{Active}@300ffa5d, Dispatchers.IO] //采用了新添加的调度器

系统提供协程作用域

MainScope

为了方便开发使用,kotlin标准库中定义了MainScope()可以快速生成CoroutineScope

1
2
3
4
5
6
7
8
9
10
11
12
13
14
15
//MainScope实现源码
public fun MainScope(): CoroutineScope = ContextScope(SupervisorJob() + Dispatchers.Main)

使用方式:
val mainScope = MainScope()

fun test(){
mainScope.launch{
//TODO
}
}

fun onDestroy(){
mainScope.cancel()
}
viewModelScope

在AndroidX中 引入了viewModelScope,当ViewModel销毁时会自动取消协程任务。

1
2
3
4
5
6
7
8
9
10
//引用viewModelScope
implementation "androidx.lifecycle:lifecycle-viewmodel-ktx:2.1.0-beta01:" //也可以引用更高版本

class MyViewModel:ViewModel(){
fun test(){
viewModelScope.launch{
//TODO
}
}
}

简单源码解析:

1
2
3
4
5
6
7
8
9
10
11
12
13
14
15
16
17
18
19
20
21
22
23
24
25
26
27
28
29
30
31
//lifecycle/lifecycle-viewmodel-ktx/src/main/java/androidx/lifecycle/ViewModel.kt

private const val JOB_KEY = "androidx.lifecycle.ViewModelCoroutineScope.JOB_KEY"

/**
* [CoroutineScope] tied to this [ViewModel].
* This scope will be canceled when ViewModel will be cleared, i.e [ViewModel.onCleared] is called
*
* This scope is bound to
* [Dispatchers.Main.immediate][kotlinx.coroutines.MainCoroutineDispatcher.immediate]
*/

//使用拓展方法
val ViewModel.viewModelScope: CoroutineScope
get() {
val scope: CoroutineScope? = this.getTag(JOB_KEY)
//缓存中读取 对应scope
if (scope != null) {
return scope
}
//对应了ViewModel内部的实现代码
return setTagIfAbsent(JOB_KEY,
CloseableCoroutineScope(SupervisorJob() + Dispatchers.Main.immediate))
}
//自动取消 coroutineScope
internal class CloseableCoroutineScope(context: CoroutineContext) : Closeable, CoroutineScope {
override val coroutineContext: CoroutineContext = context

override fun close() {
coroutineContext.cancel()
}
}

viewModelScope默认调度器为Dispatchers.Main,因为ViewModel与UI交互较为频繁,减少线程间的切换。

1
2
3
4
5
6
7
8
9
10
11
12
13
14
15
16
17
18
19
20
21
22
23
24
25
26
27
28
29
30
31
32
33
34
35
36
37
38
39
40
41
42
43
44
45
46
47
48
49
//lifecycle/lifecycle-viewmodel/src/main/java/androidx/lifecycle/ViewModel.java

private final Map<String, Object> mBagOfTags = new HashMap<>();
//同步存值
<T> T setTagIfAbsent(String key, T newValue) {
T previous;
synchronized (mBagOfTags) {
previous = (T) mBagOfTags.get(key);
if (previous == null) {
mBagOfTags.put(key, newValue);
}
}
T result = previous == null ? newValue : previous;
if (mCleared) {
closeWithRuntimeException(result);
}
return result;
}

@MainThread
//销毁ViewModel
final void clear() {
mCleared = true;
// Since clear() is final, this method is still called on mock objects
// and in those cases, mBagOfTags is null. It'll always be empty though
// because setTagIfAbsent and getTag are not final so we can skip
// clearing it
if (mBagOfTags != null) {
synchronized (mBagOfTags) {
//读取缓存好的 viewModelScope对象
for (Object value : mBagOfTags.values()) {
// see comment for the similar call in setTagIfAbsent
closeWithRuntimeException(value);
}
}
}
onCleared();
}

//清理缓存对象 这也是CloseableCoroutineScope存在的原因
private static void closeWithRuntimeException(Object obj) {
if (obj instanceof Closeable) {
try {
((Closeable) obj).close();
} catch (IOException e) {
throw new RuntimeException(e);
}
}
}

协程启动模式(CoroutineStart)

控制协程创建后的调用规则

CoroutineStart.DEFAULT

协程的默认启动模式,为饿汉式调用,调用协程后,会立即进入调度状态(等待调度器初始化完毕)。

1
2
3
4
5
6
7
8
9
10
11
12
13
suspend fun test1(){
print(1)
val job = GlobalScope.launch {
print(2)
delay(1000)
}
print(3)
job.join()
print(4)
}

输出结果:
123(delay 1000ms)4

协程创建后,立即开始调度,在调度前如果协程被取消,将直接进入取消响应的状态。

CoroutineStart.LAZY

懒汉式调用launch后并不会有任何调度行为,协程也不会执行,直到调用执行时,协程才会执行。

只有主动调用start、join、或await后协程才会开始调度。

job.start():启动协程

job.join():启动协程并等待任务执行结束

1
2
3
4
5
6
7
8
9
10
11
12
13
14
15
16
suspend fun test1(){
print(1)
val job = coroutineScope.launch(start = CoroutineStart.LAZY) {
print(2)
delay(1000)
}

print(3)
job.start()
//job.join()
print(4)
}

输出结果:
job.start() 1324 没有延迟输出4
job.join() 1324 延迟1s后输出4

协程创建后,只有被需要使用时才会执行,例如调用start、join才会开始调度执行。

CoroutineStart.ATOMIC(实验版)

协程创建后,立即开始调度,在协程执行到第一个挂起点之前不会响应cancel操作

1
2
3
4
5
6
7
8
9
10
11
12
13
14
15
suspend fun test1(){
print(1)
//val job = GlobalScope.launch(start = CoroutineStart.DEFAULT) {
val job = GlobalScope.launch(start = CoroutineStart.ATOMIC) {
print(2)
delay(1000)
}
job.cancel()
print(3)
print(4)
}

输出结果:
DEFAULT:134 由于在准备执行时触发了cancel,导致2无法输出
ATOMIC:1324 ATOMIC在执行前不会响应到cancel,所以2正常输出

ATOMIC将调度执行合二为一,是一个原子化操作。

升级版示例:

1
2
3
4
5
6
7
8
9
10
11
12
13
    print(1)
val job = GlobalScope.launch(start = CoroutineStart.ATOMIC) {
print(2)
delay(1000)
print(5)
}
job.cancel()
print(3)
print(4)

输出结果:
1342
不输出5的原因是:`ATOMIC`在第一个挂起点时忽略`cancel`,后续在执行挂起时,`cancel` 功能生效,导致后续无法输出,这里`delay`就是下一次的挂起操作。

CoroutineStart.UNDISPATCHED(实验版)

协程创建后立即在当前函数调用栈中执行,直到第一个挂起点?

1
2
3
4
5
6
7
8
9
10
11
12
13
14
15
16
17
18
19
20
21
22
23
24
25
26
27
28
suspend fun test1(){
println("${Thread.currentThread()} 1")
val job = GlobalScope.launch(start = CoroutineStart.UNDISPATCHED) {
// val job = GlobalScope.launch(start = CoroutineStart.DEFAULT) {
println("${Thread.currentThread()} 2")
delay(1000)
println("${Thread.currentThread()} 5")
}

println("${Thread.currentThread()} 3")
job.join()
println("${Thread.currentThread()} 4")
}

输出结果:
DEFAULT
Thread[main,5,main] 1
Thread[main,5,main] 3
Thread[DefaultDispatcher-worker-1,5,main] 2
Thread[DefaultDispatcher-worker-1,5,main] 5
Thread[DefaultDispatcher-worker-1,5,main] 4

UNDISPATCHED
Thread[main,5,main] 1
Thread[main,5,main] 2
Thread[main,5,main] 3
Thread[DefaultDispatcher-worker-1,5,main] 5
Thread[DefaultDispatcher-worker-1,5,main] 4

比较DEFAULT结果可见,在UNDISPATCHED条件下,未达到挂起点时,代码会执行在调用函数栈中,例如UNDISPATCHEDprint(2)就输出在Main线程下。

CoroutineStart配置 功能
DEFAULT 协程创建后立即执行
LAZY 协程创建后,等待需要调用时才会执行协程
start、join、await等代码调用
ATOMIC 功能类似DEFAULT,但是在执行协程前无法被取消,直到执行到了第一个suspend函数,例如delay()就是个suspend函数
UNDISPATCHED 立即在当前线程执行协程,直到执行到了第一个suspend函数

*协程上下文(CoroutineContext)

本体是一个数据结构,可以看做是map,内部实现为单链表

上下文记录了协程所需信息:

  • 协程调度器:Dispatchers
  • 执行任务:Job
  • 协程名字:CoroutineName
  • 协程异常处理:CoroutineExceptionHandler
1
val coroutineContext : CoroutineContext = Dispatchers.Main + Job() + CoroutineName("name")//协程上下文

自定义上下文

Kotlin提供了AbstractCoroutineContextElement可以快速实现自定义上下文,例如CoroutineName就是依赖这个实现的

1
2
3
4
5
6
7
8
9
10
11
12
13
14
15
16
public data class CoroutineName(
/**
* User-defined coroutine name.
*/

val name: String
) : AbstractCoroutineContextElement(CoroutineName) {
/**
* Key for [CoroutineName] instance in the coroutine context.
*/

public companion object Key : CoroutineContext.Key<CoroutineName>

/**
* Returns a string representation of the object.
*/

override fun toString(): String = "CoroutineName($name)"
}

协程上下文的父子关系

每个协程都会有一个父级对象,协程的父级对象的上下文也会和父级协程的上下文不一致。

关系遵循如下公式

父级上下文 = 默认值 + 继承的CoroutineContext + 参数

默认值:一些元素包含的默认值,例如默认Dispatcher就是Dispatchers.Default

继承的CoroutineContext:父协程的CoroutineContenxt

参数:后续子协程配置的参数,如上文所示组成部分,新添加的参数会覆盖前面的对应配置。

1
2
3
4
5
6
7
8
9
10
11
12
13
14
15
suspend fun testCoroutineContextExtend() {
val parentContext: CoroutineContext = Dispatchers.Default + Job() + CoroutineName("parent")
val parentScope = CoroutineScope(parentContext)
parentScope.launch {
log(currentCoroutineContext().toString()) //打印当前上下文内容
val childContext = parentContext + Dispatchers.IO + CoroutineName("child")
val job = launch(childContext) {
log(currentCoroutineContext().toString())
}
}
}

输出结果:
19:29:57:497 [DefaultDispatcher-worker-1] [CoroutineName(parent), StandaloneCoroutine{Active}@4815c1f8, Dispatchers.Default]
19:29:57:500 [DefaultDispatcher-worker-2] [CoroutineName(child), StandaloneCoroutine{Active}@2ca2b65d, Dispatchers.IO]

根据上述输出结果可得到后续的同类内容会覆盖前面的元素

CoroutineContext使用+进行元素的合并,加号右侧的元素会覆盖左侧的元素,最后得到一个新的CoroutineContext元素。

//TODO 后续会补充如何调用自定义上下文

协程拦截器(ContinuationInterceptor)

协程拦截器也是CoroutineContext的一个实现,可以控制协程的执行流程,功能类似于Okhttp的拦截器

协程拦截器永远置于CoroutineContext组合的最后一位,保证不会被其他实现所覆盖。

协程拦截器最多只能存在1个。

1
2
3
4
5
6
7
8
9
10
11
12
13
14
15
16
17
18
19
20
class CustomInterceptor : ContinuationInterceptor {
override val key = ContinuationInterceptor

override fun <T> interceptContinuation(continuation: Continuation<T>): Continuation<T> = CustomContinuation<T>(continuation)

class CustomContinuation<T>(val continuation: Continuation<T>) : Continuation<T> {
override val context: CoroutineContext = continuation.context

override fun resumeWith(result: Result<T>) {
println("result = $result")
//对result进行多次处理,也可以联动成多个拦截器的处理
//此处hook 返回值可对其进行修改或者拓展
continuation.resumeWith(result)
}
}
}

GlobalScope.launch(CustomInterceptor()){
//TODO ...
}

协程调度器(CoroutineDispatcher)

属于CoroutineContext的子类,同时实现了ContinuationInterceptor接口,通过拦截功能实现协程的调度。

调度器的主要目的切换执行线程

1
2
3
4
5
6
7
8
public abstract class CoroutineDispatcher :
AbstractCoroutineContextElement
(ContinuationInterceptor), ContinuationInterceptor {

...
//此处切换任务执行线程
public abstract fun dispatch(context: CoroutineContext, block: Runnable)

}

先了解源码中提供的调度器

Dispatchers.Default

默认协程调度器,适合处理后台计算,为CPU密集型任务调度器

1
2
3
4
5
6
7
8
9
10
11
12
13
14
15
16
17
18
19
20
21
22
23
24
25
26
27
public actual object Dispatchers {
@JvmStatic
public actual val Default: CoroutineDispatcher = createDefaultDispatcher()
...
}

internal actual fun createDefaultDispatcher(): CoroutineDispatcher =
if (useCoroutinesScheduler) DefaultScheduler else CommonPool

internal object DefaultScheduler : ExperimentalCoroutineDispatcher() {
val IO: CoroutineDispatcher = LimitingDispatcher(
this,
systemProp(IO_PARALLELISM_PROPERTY_NAME, 64.coerceAtLeast(AVAILABLE_PROCESSORS)),
"Dispatchers.IO",
TASK_PROBABLY_BLOCKING
)

override fun close() {
throw UnsupportedOperationException("$DEFAULT_DISPATCHER_NAME cannot be closed")
}

override fun toString(): String = DEFAULT_DISPATCHER_NAME

@InternalCoroutinesApi
@Suppress("UNUSED")
public fun toDebugString(): String = super.toString()
}

Dispatchers.IO(仅JVM可用)

IO调度器,适合执行IO相关操作,例如读写文件,为IO密集型任务调度器

IO仅在JVM上有定义,基于Default调度器,并实现了独立的队列和限制,因此Default与IO切换不会触发线程切换。

1
2
3
4
5
6
7
8
9
10
11
12
13
14
15
16
17
18
19
20
21
22
23
24
25
suspend fun test2(){
log("1")
val job = GlobalScope.async(Dispatchers.IO) {
log(2)
withContext(Dispatchers.Default){
log(3)
withContext(Dispatchers.IO){
log(4)
withContext(Dispatchers.Default){
log(5)
123
}
}
}
}
log(job.await())
}

输出结果:
13:26:04:564 [main] 1
13:26:04:581 [DefaultDispatcher-worker-1] 2
13:26:04:586 [DefaultDispatcher-worker-1] 3
13:26:04:586 [DefaultDispatcher-worker-1] 4
13:26:04:587 [DefaultDispatcher-worker-1] 5 //切换过程中一直在同一线程
13:26:04:588 [DefaultDispatcher-worker-2] 123

DefaultIO调度器对任务的执行做了优化,可以保证线程执行效率较高。

主要原理为:Kotlin实现了CoroutineScheduler,支持抢占任务。

1
2
3
4
5
6
7
8
9
10
11
12
13
14
15
16
17
18
19
20
21
22
23
24
25
26
27
28
29
30
31
32
33
34
35
36
37
38
39
40
41
42
43
44
45
46
47
48
49
50
51
52
53
54
55
56
57
58
59
60
61
62
63
64
65
66
67
68
69
70
71
72
73
74
75
76
77
78
79
80
81
82
83
84
85
86
87
88
89
90
91
92
internal class CoroutineScheduler(
@JvmField val corePoolSize: Int,
@JvmField val maxPoolSize: Int,
@JvmField val idleWorkerKeepAliveNs: Long = IDLE_WORKER_KEEP_ALIVE_NS,
@JvmField val schedulerName: String = DEFAULT_SCHEDULER_NAME
) : Executor, Closeable {
...
//CPU密集任务队列
@JvmField
val globalCpuQueue = GlobalQueue()
//IO密集任务队列
@JvmField
val globalBlockingQueue = GlobalQueue()

...
fun dispatch(block: Runnable, taskContext: TaskContext = NonBlockingContext, tailDispatch: Boolean = false) {
trackTask() // this is needed for virtual time support
val task = createTask(block, taskContext)
// try to submit the task to the local queue and act depending on the result
val currentWorker = currentWorker()
//任务优先插入本地队列中执行
val notAdded = currentWorker.submitToLocalQueue(task, tailDispatch)
//本地队列已满,就将任务插入到全局队列中
if (notAdded != null) {
if (!addToGlobalQueue(notAdded)) {
// Global queue is closed in the last step of close/shutdown -- no more tasks should be accepted
throw RejectedExecutionException("$schedulerName was terminated")
}
}
...
}
//执行的任务
internal inner class Worker private constructor() : Thread() {
override fun run() = runWorker()
//执行任务
private fun runWorker() {
var rescanned = false
while (!isTerminated && state != WorkerState.TERMINATED) {
//从队列中找到任务
val task = findTask(mayHaveLocalTasks)
...
}
}
//找到本地队列任务
fun findTask(scanLocalQueue: Boolean): Task? {
//获取CPU控制权
if (tryAcquireCpuPermit()) return findAnyTask(scanLocalQueue)
// If we can't acquire a CPU permit -- attempt to find blocking task
val task = if (scanLocalQueue) {
localQueue.poll() ?: globalBlockingQueue.removeFirstOrNull()
} else {
globalBlockingQueue.removeFirstOrNull()
}
//从其他队列获取任务执行
return task ?: trySteal(blockingOnly = true)
}

//从其他队列获取任务
private fun trySteal(blockingOnly: Boolean): Task? {
assert { localQueue.size == 0 }
val created = createdWorkers
// 0 to await an initialization and 1 to avoid excess stealing on single-core machines
if (created < 2) {
return null
}

var currentIndex = nextInt(created)
var minDelay = Long.MAX_VALUE
repeat(created) {
++currentIndex
if (currentIndex > created) currentIndex = 1
val worker = workers[currentIndex]
if (worker !== null && worker !== this) {
assert { localQueue.size == 0 }
//从其他工作线程中获取任务来执行
val stealResult = if (blockingOnly) {
localQueue.tryStealBlockingFrom(victim = worker.localQueue)
} else {
localQueue.tryStealFrom(victim = worker.localQueue)
}
if (stealResult == TASK_STOLEN) {
return localQueue.poll()
} else if (stealResult > 0) {
minDelay = min(minDelay, stealResult)
}
}
}
minDelayUntilStealableTaskNs = if (minDelay != Long.MAX_VALUE) minDelay else 0
return null
}

}

总体设计分为三步:

  1. 优先任务放在本地线程中,放在Worker中的LocalQueue
  2. 使用双重队列GlobalCpuQueue(CPU密集任务队列)GlobalBlockingQueue(IO密集任务队列)LocalQueue满后,任务会放到对应全局队列中
  3. LocalQueueGlobalQueue中的任务执行完时,会从其他正在执行任务的Worker中获取他的LocalQueue的任务放到自己的LocalQueue中执行。

这三步可以保证线程资源的充分利用,减少了多线程的切换开销,提高了使用效率。实现参考的是ForkJoinPool

Dispatchers.Main

UI调度器,根据执行平台不同会初始化为对应平台UI线程的调度器

在Android中,就会通过Handler调度到UI线程执行任务

1
2
3
4
5
6
7
8
9
10
11
12
13
14
15
16
17
18
19
20
21
22
//加载各个平台下定义的`MainDispatcherFactory`
private fun loadMainDispatcher(): MainCoroutineDispatcher {
return try {
val factories = if (FAST_SERVICE_LOADER_ENABLED) {
FastServiceLoader.loadMainDispatcherFactory()
} else {
// We are explicitly using the
// `ServiceLoader.load(MyClass::class.java, MyClass::class.java.classLoader).iterator()`
// form of the ServiceLoader call to enable R8 optimization when compiled on Android.
ServiceLoader.load(
MainDispatcherFactory::class.java,
MainDispatcherFactory::class.java.classLoader

).iterator().asSequence().toList()
}
@Suppress("ConstantConditionIf")
factories.maxBy { it.loadPriority }?.tryCreateDispatcher(factories)
?: createMissingDispatcher()
} catch (e: Throwable) {
// Service loader can throw an exception as well
createMissingDispatcher(e)
}
}

拿Android举例,分析下如何实现Dispatchers.Main功能

1
2
3
4
5
6
7
8
9
10
11
12
13
14
15
16
17
internal fun loadMainDispatcherFactory(): List<MainDispatcherFactory> {
val clz = MainDispatcherFactory::class.java
if (!ANDROID_DETECTED) {
return load(clz, clz.classLoader)
}

return try {
val result = ArrayList<MainDispatcherFactory>(2)
//加载对应类名的类
createInstanceOf(clz, "kotlinx.coroutines.android.AndroidDispatcherFactory")?.apply { result.add(this) }
createInstanceOf(clz, "kotlinx.coroutines.test.internal.TestMainDispatcherFactory")?.apply { result.add(this) }
result
} catch (e: Throwable) {
// Fallback to the regular SL in case of any unexpected exception
load(clz, clz.classLoader)
}
}

Android下的实现

1
2
3
4
5
6
7
8
9
10
11
12
13
14
15
16
17
18
19
20
21
22
23
24
25
//在Android编译完成后,可以读取到该类
internal class AndroidDispatcherFactory : MainDispatcherFactory {
override fun createDispatcher(allFactories: List<MainDispatcherFactory>) = HandlerContext(Looper.getMainLooper().asHandler(async = true), "Main")
}
internal class HandlerContext private constructor(
private val handler: Handler,
private val name: String?,
private val invokeImmediately: Boolean
) : HandlerDispatcher(), Delay {
public constructor(
handler: Handler,
name: String? = null
) : this(handler, name, false)

//android中需要向主looper进行提交调度
override fun isDispatchNeeded(context: CoroutineContext): Boolean {
return !invokeImmediately || Looper.myLooper() != handler.looper
}

//通过持有主线程looper的handler进行调度
override fun dispatch(context: CoroutineContext, block: Runnable) {
handler.post(block)
}
...
}

Android的Dispatchers.Main通过Handler将任务放到主线程中执行。

Dispatchers.Unconfined

在协程体中,遇到第一个挂起函数前的代码运行在原线程中,执行挂起函数后,就运行在子线程中,

自定义调度器

DefaultIO的底层实现都依赖了线程池,执行到挂起函数时还是会发生线程的切换。可以通过自定义调度器减少这类切换的发生。

1
2
3
4
5
6
7
8
9
10
11
val myDispatcher= Executors.newSingleThreadExecutor{ r -> Thread(r, "MyThread") }.asCoroutineDispatcher() //转换线程池到 Dispatcher

suspend fun test(){
GlobalScope.launch(myDispatcher){
//TODO
}

//任务执行完毕后关闭线程池,避免内存泄漏
myDispatcher.close()

}

协程执行任务(Job)

Job用于处理协程。封装了协程需要执行的代码逻辑,并且拥有简单的生命周期。

负责管理协程的声明周期。

主要有以下几个生命周期:

  • New 新建任务
  • Active 任务活跃
  • Completing 任务完成中
  • Cancelling 任务取消中
  • Cancelled 任务已取消
  • Completed 任务已完成
{% fullimage /images/Job生命周期.jpg,ViewTree,ViewTree%}

Job.join():中断与当前Job关联的协程,直到所有子Job执行完成,所关联的协程才可以继续执行。

join()suspend修饰,所以必须在协程内部被调用。

SupervisorJob

使用Job时,若发生异常会导致异常进行传递,导致父任务及兄弟任务都会被取消

SupervisorJob针对异常传播情况进行处理,当发生异常时,只会影响自身,其他任务不受影响。

SupervisorJob只有在supervisorScope或者CoroutineScope(SupervisorJob())内执行可以生效。

1
2
3
4
5
6
7
8
9
10
11
12
13
val scope = CoroutineScope(SupervisorJob())

scope.launch{
launch{
//child 1
}

launch{
// child 2
}
}

若 child1 发生异常 child2可以继续运行。

协程构造器(Coroutine Builders)

配置完上述的启动模式、调度器、上下文之后,就要开始构造一个协程

协程提供了几个通用的构造器

launch

默认构建一个新的协程,并返回一个Job对象,可以对该Job进行操作,例如start()、join()启动协程,cancel()取消该协程。

1
2
3
4
val job = GlobalScope.launch{
//TODO ...
}
job.cancel()

Job代表了协程本身,封装了协程需要执行的代码逻辑,并且拥有简单的生命周期。

async

创建一个协程后,会返回一个Deferred<T>对象,可以通过该对象调用await()获取返回值。

1
2
3
4
5
6
val job = GlobalScope.async(Dispatchers.IO) {
2log(2)
delay(1000)
123
}
val result = job.await()

async允许并行的允许多个子线程任务。减少请求的耗时。

Deferred提供了await(),用suspend修饰,需要获取Deferred对象的结果时,调用await()等待执行结果返回。

协程异常处理(Coroutine Exception)

以下是会导致协程异常发生的测试代码

1
2
3
4
5
6
7
8
9
10
11
12
13
14
15
16
17
18
19
20
21
22
23
24
25
26
27
28
29
30
31
32
val a = 1
//模拟产生异常方法
suspend fun test3() =
suspendCoroutine<Int> { continuation ->
if (a == 0) {
continuation.resume(a)
} else {
continuation.resumeWithException(IllegalArgumentException("haha"))
}
}

suspend fun main(args:Array<String>){
val dispatcher = Executors.newSingleThreadExecutor().asCoroutineDispatcher();
coroutineScope.launch(dispatcher) {
log(1)
//创建子协程
val job = coroutineScope.async {
test2()
}
job.join()
log(2)
}
log(3)
dispatcher.close()
}

输出结果:
[main] 3
[pool-1-thread-1] 1
Exception in thread "pool-1-thread-1" java.lang.IllegalArgumentException: haha

Process finished with exit code 0 //程序终止

有以下两种手段来对异常进行捕获处理

局部异常捕获

这部分主要涉及到协程作用域的概念,根据上面对协程作用域的描述,主要分为GlobalScope以及自定义CoroutineScope两种。

对于这两种协程作用域异常传播也有不同的形式。

不传播异常

上面提到过GlobalScope为全局作用域,本身不存在父协程,发生异常后,只会输出异常信息,不会对运行产生影响。

1
2
3
4
5
6
7
8
9
10
11
12
13
14
15
16
17
18
19
20
21
22
23
24
suspend fun test5() {
coroutineScope.launch {
log(1)
val job = GlobalScope.launch {
throw NullPointerException("11")
}
log(2)
delay(1000)
log(3)
}
delay(1000)
log(4)
}

输出结果:
20:02:29:623 [DefaultDispatcher-worker-1] 1
20:02:29:625 [DefaultDispatcher-worker-1] 2
Global Exception is catch and msg = 11
Exception in thread "DefaultDispatcher-worker-3" java.lang.NullPointerException: 11
2at com.webrtc.lib_licode_adaptation.MyClassKt$test5$2$job$1.invokeSuspend(MyClass.kt:183)
20:02:30:632 [kotlinx.coroutines.DefaultExecutor] 4
20:02:30:632 [DefaultDispatcher-worker-3] 3

Process finished with exit code 0

使用GlobalScope启动协程,发生异常时,不会影响外部协程的运行。

传播异常

将异常主动往外抛到启动顶层协程所在的线程。

主要采用try{..}catch{...}方式进行异常捕获

coroutineScope

协程默认作用域,在该作用域内当自身执行任务失败的时候,触发双向传播。

子协程异常<=>父协程异常

示例:

1
2
3
4
5
6
7
8
9
10
11
12
13
14
15
16
17
18
19
20
21
22
suspend fun test7() {
log(1)
coroutineScope {
// 启动一个子协程
launch {
try {
delay(1000)
println("3")
} catch (e: Exception) {
println(e.message)
}
}
delay(100)
throw NullPointerException("111")
println("3")
}
}

输出结果:
10:15:46:738 [main] 1
Parent job is Cancelling //由于父协程异常,导致子协程的执行取消
Exception in thread "main" java.lang.NullPointerException: 111

img

supervisorScope

在作用域内当自身执行任务失败的时候,只会向下传播关闭子协程,不会影响父协程及其他同级协程的运行。

父协程异常->子线程异常,子协程异常不影响父协程

supervisorScope使用SupervisorJob

1
2
3
private class SupervisorJobImpl(parent: Job?) : JobImpl(parent) {
override fun childCancelled(cause: Throwable): Boolean = false //子协程不影响父协程
}

示例:

1
2
3
4
5
6
7
8
9
10
11
12
13
14
15
16
17
18
19
20
21
suspend fun test7() {
println(1)
supervisorScope {
println("2")
// 启动一个子协程
launch {
throw NullPointerException("111")// 故意让子协程出现异常
}
delay(100)
println("3")
}
println("4")
}

输出结果:
1
2
Exception in thread "DefaultDispatcher-worker-1" java.lang.NullPointerException: 111
...
3
4

supervisorScope内子协程的异常不影响父协程的继续运行。

img

全局异常捕获

类似Java,协程也提供了捕获全局异常(未声明捕获异常)的方式。

Java的全局异常捕获方式:

1
2
3
4
5
6
Thread.setDefaultUncaughtExceptionHandler(new UncaughtExceptionHandler() {
@Override
public void uncaughtException(Thread t, Throwable e) {
//TODO 异常处理
}
});
协程内全局异常捕获方式(针对协程作用域内未捕获的异常
1
2
3
4
5
6
7
8
9
10
11
12
13
14
15
16
17
18
19
20
21
suspend fun test4() {
val exceptionHandler = CoroutineExceptionHandler { coroutineContext, throwable ->
log("Throws an exception with message: ${throwable.message}")
}
log(1)
val job = coroutineScope.launch(exceptionHandler) {
log(3)
throw ArithmeticException("Hey!")
}
log(2)
//避免执行过程中 进程中断,导致输出结果不一致
delay(1000)
}

输出结果:
15:31:47:846 [main] 1
15:31:47:927 [main] 2
15:31:47:929 [DefaultDispatcher-worker-1] 3
15:31:47:933 [DefaultDispatcher-worker-1] Throws an exception with message: Hey! //捕获到异常

Process finished with exit code 0

上述代码调用了launch的构造方式,async的输出结果会如何?

1
2
3
4
5
6
7
8
9
10
11
12
13
14
15
16
17
18
19
20
21
suspend fun test4() {
val exceptionHandler = CoroutineExceptionHandler { coroutineContext, throwable ->
log("Throws an exception with message: ${throwable.message}")
}
log(1)
val job = coroutineScope.async(exceptionHandler) {
log(3)
4
throw ArithmeticException("Hey!")
}
log(2)
log(job.await())
delay(1000)
}

输出结果:
16:04:14:980 [main] 1
16:04:15:013 [main] 2
16:04:15:015 [DefaultDispatcher-worker-1] 3
Exception in thread "main" java.lang.ArithmeticException: Hey!
2at com.webrtc.lib_licode_adaptation.MyClassKt$test4$job$1.invokeSuspend(MyClass.kt:171)

async直接抛出未捕获异常,导致当前进程执行中断

针对launchasync的不同表现,需要从源码层面进行分析

1
2
3
4
5
6
7
8
9
10
11
12
13
14
15
16
17
18
19
20
21
22
23
24
25
26
27
28
29
30
31
32
33
34
35
36
37
38
39
40
41
42
43
44
45
46
47
48
49
50
51
52
53
54
55
56
57
58
59
60
61
62
63
64
65
66
`launch`执行指向以下代码
// kotlinx.coroutines.BuildersKt
public fun CoroutineScope.launch(
context: CoroutineContext = EmptyCoroutineContext,
start: CoroutineStart = CoroutineStart.DEFAULT,//启动方式
block: suspend CoroutineScope.() -> Unit
)
: Job {
val newContext = newCoroutineContext(context)
val coroutine = if (start.isLazy)
LazyStandaloneCoroutine(newContext, block) else
StandaloneCoroutine(newContext, active = true)
coroutine.start(start, coroutine, block)
return coroutine
}

private open class StandaloneCoroutine(
parentContext: CoroutineContext,
active: Boolean
) : AbstractCoroutine<Unit>(parentContext, active) {
override fun handleJobException(exception: Throwable): Boolean {
handleCoroutineException(context, exception)
return true
}
}

public fun handleCoroutineException(context: CoroutineContext, exception: Throwable) {
// Invoke an exception handler from the context if present
//若context存在 ExceptionHandler 则会对异常进行处理
try {
context[CoroutineExceptionHandler]?.let {
it.handleException(context, exception)
return
}
} catch (t: Throwable) {
handleCoroutineExceptionImpl(context, handlerException(exception, t))
return
}
// If a handler is not present in the context or an exception was thrown, fallback to the global handler
handleCoroutineExceptionImpl(context, exception)
}

`async`执行指向如下代码
public fun <T> CoroutineScope.async(
context: CoroutineContext = EmptyCoroutineContext,
start: CoroutineStart = CoroutineStart.DEFAULT,
block: suspend CoroutineScope.() -> T
)
: Deferred<T> {
val newContext = newCoroutineContext(context)
val coroutine = if (start.isLazy)
LazyDeferredCoroutine(newContext, block) else
DeferredCoroutine<T>(newContext, active = true)
coroutine.start(start, coroutine, block)
return coroutine
}

private open class DeferredCoroutine<T>(
parentContext: CoroutineContext,
active: Boolean
) : AbstractCoroutine<T>(parentContext, active), Deferred<T>, SelectClause1<T> {
//没有对 exception进行处理,导致全局异常无法处理
override fun getCompleted(): T = getCompletedInternal() as T
override suspend fun await(): T = awaitInternal() as T
override val onAwait: SelectClause1<T> get() = this
override fun <R> registerSelectClause1(select: SelectInstance<R>, block: suspend (T) -> R) =
registerSelectClause1Internal(select, block)
}

综上所述:在全局异常处理下,只有用launch启动的协程才可以捕获异常,而async不能被捕获异常,会继续抛出异常。

真·全局异常捕获方式

上述实现的ExceptionHandler只能在协程内使用,而无法处理其他协程的异常情况。需要使用ServiceLoader来实现全局协程异常捕获

实现全局的异常捕获需要如下几步:

  1. 新建全局ExceptionHandler

    1
    2
    3
    4
    5
    6
    7
    class GlobalExceptionHandler : CoroutineExceptionHandler{
    override val key: CoroutineContext.Key<*> = CoroutineExceptionHandler

    override fun handleException(context: CoroutineContext, exception: Throwable) {
    print("Global Exception is catch and msg = ${exception.message}")
    }
    }
  1. classpath中注册该类

    src/main目录下新建resources/META-INF/文件夹,然后新建文件命名为kotlinx.coroutines.CoroutineExceptionHandler,文件内写入

    1
    com.XX.lib.GlobalExceptionHandler

    目录结构如下:

    src

    ​ -main

    ​ -java

    ​ -resources

    ​ -META-INF

    ​ -services

    ​ -kotlinx.coroutines.CoroutineExceptionHandler

  2. 测试效果

    1
    2
    3
    4
    5
    6
    7
    8
    9
    10
    11
    12
    13
    14
    15
    16
    17
    18
    19
    20
    21
    22
    23
    24
    25
    26
    27
    28
    29
    suspend fun test4() {
    val exceptionHandler = CoroutineExceptionHandler { coroutineContext, throwable ->
    print("Throws an exception with message: ${throwable.message}")
    }
    log(1)
    val job = coroutineScope.launch() { //exceptionHandler配置
    log(3)
    throw ArithmeticException("Hey!")
    }
    log(2)
    //避免执行过程中 进程中断,导致输出结果不一致
    delay(1000)
    }

    输出结果:
    16:04:14:980 [main] 1
    16:04:15:013 [main] 2
    16:04:15:015 [DefaultDispatcher-worker-1] 3
    Global Exception is catch and msg = Hey!
    Exception in thread "main" java.lang.ArithmeticException: Hey!
    2at com.webrtc.lib_licode_adaptation.MyClassKt$test4$job$1.invokeSuspend(MyClass.kt:171)

    若配置了exceptionHandler就会覆盖Global的配置
    输出如下内容:
    16:04:14:980 [main] 1
    16:04:15:013 [main] 2
    16:04:15:015 [DefaultDispatcher-worker-1] 3
    Exception in thread "main" java.lang.ArithmeticException: Hey!
    2at com.webrtc.lib_licode_adaptation.MyClassKt$test4$job$1.invokeSuspend(MyClass.kt:171)

    全局异常捕获的配置只对launch有效,async无效。

    真·全局异常捕获不支持JS以及Native平台。

    拓展:

    1. SPI机制

      全称为Service Provider Interface,JDK内置的一种服务提供发现机制,主要源码在java.util.ServiceLoader

      使用时需要在META-INF/services创建和服务同名的全限定名相同的文件(例如com.xx.xx.service),在文件中写入服务提供者的全限定名(例如com.xxx.xx.XXService)。

      实现原理:

      1. 调用ServiceLaoder.load()创建新的ServiceLoader
      2. 再通过迭代器获取对象实例
        • 判断providers是否缓存实例对象,若存在则返回
        • 不存在,则执行类的装载过程:
          1. 读取META-INF/services的配置文件,获得需要被实例化类的名称
          2. 反射调用Class.forName()并调用instance()进行类实例化。需要对应类必须存在一个无参构造方法。
          3. 实例化对象存到providers缓存对象中并返回实例对象。

      缺点:

      1. 无法按需加载,只能通过遍历的方式获取全部接口实现类
      2. 无法直接获取实例对象,只能通过遍历匹配对应实现类
      3. 并发serviceLoader是不安全的

总结

  1. 协程内部异常处理流程

    • 在作用域内使用try..catch可以直接捕获子线程中的异常
    • 如果未设置异常捕获,则会走全局异常捕获流程(只在launch创建协程下生效)
      • 若设置CoroutineExceptionHandler则处理
      • 没配置,向GlobalExceptionHandler进行处理,该配置是全局的,对所有协程任务生效
  2. 异常传播不同作用域表现

    • GlobalScope:异常不会向外传递,因为已经是根协程
    • coroutineScope:异常进行双向传递,父协程和子协程都会被取消
    • supervisorScope:异常进行单向传递,只有父协程向子协程传递异常,子协程会被取消,父协程不受影响
  3. launch/joinasync/await表现不同

    launch/join关注的是任务是否执行完成async/await关注的是任务的执行结果,所以在局部异常捕获的时候,两种创建方式的异常捕获也会有区别

  4. 全局的异常处理器(CoroutineExceptionHandler)只会对父协程生效,子协程的异常最后还是会传递到根协程进行处理。supervisorScope条件下。

协程取消(Coroutine Cancel)

取消针对Job而设的,调用cancel()可以取消正在运行的协程。

1
2
3
4
5
6
7
8
9
10
11
12
//官方示例代码
val job = launch {
repeat(1000) { i ->
println("I'm sleeping $i ...")
delay(500L)
}
}
delay(1300L) // 等待一段时间
println("main: I'm tired of waiting!")
job.cancel() // 取消 job
job.join() // 等待 job 结束
println("main: Now I can quit.")

上述代码是最基础的cancel使用方式

协程之间的关系

协程之间是存在着父子关系的,取消父协程时,也会取消所有子协程!

主要有以下三种关系:

父协程调用cancel()主动或者触发异常结束时,会立即取消所有子协程;子协程调用cancel()不影响父协程及兄弟协程执行。
1
2
3
4
5
6
7
8
9
10
11
12
13
14
15
16
17
18
19
20
21
22
23
24
基础调用流程
Job.cancel() => JobImpl.cancel() => JobSupport.cancelImpl() => JobSupport.notifyCancelling()

private fun notifyCancelling(list: NodeList, cause: Throwable) {
// first cancel our own children
onCancelling(cause)
notifyHandlers<JobCancellingNode<*>>(list, cause)
// then cancel parent
cancelParent(cause) // tentative cancellation -- does not matter if there is no parent
}
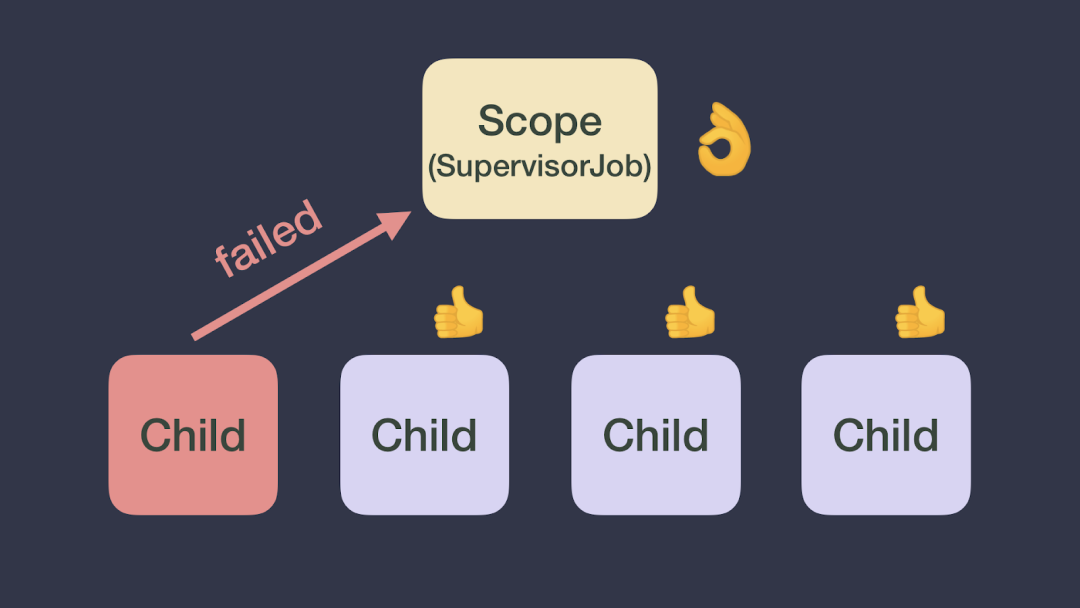
private fun cancelParent(cause: Throwable): Boolean {
// Is scoped coroutine -- don't propagate, will be rethrown
if (isScopedCoroutine) return true

val isCancellation = cause is CancellationException
val parent = parentHandle
// No parent -- ignore CE, report other exceptions.
if (parent === null || parent === NonDisposableHandle) {
return isCancellation
}
//调用所有子协程进行取消任务,子线程也会收到 CancellException
return parent.childCancelled(cause) || isCancellation
}
父协程必须等到所有子协程完成(执行完成 或 取消)才算完成
子协程抛出未捕获的异常时,默认情况下会取消父协程(CancellationException除外)

只有可取消的协程代码,才可以被取消

协程的代码必须与外界配合,才能够被取消!

目前只有kotlinx.coroutines中的所有挂起函数都是可取消的。这些挂起函数会检查协程是否被取消,并在被取消时抛出CancellationException异常。

例如delay()、yield()这些预置的挂起函数,或者封装的挂起函数都是可以被取消的。

delay()

让协程挂起,而且不会阻塞CPU。

1
2
3
4
5
6
7
8
9
10
11
12
13
14
15
16
17
18
19
20
21
22
public suspend fun delay(timeMillis: Long) {
if (timeMillis <= 0) return // don't delay
return suspendCancellableCoroutine sc@ { cont: CancellableContinuation<Unit> ->
//将任务放到
cont.context.delay.scheduleResumeAfterDelay(timeMillis, cont)
}
}

//默认延迟线程池
internal val CoroutineContext.delay: Delay get() = get(ContinuationInterceptor) as? Delay ?: DefaultDelay

//EventLoopImplBase
public override fun scheduleResumeAfterDelay(timeMillis: Long, continuation: CancellableContinuation<Unit>) {
val timeNanos = delayToNanos(timeMillis)//设置执行时间
if (timeNanos < MAX_DELAY_NS) {
val now = nanoTime()
DelayedResumeTask(now + timeNanos, continuation).also { task -> //按照延时添加任务
continuation.disposeOnCancellation(task)
schedule(now, task)
}
}
}

关键点就在于suspendCancellableCoroutine提供了普通函数的挂起转换

1
2
3
4
5
6
7
8
9
10
11
12
13
14
public suspend inline fun <T> suspendCancellableCoroutine(
crossinline block: (CancellableContinuation<T>) -> Unit
)
: T =
suspendCoroutineUninterceptedOrReturn { uCont ->
val cancellable = CancellableContinuationImpl(uCont.intercepted(), resumeMode = MODE_CANCELLABLE)
/*
* For non-atomic cancellation we setup parent-child relationship immediately
* in case when `block` blocks the current thread (e.g. Rx2 with trampoline scheduler), but
* properly supports cancellation.
*/

cancellable.initCancellability()
block(cancellable)
cancellable.getResult()
}
yield()

挂起当前协程,然后将协程分发到Dispatcher的队列,可以让该协程所在线程或线程池可以运行其他协程逻辑,然后等待Disapcher空闲的时候继续执行原来协程。

1
2
3
4
5
6
7
8
9
10
11
12
13
14
15
16
17
18
19
20
21
22
23
24
25
val dispatcher = Executors.newFixedThreadPool(2).asCoroutineDispatcher()  
coroutineScope.launch(dispatcher){
launch { //协程1
repeat(3) {
log("job1 repeat $it times")
yield() //让协程2得以执行
}
}
launch { //协程2
repeat(3) {
log("job2 repeat $it times")
// yield()
}
}
}
delay(1000)
dispatcher.close()

输出结果:
19:28:30:808 [pool-1-thread-2] job1 repeat 0 times
19:28:30:809 [pool-1-thread-1] job2 repeat 0 times
19:28:30:809 [pool-1-thread-1] job2 repeat 1 times
19:28:30:809 [pool-1-thread-1] job2 repeat 2 times
19:28:30:809 [pool-1-thread-1] job1 repeat 1 times
19:28:30:809 [pool-1-thread-1] job1 repeat 2 times

yield()相关源码

1
2
3
4
5
6
public suspend fun yield(): Unit = suspendCoroutineUninterceptedOrReturn sc@ { uCont ->
val context = uCont.context
context.checkCompletion()
...
COROUTINE_SUSPENDED
}
*suspendCoroutineUninterceptedOrReturn

根据上面两个源码发现,转换挂起函数的关键在于suspendCoroutineUninterceptedOrReturn,只要实现了该函数,就可以转换为可被取消的挂起函数

通常做转换的时候,可以使用系统提供的两个转换函数

  • suspendCoroutine
  • suspendCancellableCoroutine

这两者都调用了suspendCoroutineUninterceptedOrReturn函数

1
2
3
4
5
6
7
8
9
10
11
12
13
14
15
16
17
val aa = 0
suspend fun ttt() = suspendCancellableCoroutine<Int> { cancellableContinuation ->
if (aa == 0) {
//执行完毕抛出结果
cancellableContinuation.resume(1) {
// 执行过程异常捕获
log("aaa ${it.message}")
}
} else {
cancellableContinuation.resumeWithException(IllegalArgumentException("123"))
}

cancellableContinuation.invokeOnCancellation {
//协程任务执行cancel时,回调该方法
log("我被取消了")
}
}

取消计算代码(使用isActive判断)

如果协程正处在某个计算过程当中,并且不进行检查状态的取消,那它就是无法被取消的。

对于这种情况有两种处理方式:

  1. 周期性调用挂起函数(采用上面的手段得到挂起函数),检查协程是否被取消
  2. 显式检查协程是否被取消

在这一节,采用的就是第二种方案取消协程。

1
2
3
4
5
6
7
8
9
10
11
12
13
14
15
16
17
18
19
20
21
22
23
24
25
26
27
28
suspend fun test9() {
val startTime = System.currentTimeMillis()
val dispatcher = Executors.newFixedThreadPool(3).asCoroutineDispatcher()
val job = coroutineScope.launch(dispatcher) {
var nextPrintTime = startTime
var i = 0
while (isActive) { // 一个浪费 CPU 的计算任务循环
// 每秒打印信息 2 次
if (System.currentTimeMillis() >= nextPrintTime) {
i++
log(i)
nextPrintTime += 500L
}
}
}
delay(1300L) // 等待一段时间
println("main: I'm tired of waiting!")
job.cancelAndJoin() // 取消 job, 并等待它结束
println("main: Now I can quit.")
dispatcher.close()
}

输出结果:
19:30:01:805 [pool-1-thread-1] 1
19:30:02:292 [pool-1-thread-1] 2
19:30:02:792 [pool-1-thread-1] 3
main: I'm tired of waiting!
main: Now I can quit.

相关源码

1
2
3
4
5
6
7
8
9
10
11
12
13
14
15
16
17
18
19
20
21
22
23
24
JobSupport.cancelImpl() => JobSupport.makeCancelling() => JobSupport.tryMakeCancelling()

private fun tryMakeCancelling(state: Incomplete, rootCause: Throwable): Boolean {
assert { state !is Finishing } // only for non-finishing states
assert { state.isActive } // only for active states
// get state's list or else promote to list to correctly operate on child lists
val list = getOrPromoteCancellingList(state) ?: return false
// Create cancelling state (with rootCause!)
val cancelling = Finishing(list, false, rootCause)
if (!_state.compareAndSet(state, cancelling)) return false
// Notify listeners
notifyCancelling(list, rootCause)
return true
}

private class Finishing(
override val list: NodeList,
isCompleting: Boolean,
rootCause: Throwable?
) : SynchronizedObject(), Incomplete {

...
override val isActive: Boolean get() = rootCause == null // !isCancelling 此处isActive就变为false
}

禁止取消

当任务被取消时,挂起函数会收到CancellationException后续如果需要执行一些其他的挂起函数任务将无法执行。

可以通过对挂起函数调用withContext(NonCancellable)进行包含,保证挂起函数正常执行

1
2
3
4
5
6
7
8
9
10
11
12
13
14
15
16
17
18
19
20
21
22
23
24
25
26
27
28
29
30
31
32
suspend fun test9() {
val startTime = System.currentTimeMillis()
val dispatcher = Executors.newFixedThreadPool(3).asCoroutineDispatcher()
val job = coroutineScope.launch(dispatcher) {
try {
var nextPrintTime = startTime
var i = 0
//按道理 这边会被取消,因为设置了 NonCancellable导致任务无法被取消
withContext(NonCancellable){
log("111")
delay(2000)
}
}
finally {
withContext(NonCancellable){
delay(1000)
}
log("111")
}
}
delay(1300L) // 等待一段时间
println("main: I'm tired of waiting!")
job.cancelAndJoin() // 取消 job, 并等待它结束
println("main: Now I can quit.")
dispatcher.close()
}

输出结果:
20:31:35:163 [pool-1-thread-1] 111
main: I'm tired of waiting!
20:31:38:173 [pool-1-thread-3] 111 //间隔大概3s
main: Now I can quit.

NonCancellable就是一个普通的对象

1
2
3
4
public object NonCancellable : AbstractCoroutineContextElement(Job), Job {
...
override val isActive: Boolean get() = true //永远为true
}

超时取消

大部分取消协程的原因都是超出了预期的执行时间,此时就会去触发取消的操作。

1
2
3
4
5
6
7
8
9
10
11
12
13
14
15
16
17
18
suspend fun testTimeout() {
try {
withTimeout(1300) {
repeat(5) {
delay(500)
}
}
} catch (e: Exception) {
log("e.msg = ${e.message}") //捕获超时异常
} finally {
log("job cancelled") //任务取消后,可以做一些其他工作
}
delay(1000)
}

输出结果:
13:25:54:484 [kotlinx.coroutines.DefaultExecutor] e.msg = Timed out waiting for 1300 ms
13:25:54:485 [kotlinx.coroutines.DefaultExecutor] job cancelled

执行超过timeout的时候,会抛出TimeoutCancellationException异常

上述withTimeout()超时时会抛出异常,系统另外提供了withTimeoutOrNull()超时的时候不会抛出异常,而是返回一个null

协程挂起(suspend)

在上节协程取消中,说到取消协程的一个要求就是必须为可被取消的协程代码,里面就有讲到转换成挂起函数就可以被取消。

把协程当成一个任务,运行在某个线程之上,该任务是可以中止也可以被继续恢复执行。

协程挂起指的就是任务的中止,而且不会阻塞当前的线程。

协程挂起的条件是在协程调用挂起函数时,才可以被挂起

基础概念

续体接口(Continuation)

作为协程调用挂起函数时的回调,挂起函数执行结束后通过使用该接口唤醒调用者。

1
2
3
4
5
6
7
8
9
10
11
12
13
14
15
16
17
18
19
20
21
@SinceKotlin("1.3")
public interface Continuation<in T> {
/**
* The context of the coroutine that corresponds to this continuation.
* 定义的协程上下文
*/

public val context: CoroutineContext

/**
* Resumes the execution of the corresponding coroutine passing a successful or failed [result] as the
* return value of the last suspension point.
* 执行完毕回调,回调成功或失败的结果
*/

public fun resumeWith(result: Result<T>)
}
//提供拓展函数,支持直接调用成功或失败回调
public inline fun <T> Continuation<T>.resume(value: T): Unit =
resumeWith(Result.success(value))

public inline fun <T> Continuation<T>.resumeWithException(exception: Throwable): Unit =
resumeWith(Result.failure(exception))

Continuation作为挂起函数调用时的一个隐式参数传入,封装了协程恢复后的执行代码逻辑。

挂起函数(suspend function)

suspend修饰挂起函数,可以通过调用其他挂起函数执行代码,而且不阻塞当前执行线程

挂起函数的运行可以被中止,运行挂起函数的线程可以去执行其他任务。

挂起函数无法被其他常规函数调用!

1
2
3
suspend fun test(){
...
}

上述实例为挂起函数

挂起函数在一个协程中被调用时,该挂起函数内部会增加一个参数Continuation,类似下面的代码

1
2
3
fun test(contimuation:Continuation){
...
}

这种转换被称为CPS(续体传递风格),每个挂起函数挂起Lambda表达式都会附加一个Continuation参数,在外界调用挂起函数时隐式入参。

协程的原理

上述的基础概念已基本涵盖协程的整套执行流程,后面会在Kotlin协程原理 串联整体流程。

协程在Android中的应用

附录

CPU上下文

CPU寄存器和程序计数器,这两者都是CPU在运行任务前,都必须的依赖环境。

CPU寄存器:CPU内置的容量小、但速度极快的内存

程序计数器:存储CPU正在执行的指令位置,或即将执行的下一条指令位置

上下文切换

把前一个任务的CPU上下文保存起来,然后加载新任务的上下文到这些寄存器和程序计数器,最后在跳转到程序计数器所指的新位置,运行新任务。

被保存的上下文会存储到系统内核中,在任务被重新调度时重新加载。

进程上下文切换

从一个进程切换到另一个进程运行。

进程的运行空间分为:

  • 内核空间:具有最高权限,可以访问进程间的所有资源。(进程运行其中称为内核态。)
  • 用户空间:只能访问受限资源,不能直接访问内存等硬件设备,必须通过系统调用陷入到内核中,才能访问所有资源。(进程运行其中为用户态。)

系统调用(system-call):进程从用户态内核态的转变,需要通过系统调用实现。过程如下:

  • 保存CPU寄存器里原来用户态的指令位
  • 为了执行内核态代码,CPU寄存器需要更新为内核态指令的新位置
  • 跳转到内核态执行内核任务
  • 系统调用结束后,CPU寄存器需要回复到原来保存的用户态,然后再切换到用户空间,继续运行线程。

系统调用过程中,总共发生了两次CPU上下文切换(用户态->内核态->用户态)。

线程上下文切换

从一个线程切换到另一个线程执行。

线程时调度的基本单位,进程这是资源拥有的基本单位。内核中的任务调度,实际调度对象为线程;进程只是给线程提供了虚拟内存、全局变量等资源。

线程发生上下文切换时,还需要保存线程所拥有的私有数据,例如栈、寄存器等。

线程上下文切换场景:

  • 切换的线程不处于同一进程中,因为资源不共享,执行的流程同进程上下文切换
  • 切换的线程处于同一进程中,资源是共享的,公共资源就不需要进行切换,只要切换线程的私有数据。

中断上下文切换

中断处理会打断进程的正常调度和执行,转而调用中断处理程序,响应设备事件。打断进程时,只需要保留当前进程的运行状态,中断执行结束后,继续从愿状态运行。

中断上下文切换不涉及进程的用户态,在中断触发时,只需要保存内核态中断服务程序所必需的状态。例如CPU寄存器、内核堆栈、硬件中断参数等

中断上下文切换比进程上下文切换拥有更高的优先级,两者不会在同一CPU上同时发生。

参考链接

viewModelScope简易介绍

Kotlin-调度器介绍

协程官方文档

SPI机制

Kotlin协程设计思路

揭秘suspend修饰符


本博客所有文章除特别声明外,均采用 CC BY-SA 4.0 协议 ,转载请注明出处!