在Kotlin-协程 介绍了大部分概念,现在需要针对这些概念进行详细的说明以及分析。
协程是轻量级的线程
阅读地图(按问题定位)
展开子目录(细分知识点)
一、协程是什么(概念与术语)
协程概念
非抢占式或协作式的计算机并发调度的实现,程序可以主动挂起或者恢复执行,
避免在异步程序中使用大量的回调,使用阻塞的方式写出非阻塞的代码。
一种全新处理并发的方式,可以在Android平台上简化异步执行的代码。
协程主要用来解决两个问题:
在后面的原理介绍中,会介绍与这两个问题相关的概念。
概念介绍
在执行过程中会涉及的一些概念,在后续源码分析也会涉及。
协程体
协程中要执行的操作,是一个被suspend修饰的lambda表达式
挂起函数
由suspend修饰的函数,只能在挂起函数或者协程体中调用。可以通过调用其他挂起函数挂起执行代码,而不阻塞当前执行线程。
挂起点
一般对应挂起函数被调用的位置
续体-Continuation
挂起的协程在挂起点时的状态。概念上表示挂起点之后的剩余应该执行的代码。
协程与线程的关系(易混点) 协程常被描述为“轻量级线程”,更准确地说:协程是运行在线程之上的任务抽象,线程仍然是最终执行载体。
维度
线程
协程
调度单位
操作系统调度
用户态(库/运行时)调度
创建与切换成本
相对更高
相对更低
阻塞影响
阻塞会占住线程
挂起不会阻塞线程
并发规模
数量受限(线程资源)
可创建大量任务(但不是无限)
生命周期管理
需手动管理
借助CoroutineScope结构化管理
补充:
协程“轻量”不等于“无成本”,大量协程仍会带来调度和内存开销。
协程是否切线程,取决于CoroutineDispatcher和挂起点恢复位置。
挂起函数是“让出执行权”,不是“停止线程运行”。
二、协程怎么运行(核心组件与调度)
协程作用域—CoroutineScope
追踪每一个通过launch或async创建的协程。并且任何时候都可以通过scope.cancel()取消正在执行的协程。
可以通过CoroutineScope控制协程的生命周期,当Activity/Fragment关闭时,调用cancel()及时关闭。
协程作用域主要有三种:
阻塞协程作用域 调用runBlocking()的线程会被阻塞直到内部协程任务执行完毕。
全局协程作用域 GlobalScope作用于整个应用生命周期,不会随页面生命周期自动取消。它并非“无法取消”,但如果缺少显式管理,在界面上使用时很容易导致任务泄漏或状态错乱。
1
2
3
4
5
6
7
8
9
10
public object GlobalScope : CoroutineScope { override val coroutineContext: CoroutineContext get () = EmptyCoroutineContext public interface CoroutineScope { public val coroutineContext: CoroutineContext
自定义作用域 自定义协程作用域,可以针对性的控制避免内存泄漏。
1
2
val coroutineContext : CoroutineContext = Dispatchers.Main + Job()val coroutineScope = CoroutineScope(coroutineContext)
需要自定义协程作用域时,需要构造一个CoroutineContext作为参数。
CoroutineContext会在下面重点介绍。
内置的自定义作用域 MainScope
为了方便开发使用,Kotlin标准库提供了MainScope用于快速生成CoroutineScope
1 public fun MainScope ()
viewModelScope
在AndroidX中引入的viewModelScope,在ViewModel销毁时会自动取消协程任务
1
2
3
4
5
6
7
8
9
10
11
12
13
14
15
16
17
18
19
val ViewModel.viewModelScope: CoroutineScopeget () {val scope: CoroutineScope? = this .getTag(JOB_KEY)if (scope != null ) {return scopereturn setTagIfAbsent(JOB_KEY,internal class CloseableCoroutineScope (context: CoroutineContext) : Closeable, CoroutineScope {override val coroutineContext: CoroutineContext = contextoverride fun close ()
协程上下文-CoroutineContext
一组定义协程行为的元素,本体是一个数据结构,类似于Map,内部实现为单链表
由如下几项构成:
Job:执行的任务
CoroutineDispatcher:协程调度器
CoroutineName:协程的名称,主要用于调试
CoroutineExceptionHandler:处理未被捕获的异常。
1
2
3
4
5
6
7
8
9
10
11
12
13
14
15
16
17
18
19
20
21
22
23
24
25
26
27
public interface CoroutineContext {public operator fun <E : Element> get (key: Key <E >) public fun <R> fold (initial: R , operation: (R , Element ) -> R ) public operator fun plus (context: CoroutineContext ) if (context === EmptyCoroutineContext) this else this ) { acc, element -> val removed = acc.minusKey(element.key) if (removed === EmptyCoroutineContext) element else { val interceptor = removed[ContinuationInterceptor] if (interceptor == null ) CombinedContext(removed, element) else {val left = removed.minusKey(ContinuationInterceptor)if (left === EmptyCoroutineContext) CombinedContext(element, interceptor) else public fun minusKey (key: Key <*>)
自定义CoroutineContext 1 val coroutineContext : CoroutineContext = Dispatchers.Main + Job() + CoroutineName("name" )
CoroutineContext通过+进行元素的合并,+右侧的元素会覆盖左侧的元素。
CoroutineContext存储方式为左向链表,链表的每一个节点都是CombinedContext,当存在协程拦截器时,永远处于链表的最后。
经过上述的plus操作后,最后得到一个完整的CoroutineContext对象。
CoroutineContext的父子关系
每个协程都会有一个父对象,协程的父级CoroutineContext和父协程的CoroutineContext是不一致的。
父级上下文 = 默认值 + 继承的CoroutineContext+参数
默认值:一些元素包含的默认值,例如默认Dispatcher就是Dispatchers.Default
继承的CoroutineContext:父协程的CoroutineContenxt
参数:后续子协程配置的参数,如上文所示组成部分,新添加的参数会覆盖前面的对应配置。
协程执行任务-Job
用于处理协程,封装了协程需要执行的代码逻辑,并且负责管理协程的生命周期。
通过协程构造器创建的协程都会返回一个Job实例。
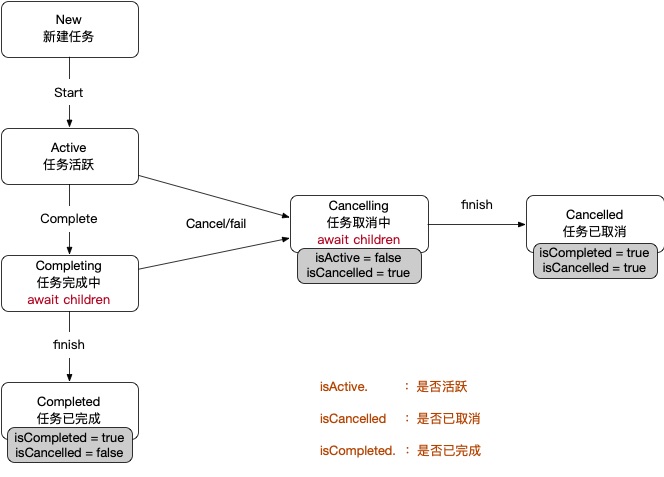
主要有以下几种生命周期:
New 新建任务Active 任务活跃Completing 任务完成中Cancelling 任务取消中Cancelled 任务已取消Completed 任务已完成
Job内提供了isActive()、isCancelled()和isCompleted()等属性用于判断协程的状态。
协程取消 会更多的分析Job相关。
协程调度器-CoroutineDispatcher
Dispatchers是协程中提供的线程调度器,用来切换线程,指定协程运行的线程。
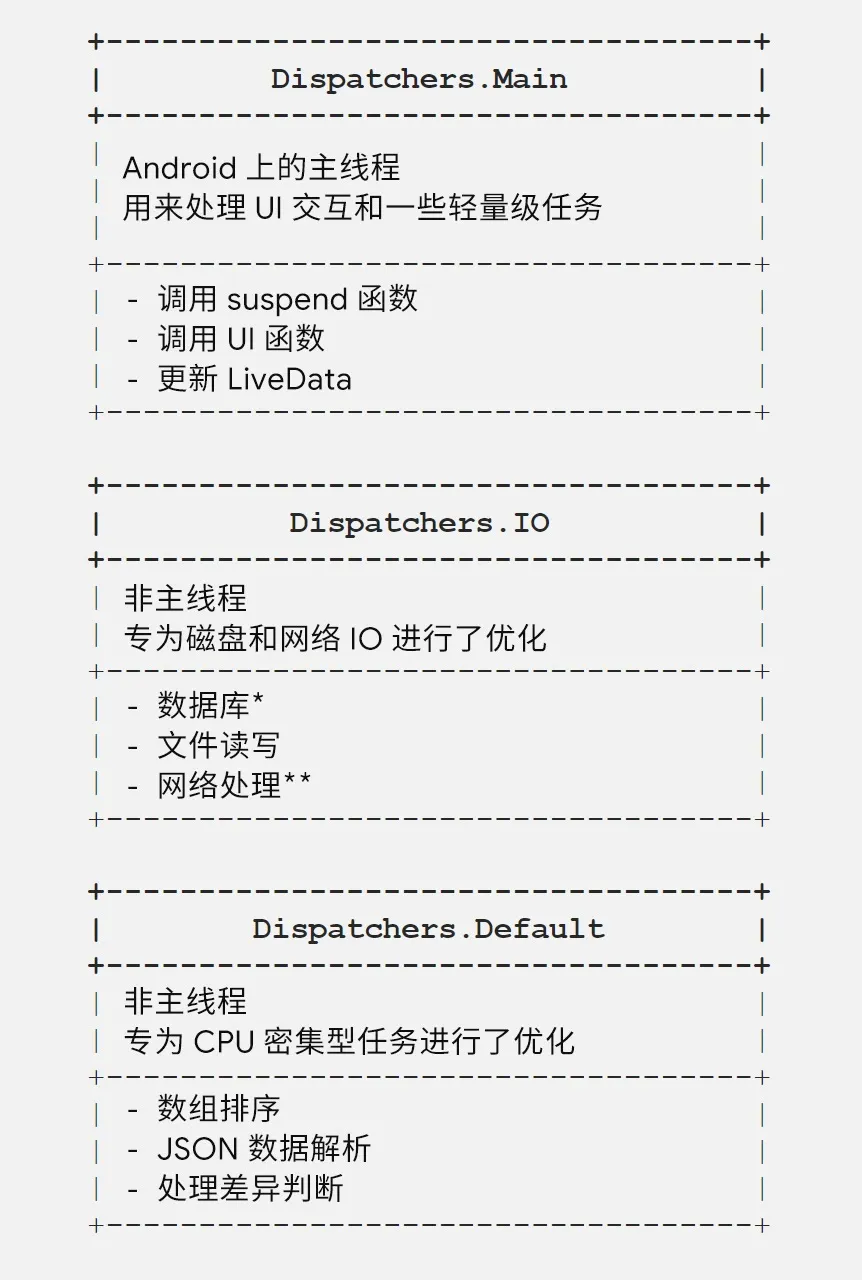
默认提供了四种调度器
Dispatchers.Default
默认调度器,适合处理后台运算,为CPU密集型任务调度器
Dispatchers.IO(仅JVM可用)
适合执行IO相关操作,例如读写文件等,为IO密集型任务调度器
Dispatchers.Main
UI调度器,根据执行平台的不同会初始化为对应平台的UI线程调度器。
在Android中,就会通过Handler调度任务到UI线程执行。
1 2 3 4 5 6 7 8 9 10 11 12 13 14 15 16 17 18 19 20 21 22 23 24 25 26 27 28 29 30 31 32 33 34 35 36 37 38 39 40 private fun loadMainDispatcher () return try {val factories = if (FAST_SERVICE_LOADER_ENABLED) {else {class .java,class .java.classLoader@Suppress("ConstantConditionIf" ) catch (e: Throwable) {internal fun loadMainDispatcherFactory () val clz = MainDispatcherFactory::class .javaif (!ANDROID_DETECTED) {return load(clz, clz.classLoader)return try {val result = ArrayList<MainDispatcherFactory>(2 )"kotlinx.coroutines.android.AndroidDispatcherFactory" )?.apply { result.add(this ) }"kotlinx.coroutines.test.internal.TestMainDispatcherFactory" )?.apply { result.add(this ) }catch (e: Throwable) {
按照类名去加载,Android下的名为kotlinx.coroutines.android.AndroidDispatcherFactory的类
1 2 3 4 5 6 7 8 9 10 11 12 13 14 15 16 17 18 19 20 21 22 23 24 25 internal class AndroidDispatcherFactory : MainDispatcherFactory {override fun createDispatcher (allFactories: List <MainDispatcherFactory >) true ), "Main" )internal class HandlerContext private constructor (private val handler: Handler,private val name: String?,private val invokeImmediately: Boolean public constructor (null this (handler, name, false )override fun isDispatchNeeded (context: CoroutineContext ) Boolean {return !invokeImmediately || Looper.myLooper() != handler.looperoverride fun dispatch (context: CoroutineContext , block: Runnable )
Dispatchers.Main.immediate
适用于响应UI事件后立即执行后续逻辑的场景:当当前线程已经是Main线程时会立刻执行而不是再次分发;如果不在Main线程,行为与Dispatchers.Main一致。
Dispatchers.Unconfined
非限制的调度器,在遇到第一个挂起函数前的代码运行在原线程中,执行挂起函数后,就切换线程运行。
自定义调度器
Default和IO的底层实现都依赖于线程池,执行到挂起函数时还是会发生线程的切换,可以通过自定义调度器减少这类切换的发生。
1
2
val myDispatcher= Executors.newSingleThreadExecutor{ r -> Thread(r, "MyThread" ) }.asCoroutineDispatcher()
调度器与性能(补充)
Dispatchers.Default 与 Dispatchers.IO 都基于共享调度体系,IO 任务过量会影响整体调度公平性。withContext 每次切换都存在调度开销,细粒度频繁切换会放大性能损耗。对高并发 IO 场景建议限流,避免把线程池和下游资源(DB/网络)同时打满。
Dispatchers.Main.immediate 适合“已经在主线程且希望避免二次分发”的场景。Dispatchers.Unconfined 更适合调试/框架层场景,业务代码中应谨慎使用。
1 2 val dbDispatcher = Dispatchers.IO.limitedParallelism(4 )
协程拦截器-ContinuationInterceptor
ContinuationInterceptor是一个拦截器的接口定义,用于控制协程的执行流程。
在CoroutineContext中,实现了ContinuationInterceptor接口的类,永远会处于最后一位,保证不会被其他类覆盖。
协程拦截器只能存在一个!
1 2 3 4 5 6 7 8 9 10 11 12 13 14 public interface ContinuationInterceptor : CoroutineContext.Element { companion object Key : CoroutineContext.Key<ContinuationInterceptor> public fun <T> interceptContinuation (continuation: Continuation <T >) public fun releaseInterceptedContinuation (continuation: Continuation <*>)
其中CoroutineDispatcher就是基于ContinuationInterceptor所实现的。
协程异常处理-CoroutineExceptionHandler
所有未被捕获的异常一定会抛出,无论使用哪种Job!!!
当一个协程由于一个异常而运行失败时,它会传播这个异常并传递给他的父级。
主要执行以下几步:
取消它的子级任务
取消自己的任务
把异常继续向上传递到自己的父级
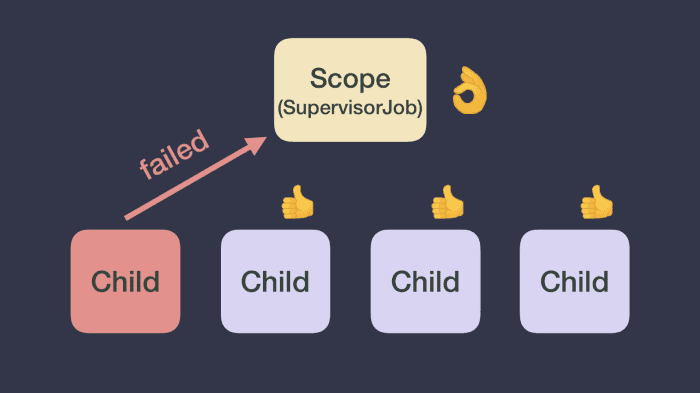
SupervisorJob 使用Job时,若发生异常会导致异常传递,使得所有的任务都会被取消。
使用SupervisorJob,一个子协程运行失败不会传播异常,只会影响自身,其他任务都不会受到影响。
SupervisorJob只有在supervisorScope或CoroutineScope(SupervisorJob())内执行才可以生效。
CoroutineScope(SupervisorJob())
1
2
3
4
5
6
7
8
val scope = CoroutineScope(SupervisorJob())
supervisorScope
1
2
3
4
5
6
7
8
9
supervisorScope {throw NullPointerException("123" )3 )
使用这两种方式都可以保证异常不向上传播
Job VS SupervisorJob
如果想在出现错误时不会退出父级和其他平级的协程,就要使用SupervisorJob或supervisorScope
局部异常捕获 根据不同的协程构造器,处理方式也不尽相同
launch()主要采用try{}catch{}的形式进行异常捕获
1
2
3
4
5
6
7
scope.launch {try {catch (e: Exception) {
launch()时,异常会在第一时间被抛出。
async/await()只有当async()作为根协程时,不会自动抛出异常,而是要等到await()执行时才抛出异常。
根协程:coroutineScope或supervisorScope的直接子协程,或者类似scope.async()这种实现。
这种情况下可以通过try{}catch{}捕获异常
1 2 3 4 5 6 val deferred = async{throw NullPointerException("123" )
此时不会执行任何
只有在调用.await()时才会抛出异常,此时就可以添加try{}catch{}捕获异常。
针对async()这种情况,最有效的方式就是async()内部进行try{}catch{}
全局异常捕获
类似Java,协程也提供了捕获全局异常(未声明捕获异常)的方式
Java的全局异常捕获方式
1 2 3 4 5 6 Thread.setDefaultUncaughtExceptionHandler(new UncaughtExceptionHandler () {@Override public void uncaughtException (Thread t, Throwable e) {
协程内全局异常捕获方式 主要使用的是CoroutineExceptionHandler,可以帮助处理一些未捕获的异常。
1
2
3
4
5
6
7
8
9
10
11
12
13
14
15
16
val exceptionHandler = CoroutineExceptionHandler { coroutineContext, throwable ->"Throws an exception with message: ${throwable.message} " )val context = Dispatchers.Main + Job() + exceptionHandlerval scope = CoroutineScope(context)fun main () throw NullPointerException("1234" )1000 )
此时就会捕获到NPE。
需要CoroutineExceptionHandler生效通常需要两个条件:
异常是未被捕获的异常(协程体内没有被try/catch处理)。
异常发生在会向外抛出的协程上(典型是launch根协程)。async会把异常封装到Deferred,通常需要在await()时处理。
真·全局异常捕获 上面说到的CoroutineExceptionHandler只能在协程内部使用,无法兼顾其他协程的异常情况。此时就需要使用另一种方式,使用ServiceLoader实现全局内协程异常捕获
实现这个功能需要如下几步:
新建全局CoroutineExceptionHandler类
在classPath中注册该类
在src/main/目录下的,resources/META-INF/services文件夹
新建kotlinx.coroutines.CoroutineExceptionHandler文件
文件内写入自定义的全局CoroutineExceptionHandler完整类名
同样,这种配置方式只处理未被捕获异常;async的异常仍需通过await()或局部try/catch处理。
这里主要应用了SPI机制
全称为Service Provider Interface,JDK内置的一种服务提供发现机制,主要源码实现在java.util.ServiceLoader
使用过程:
需要在resources/META-INF/services目录下创建与服务同名的全限定名 相同的文件,然后在文件中写入服务提供者的全限定名 。
原理简介:
主要通过反射调用配置的类进行实例化,反射成功后存入缓存,后续使用直接从缓存重新读取。
总结
协程内部异常处理流程
异常传播在不同作用域的表现
GlobalScope:异常不会向外传递,因为已经是根协程coroutineScope:异常进行双向传递,父协程和子协程都会被取消supervisorScope:异常进行单向传递,只有父协程向子协程传递异常,子协程会被取消,父协程不受影响
launch/join和async/await表现不同
launch/join关注的是任务是否执行完成 ,async/await关注的是任务的执行结果 ,所以在局部异常捕获的时候,两种创建方式的异常捕获也会有区别
想要避免异常传播,就要使用SupervisorJob;不在意就用Job
异常语义深水区(补充)
场景
结果
处理建议
launch 根协程未捕获异常立即向上抛出,触发父级取消链路
局部try/catch优先,必要时配合CoroutineExceptionHandler
async 未 await()异常会留在 Deferred,调用方感知可能延后
确保await()或在async内部处理异常
抛出 CancellationException
视为正常取消语义,不等同业务失败
清理资源后继续向外抛,避免误吞取消信号
supervisorScope 子协程异常默认不取消其他同级子协程
适用于“局部失败可接受”的聚合任务
补充:异常处理顺序建议是“局部处理 -> 作用域处理 -> 全局兜底”,避免把业务异常全部压到全局处理器。
三、协程怎么用好(构造、启动与取消)
结构化并发决策(补充)
目标
推荐作用域/模型
失败行为
全部成功才算成功
coroutineScope + async/awaitAll一个失败,整体快速失败
允许部分失败继续执行
supervisorScope + 独立异常处理失败子任务不影响其他子任务
长生命周期后台任务
显式 CoroutineScope(Job/SupervisorJob + Dispatcher)
由作用域统一管理取消
实践要点:
子任务必须可追踪(有作用域、有Job、可取消)。
作用域退出前应完成“等待、取消、清理”三件事。
不要在业务层随意创建新的根作用域,避免协程漂移。
协程工具选型(launch / async / withContext)
场景
推荐方式
原因
返回值
只关心执行,不关心结果
launch语义直接,便于通过Job取消
Job
需要并发并汇总结果
async + await/awaitAll可并行执行并拿到结果
Deferred<T>
单段任务切线程并返回结果
withContext结构清晰,避免不必要并发
直接返回 T
常见误区:
withContext不是并发模型,它是“切上下文执行一段代码”。async不是默认更快,若没有并发需求,withContext更简单可控。在父协程中混用过多launch而不追踪Job,容易导致状态不可控。
推荐写法:
1 2 3 4 5 6 7 8 9 val user = withContext(Dispatchers.IO) { api.loadUser() }val result = coroutineScope {val a = async(Dispatchers.IO) { api.a() }val b = async(Dispatchers.IO) { api.b() }
Flow 体系(Flow / StateFlow / SharedFlow / Channel)
类型
冷/热
数据语义
典型用途
Flow<T>冷流
每次收集重新执行上游
请求链路、转换流水线
StateFlow<T>热流
始终持有最新状态(value)
UI 状态驱动
SharedFlow<T>热流
广播事件,可配置replay
一次性事件、多订阅分发
Channel<T>热通道
点对点发送接收(队列)
生产者-消费者模型
使用建议:
状态流优先用StateFlow,事件流优先用SharedFlow。
高频流场景按需使用buffer、conflate、collectLatest降低背压影响。
UI 收集前可结合distinctUntilChanged减少重复渲染。
1 2 3 4 5 private val _state = MutableStateFlow(UiState.Loading)val state: StateFlow<UiState> = _stateprivate val _events = MutableSharedFlow<UiEvent>(extraBufferCapacity = 1 )val events: SharedFlow<UiEvent> = _events
并发原语(Mutex / Semaphore / Channel / select)
原语
作用
适用场景
Mutex互斥访问共享资源
保护共享可变状态
Semaphore限制并发数量
批量请求限流
Channel协程间消息通道
生产消费、任务管道
select多路等待与竞速
超时竞速、多个源择优
1 2 3 4 5 6 7 8 val mutex = Mutex()var counter = 0 suspend fun incSafely ()
协程构造器-CoroutineBuilder
主要负责构造一个协程并启动它
常用的有两种方法
launch(重点分析)
默认创建一个新的协程,并返回Job对象,通过Job管理协程。
1 2 3 4 5 6 7 8 9 10 11 12 public fun CoroutineScope.launch ( context: CoroutineContext = EmptyCoroutineContext, start: CoroutineStart = CoroutineStart.DEFAULT, block: suspend CoroutineScope .() -> Unit ) val newContext = newCoroutineContext(context)val coroutine = if (start.isLazy)else true )return coroutine
主要有三个参数:
context:就是前面介绍的CoroutineContextstart:协程启动模式 block:需要执行的任务,由suspend修饰
newCoroutineContext
将传参的context与ContextScope配置的context进行合并,并返回一个新的context。
1 2 3 4 5 6 public actual fun CoroutineScope.newCoroutineContext (context: CoroutineContext ) val combined = coroutineContext + contextval debug = if (DEBUG) combined + CoroutineId(COROUTINE_ID.incrementAndGet()) else combinedreturn if (combined !== Dispatchers.Default && combined[ContinuationInterceptor] == null )else debug
StandaloneCoroutine/LazyStandaloneCoroutine 1 2 3 4 5 6 7 8 9 private open class StandaloneCoroutine (Boolean Unit >(parentContext, active) {override fun handleJobException (exception: Throwable ) Boolean {return true
继承AbstractCoroutine且重写了handleJobException(),这也是为什么CoroutineExceptionHandler可以监听到异常的原因。
1 2 3 4 5 6 7 8 9 10 11 12 private class LazyStandaloneCoroutine (suspend CoroutineScope.() -> Unit false ) {private var block: (suspend CoroutineScope.() -> Unit )? = blockoverride fun onStart () val block = checkNotNull(this .block) { "Already started" }this .block = null this , this )
LazyStandaloneCoroutine重写了onStart(),只有在调用到start()/join()等方法才会执行。
start()
启动协程任务
1 2 3 4 5 public fun <R> start (start: CoroutineStart , receiver: R , block: suspend R .() -> T ) this )
调用到CoroutineStart.invoke()
1 2 3 4 5 6 7 8 9 public operator fun <R, T> invoke (block: suspend R .() -> T , receiver: R , completion: Continuation <T >) when (this ) {Unit
默认使用CoroutineStart.DEFAULT,以这个作为示例分析
1 2 3 4 5 6 7 8 internal fun <R, T> (suspend (R) Unit )
主要流程分为三步:
createCoroutineUninterecpted 1 2 3 4 5 6 7 8 9 10 11 12 13 @SinceKotlin("1.3" ) public actual fun <T> (suspend () Unit > {val probeCompletion = probeCoroutineCreated(completion)return if (this is BaseContinuationImpl)else this as Function1<Continuation<T>, Any?>).invoke(it)
主要是为了创建Continuation对象
intercepted 1 2 3 4 5 6 7 8 9 public actual fun <T> Continuation<T> .intercepted () this as ? ContinuationImpl)?.intercepted() ?: this public fun intercepted () this ) ?: this )
如果设置了ContinuationInterceptor,就获取并执行interceptContinuation()。
resumeCancellable 1 2 3 4 internal fun <T> Continuation<T> .resumeCancellable (value: T ) when (this ) {is DispatchedContinuation -> resumeCancellable(value)else -> resume(value)
进行线程调度或者事件拦截处理,然后协程就开始启动了。
async
协程启动模式-CoroutineStart
控制协程创建后的调用规则
CoroutineStart.DEFAULT
协程的默认启动模式,为饿汉式调用。在调用协程后,会立即进入调度状态。
可以在调度前被取消。
CoroutineStart.LAZY
懒汉式调用,只有需要执行时才会执行。
通过调用以下方法就可以进入调度状态。
job.start():启动协程job.join:启动协程并等待任务执行结束job.await()
CoroutineStart.ATOMIC
协程创建后,立即开始调度。
在执行到第一个挂起点之前不会响应cancel()
CoroutineStart.UNDISPATCHED
协程创建后,立即开始调度
直到遇到第一个挂起点之前,都会在当前线程中执行。
协程取消-Cancel
取消协程可以针对CoroutineScope或Job去执行。
取消作用域下所有协程
调用CoroutineScope.cancel()
1 2 3 4 5 6 7 val scope = CoroutineScope(context)if (scope.isActive){
适用于页面关闭时,需要回收资源的情况
不能在已取消的作用域中再次启动新的协程。
取消单个协程
针对Job进行取消,调用cancel()可以取消正在运行的协程
1 2 3 4 5 6 7 8 9 10 11 12 val job = launch {1000 ) { i ->"I'm sleeping $i ..." )500L )1300L ) "main: I'm tired of waiting!" )"main: Now I can quit." )
协程之间的关系
协程是存在着父子关系的,取消父协程时,也会取消所有子协程
主要有以下三种关系:
父协程调用cancel()或触发异常时,会立即取消所有子协程;子协程调用cancel()不影响父协程及兄弟协程的执行
在底层实现中,子协程通过抛出异常的方式将取消的情况通知到父协程。
父协程通过传入的异常来决定是否处理异常,如果异常为CancellationException就不做处理。
父协程必须等到所有子协程完成才算完成
子协程抛出未捕获的异常时,默认情况下会取消父协程(superVisorJob和CancellationException除外)
使协程可以取消
协程处理任务的代码必须是协作式 的,需要配合协程取消进行了处理。
需要在任务处理期间定期检查协程是否已被取消,或者在处理耗时任务之前就检查当前协程是否已取消。
目前只有kotlinx.coroutines所有的挂起函数都是可取消的,例如delay()、yield()等,这些都不需要去检查协程是否已取消。
因此要使协程可以被取消,可以使用以下两种方法:
通过job.isActive或ensureActive()检查协程状态
内部使用delay()或yield()等挂起函数——核心在于suspendCoroutineUninterceptedOrReturn
检查Job的活跃状态-isActive
在协程执行过程中,添加isActive检查协程状态,若!isActive就不向下执行任务。
1 2 3 4 5 6 7 8 9 val job = scope.launch{var i = 0 while (i < 5 && isActive){"test" ,"now value = ${i++} " )
还有一种方式就是ensureActive()
1 2 3 public fun Job.ensureActive () Unit {if (!isActive) throw getCancellationException()
使用ensureActive()可以不用手动去检测isActive,通过直接抛出异常来结束任务。
使用挂起函数
挂起函数:delay()、yield()等函数,内部核心实现为suspendCancellableCoroutine
delay()
让协程挂起,而且不会阻塞CPU。类似于Thread.sleep()
1 2 3 4 5 6 public suspend fun delay (timeMillis: Long ) if (timeMillis <= 0 ) return return suspendCancellableCoroutine sc@ { cont: CancellableContinuation<Unit > ->
yield()
挂起当前协程,然后将协程分发到Dispatcher队列,可以让该协程所在线程或线程池可以运行其他协程逻辑,然后等待Dispatcher空闲的时候继续执行原来的协程任务。类似于Thread.yield()
1 2 3 4 5 6 7 8 9 10 11 12 13 14 15 public suspend fun yield () Unit = suspendCoroutineUninterceptedOrReturn sc@ { uCont ->val context = uCont.contextval cont = uCont.intercepted() as ? DispatchedContinuation<Unit > ?: return @sc Unit if (!cont.dispatcher.isDispatchNeeded(context)) {return @sc if (cont.yieldUndispatched()) COROUTINE_SUSPENDED else Unit Unit )internal fun CoroutineContext.checkCompletion () val job = get (Job)if (job != null && !job.isActive) throw job.getCancellationException()
执行yield()时,会优先检测任务的完成状态,如果!job.isActive直接抛出CancellableException
suspendCoroutineUninterceptedOrReturn
主要作用为获取当前协程的实例,并且挂起当前协程或者不挂起直接返回结果。
根据上述源码发现,挂起函数的关键在于suspendCoroutineUninterceptedOrReturn,只要使用了该方法,就可以成为挂起函数。
通过做转换的时候,可以使用系统提供的两个转换函数:
suspendCoroutinesuspendCancellableCoroutine推荐使用
相关源码 suspendCoroutine 1 2 3 4 5 6 7 suspend fun test () if (...) {"11" )else {"123" ))
suspendCancellableCoroutine 1 2 3 4 5 6 7 8 9 10 11 12 13 14 15 16 17 val aa = 0 suspend fun ttt () Int > { cancellableContinuation ->if (aa == 0 ) {1 ) {"aaa ${it.message} " )else {"123" ))"我被取消了" )
可以通过continuation.invokeCancellation()执行取消操作
1 2 3 4 5 6 7 8 9 10 11 12 13 14 public suspend inline fun <T> suspendCancellableCoroutine ( crossinline block: (CancellableContinuation <T >) -> Unit ) val cancellable = CancellableContinuationImpl(uCont.intercepted(), resumeMode = MODE_CANCELLABLE)
禁止取消
当任务被取消时,挂起函数会收到CancellationException后续如果需要执行一些其他的挂起函数任务将无法执行。
对挂起函数调用withContext(NonCancellable),保证挂起函数正常执行。
关键在于isActive永远为true
超时取消
大部分取消协程的原因都是超出了预期的执行时间 ,此时就会去触发取消的操作。
对挂起函数调用withTimeout(XX)或withTimeoutOrNull(XX),唯一的区别就是后者会返回null而不是抛出异常。
取消语义深水区(补充)
取消是协作式 的:可取消挂起点或主动检查isActive后,协程才会及时停止。
CancellationException通常代表控制流,不建议当成普通业务异常吞掉。在finally中调用挂起函数时,默认仍会受取消影响,需要withContext(NonCancellable)兜底。
使用suspendCancellableCoroutine对接回调时,务必实现invokeOnCancellation释放资源。
1 2 3 4 5 6 7 try {finally {
Android 使用建议(工程实践)
页面生命周期相关任务优先使用viewModelScope或lifecycleScope,避免GlobalScope。
UI 更新统一放在Dispatchers.Main,IO/网络放在Dispatchers.IO。
对关键请求增加超时边界:withTimeout或withTimeoutOrNull。
对可并发任务优先用coroutineScope + async/awaitAll,对“局部失败可接受”场景用supervisorScope。
长循环或计算任务增加isActive/ensureActive检查,提升取消响应速度。
Flow收集优先使用repeatOnLifecycle,避免页面不可见时持续收集。Compose 场景区分LaunchedEffect与rememberCoroutineScope的职责边界。
示例:
1 2 3 4 viewModelScope.launch {val profile = withContext(Dispatchers.IO) { repository.loadProfile() }
常见反模式与修正建议
反模式
风险
建议
页面层直接用GlobalScope
生命周期失控、任务泄漏
使用viewModelScope/lifecycleScope
async创建后不await异常与结果丢失
明确await或改用launch
高频小任务频繁withContext
调度开销放大
合并批处理,减少切换次数
吞掉CancellationException
取消链路被破坏
仅清理资源后向外抛出
多处随意新建根CoroutineScope
并发关系不可追踪
统一作用域入口,结构化管理
四、协程为什么能挂起(原理实现)
Dispatchers原理 无论是Dispatchers.Default或者IO都是CoroutineDispatcher的子类。
1 2 3 4 5 6 7 8 public abstract class CoroutineDispatcher :AbstractCoroutineContextElement (ContinuationInterceptor), ContinuationInterceptor {public abstract fun dispatch (context: CoroutineContext , block: Runnable ) public final override fun <T> interceptContinuation (continuation: Continuation <T >) this , continuation)
CoroutineDispatacher继承AbstractCoroutineContextElement类,还实现了ContinuationInterceptor接口。
DispatchedContinuation
代理协程体Continuation对象并持有线程调度器,负责使用线程调度器将协程体调度到执行的线程执行 。
1 2 3 4 5 6 7 8 9 10 11 12 13 14 15 16 17 18 19 20 21 22 23 24 25 26 27 28 29 30 31 32 33 34 35 36 37 38 39 40 41 42 internal class DispatchedContinuation <in T >(@JvmField val dispatcher: CoroutineDispatcher,@JvmField val continuation: Continuation<T>by continuation {override fun resumeWith (result: Result <T >) val context = continuation.context val state = result.toState() if (dispatcher.isDispatchNeeded(context)) { this ) else { this .context, countOrElement) { inline fun resumeCancellableWith (result: Result <T >) val state = result.toState() if (dispatcher.isDispatchNeeded(context)) { this ) else { if (!resumeCancelled()) {
DispatchedContinuation用两个参数构建
dispatcher:拦截器continuation:协程体类对象
其中resumeWith()和resumeCancellableWith()负责协程的启动。
补充:resumeWith()用于普通恢复;resumeCancellableWith()会在恢复前额外检查取消状态,并按可取消模式进行调度。
协程启动流程
通过CoroutineScope.launch()创建一个协程,默认启动模式为CoroutineStart.DEFAULT,创建一个StandaloneCoroutine协程对象
执行StandaloneCoroutine.start()实质执行到AbstractCoroutine.start(),继续触发到CoroutineStart.invoke()
由于默认调度器为Dispatchers.Default,所以执行到了startCoroutineCancellable()
startCoroutineCancellable()内部主要有三次调用
createCoroutineUnintercepted():创建一个协程体类对象intercepted:将协程体类包装成DispatchedContinuation对象resumeCancellableWith():通过Default调用到resumeCancellableWith()
实际调用到了DispatchedContinuation.resumeCancellableWith(),最后执行到Continuation.resumeWith()执行协程任务。
协程挂起/恢复原理
挂起的特点:不阻塞线程 。挂起的本质切线程 ,并且在相应逻辑处理完毕之后,再重新切回线程。
1 2 3 4 5 6 7 8 9 suspend fun loginUser (userId: String , password: String ) val user = logUserIn(userId, password)val userDb = logUserIn(user)return userDbsuspend fun logUserIn (userId: String , password: String ) suspend fun logUserIn (userId: String )
反编译后得到
1 2 3 4 5 6 fun loginUser (userId: String , password: String , completion: Continuation <Any ?>) val user = logUserIn(userId, password)val userDb = logUserIn(user)
调用挂起函数或者suspend lambda表达式时,都会一个隐式参数传入,这个参数是Continuation类型。
CPS:续体传递风格
在每个挂起函数与suspend lambda表达式都会附加一个Continuation参数,并且是用来代替suspend
Continuation接口 挂起函数通过Continuation在方法间互相通信,基本实现如下:
1 2 3 4 5 6 7 8 9 10 11 interface Continuation <in T > {public val context: CoroutineContextpublic fun resumeWith (value: Result <T >) public inline fun <T> Continuation<T> .resume (value: T ) Unit =public inline fun <T> Continuation<T> .resumeWithException (exception: Throwable ) Unit =
后续添加resume(value)和resumeWithException(exception)可以方便的获取结果,而不需要从Result解析。
Continuation主要有以下参数和方法
context:内部使用的CoroutineContextresumeWith():恢复协程的执行,同时传入一个Result。内部包括了计算结果或过程中发生的异常
状态机
Kotlin编译器会确定函数何时可以在内部挂起,每个挂起点都会被声明为有限状态机的一个状态,每个状态用label表示
查看反编译后源码,内部源码大概如下
1 2 3 4 5 6 7 8 9 10 11 12 13 14 15 16 17 18 19 20 21 22 23 24 25 26 27 28 29 30 31 32 33 34 35 36 37 38 39 40 41 42 43 44 45 46 47 48 49 50 51 52 53 54 55 56 57 58 59 60 61 62 63 64 65 66 67 68 69 70 71 72 73 74 75 76 77 78 79 80 81 82 83 84 @Nullable public final Object loginUser (@NotNull String userId, @NotNull String password, @NotNull Continuation $completion) {if ($completion instanceof <undefinedtype>) {if ((((<undefinedtype>)$continuation).label & Integer.MIN_VALUE) != 0 ) {break label27;new ContinuationImpl ($completion) {int label;0 ;1 ;2 ;3 ;@Nullable public final Object invokeSuspend (@NotNull Object $result) {this .result = $result;this .label |= Integer.MIN_VALUE;return MyClass.this .loginUser((String)null , (String)null , this );Object $result = ((<undefinedtype>)$continuation).result;Object var8 = IntrinsicsKt.getCOROUTINE_SUSPENDED();switch (((<undefinedtype>)$continuation).label) {case 0 :0 = this ;1 = userId;2 = password;1 ;this .logUserIn(userId, password, (Continuation)$continuation);if (var10000 == var8) {return var8;break ;case 1 :2 ;1 ;this = (MyClass)((<undefinedtype>)$continuation).L$0 ;0 = this ;1 = userId;2 = password;3 = user;2 ;this .logUserIn(user, (Continuation)$continuation);if (var10000 == var8) {return var8;break ;case 2 :3 ;2 ;1 ;MyClass var9 = (MyClass)((<undefinedtype>)$continuation).L$0 ;break label22;default :throw new IllegalStateException ("call to 'resume' before 'invoke' with coroutine" );String userDb = (String)var10000;return userDb;
Kotlin编译器将每个挂起函数转换为一个状态机,在每次函数需要挂起时使用回调并进行优化。
观察上述源码发现主要有几个关键点
ContinuationImpl 1 2 3 4 5 6 7 8 9 10 11 12 13 14 15 16 17 18 19 20 21 internal abstract class ContinuationImpl (private val _context: CoroutineContext?constructor (completion: Continuation<Any?>?) : this (completion, completion?.context)public override val context: CoroutineContextget () = _context!!@Transient private var intercepted: Continuation<Any?>? = null public fun intercepted () this ) ?: this )
1 2 3 4 5 6 7 8 9 10 11 12 13 14 15 16 17 18 19 20 21 22 23 24 25 26 27 28 29 30 31 32 33 34 35 36 37 38 39 internal abstract class BaseContinuationImpl (public val completion: Continuation<Any?>?public final override fun resumeWith (result: Result <Any ?>) var current = this var param = resultwhile (true ) {val completion = completion!! val outcome: Result<Any?> =try {val outcome = invokeSuspend(param)if (outcome === COROUTINE_SUSPENDED) return catch (exception: Throwable) {if (completion is BaseContinuationImpl) {else {return protected abstract fun invokeSuspend (result: Result <Any ?>)
invokeSuspend()执行的就是协程体,当invokeSuspend()返回值为COROUTINE_SUSPENDED时,执行return操作,协程体的操作也会被结束,所以COROUTINE_SUSPENDED也表示协程发生挂起 。
协程挂起
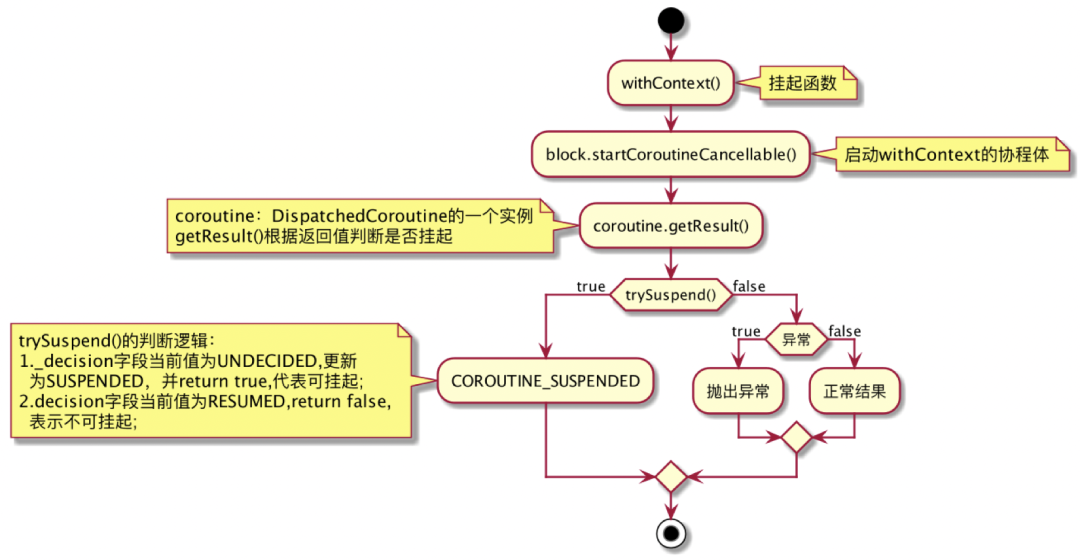
通过挂起函数将协程挂起,此处拿withContext()进行分析
1 2 3 4 5 6 7 8 9 10 11 12 13 14 15 16 17 18 19 20 21 22 23 24 25 26 27 28 29 30 public suspend fun <T> withContext ( context: CoroutineContext , block: suspend CoroutineScope .() -> T ) sc@ { uCont ->val oldContext = uCont.contextval newContext = oldContext + contextif (newContext === oldContext) {val coroutine = ScopeCoroutine(newContext, uCont) return @sc coroutine.startUndispatchedOrReturn(coroutine, block)if (newContext[ContinuationInterceptor] == oldContext[ContinuationInterceptor]) {val coroutine = UndispatchedCoroutine(newContext, uCont) null ) {return @sc coroutine.startUndispatchedOrReturn(coroutine, block)val coroutine = DispatchedCoroutine(newContext, uCont)
1 2 3 4 5 6 7 8 9 10 11 12 13 14 15 16 17 18 19 20 fun getResult () if (trySuspend()) return COROUTINE_SUSPENDEDval state = this .state.unboxState()if (state is CompletedExceptionally) throw state.cause@Suppress("UNCHECKED_CAST" ) return state as Tprivate fun trySuspend () Boolean {when (decision) {if (this ._decision.compareAndSet(UNDECIDED, SUSPENDED)) return true return false else -> error("Already suspended" )
协程是否挂起,关键在于是否返回COROUTINE_SUSPENDED ,在getResult()中就是判断trySuspend()是否返回true。
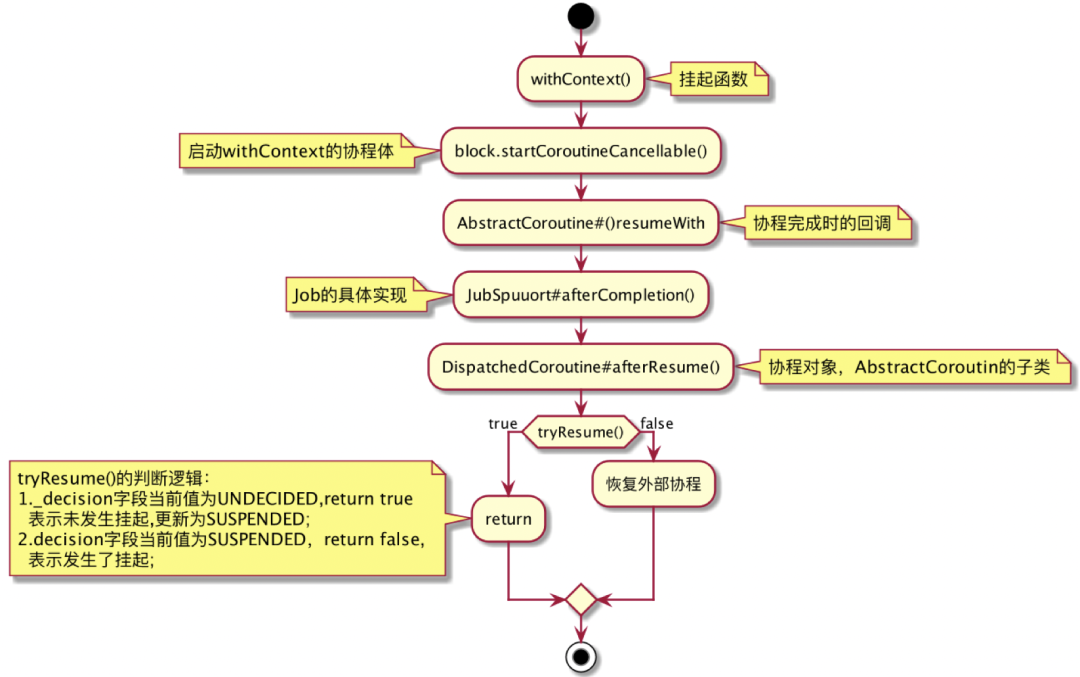
协程恢复 在withContext()中调用startCoroutine()传入了两个参数,其中第二个表示协程完成的回调。
当协程完成的时候会调用resumeWith(),然后层层传递到JobSupport.afterCompletion(),最后执行到DispatchedCoroutine
1 2 3 4 5 6 7 8 9 10 11 12 13 14 15 override fun afterCompletionInternal (state: Any ?, mode: Int ) if (tryResume()) return super .afterCompletionInternal(state, mode)private fun tryResume () Boolean {when (decision) {if (this ._decision.compareAndSet(UNDECIDED, RESUMED)) return true return false else -> error("Already resumed" )
在afterCompletionInternal()判断协程是否被挂起,若挂起则恢复已被挂起的协程。
然后再回到执行线程上,就会继续执行invokeSuspend()直到执行结束。
协程并发 协程并发建议优先使用结构化并发:在同一个作用域内启动并行任务,并在作用域退出前统一等待结果或处理异常。
1 2 3 4 5 suspend fun loadAll () val a = async(Dispatchers.IO) { requestA() }val b = async(Dispatchers.IO) { requestB() }
并发任务推荐放在coroutineScope中,失败会自动取消同级任务,避免悬挂任务。
如果希望“一个子任务失败不影响其他子任务”,可使用supervisorScope。
IO 并发建议配合限流(如limitedParallelism或Semaphore),避免无限并发导致线程池拥塞。
测试与可观测性(补充)
单元测试推荐使用runTest与StandardTestDispatcher,通过虚拟时间驱动挂起逻辑。
对延时与超时场景,使用advanceTimeBy/advanceUntilIdle验证行为。
为关键协程增加CoroutineName,方便日志与问题定位。
调试复杂并发问题时,可结合协程调试工具或协程 dump 快照观察挂起链路。
1 2 3 4 5 6 7 8 @Test fun timeout_case () val result = withTimeoutOrNull(1000 ) {2000 )1 null )
五、知识点总结(可口述)
协程原理速答(30秒) 协程原理可以概括为:编译期状态机 + 运行时调度 。
suspend函数会被编译器转换为 CPS 形式,增加Continuation参数。每个挂起点会被拆成状态机的一个label分支。
执行到挂起点返回COROUTINE_SUSPENDED,协程挂起但线程不阻塞。
异步结果返回后,通过resumeWith恢复执行,并按label继续后续逻辑。
CoroutineDispatcher通过ContinuationInterceptor决定恢复在哪个线程执行。
协程原理展开(2分钟) 可以按这条主线理解:
创建阶段 :launch/async创建协程对象,绑定CoroutineContext(Job + Dispatcher + ...)。编译转换 :suspend函数被转成状态机,挂起点对应label,本质是可恢复的函数调用链。启动执行 :协程启动时会创建并包装Continuation,必要时被Dispatcher拦截调度。挂起时机 :遇到可挂起点返回COROUTINE_SUSPENDED,当前调用栈退出,线程可执行其他任务。恢复执行 :回调或结果就绪后触发resumeWith,状态机按上次label继续执行。生命周期管理 :Job树维护父子协程关系,取消是协作式,异常按层级传播(SupervisorJob可隔离子任务失败)。
高频追问知识点(补充)
挂起 vs 阻塞 :挂起是让出执行权,不占线程;阻塞会占住线程直到完成。协程为什么轻量 :创建与切换主要在用户态完成,通常比线程上下文切换成本低。为什么async异常常在await()暴露 :异常被封装在Deferred中,读取结果时才抛出。取消为什么不一定立刻生效 :取消是协作式,需要挂起点或主动检查isActive/ensureActive。Main.immediate意义
六、参考与延伸 Kotlin/Keep
Android_开发者
Kotlin协程原理解析
图解协程:suspend